Using Netscape Communicator v. 4.0x's Bookmarks
Window
The following instruction sheets are an introductory lesson to
utilizing Netscape's Bookmarks Window to organize your bookmarks, to
create, export and import a Netscape Document and to utilize the
Edit/Compose aspect of Netscape.
These instructions are given with the assumption that these
exercises on being done using Mac OS.
A version of these lessons is available for Netscape
Navigator v. 3.0x Gold. You may send any feedback to Barry
Sovel.
Instruction Sheet Index
|
#1:
|
#2:
|
#3:
|
#4:
|
|
Setup
|
Organizing bookmarks
|
Annotating Bookmarks
|
Creating a Netscape Document
|
|
#5:
|
#6:
|
#7:
|
#8:
|
|
Importing a Netscape
File
|
Editing a Netscape
Document
|
The Netscape COMPOSER Edit Menu
Bar
|
A little bit more: odds and ends
|
[go back to top]
|
Bookmarks Instruction Sheet
I:
setup
|
|
The following instructions are to assist you in preparing for the
Bookmarks instruction activities.
- Visit the locations listed below. You can do this by going to
the pull down menu FILE at the top left side of your screen. Click
and hold your cursor over FILE, then highlight the phrase OPEN.
Another message bar appears to your right. Without letting go of
your pressed down mouse button, slide over to LOCATION IN
NAVIGATOR and let go of the mouse button.
[Mac Shortcut: Command
L].
When the small dialogue box opens, enter one of the URL's
[Internet addresses] listed below, then click OPEN.
- Once you are at that site, ADD it to you Bookmarks file. You
can do this by going to the Bookmarks menu item at the top of your
screen, move the cursor over the word Bookmarks on the
menu, then highlight the phrase Add Bookmark and then let
go of the mouse button.
[Mac Shortcut: Command D]

- Repeat this process [File --> Open --> Location in
Navigator --> Open --> Add Bookmark] until you have
entered all the addresses listed below,
then move ahead to Bookmarks Instruction Sheet #2 [in this
series of lessons].
Lycos Roadmaps
http://www.lycos.com/roadmap.html
Russian
Settlement at Fort Ross
http://www.parks.sonoma.net/rosshist.html
AltaVista
http://www.altavista.com
San Francisco
Exploratorium
http://www.exploratorium.edu
Yahoo
http://www.yahoo.com
The Mother of all Search
engines
http://www.mamma.com
Eudora- email package
http://www.eudora.com
RealAudio Home Page
http://www.realaudio.com
Judy Blume's Home
Base
http://www.judyblume.com/home.html
Download
a Dinosaur
http://www.rain.org/~philfear/download-a-dinosaur.html
Henrietta
Leavitt Flat Screen Space Theater
http://www.voicenet.com/~peterscc/index.html
1492:
An Ongoing Voyage
http://metalab.unc.edu/expo/1492.exhibit/Intro.html
[go back to top]
[go back to top]
|
Bookmarks Instruction Sheet
2:
Organizing
bookmarks
|
|
- In Netscape, go to the BOOKMARKS pull down menu at the top of
your screen. Scroll down to EDIT BOOKMARKS until it is
highlighted. Let go of the mouse button.
[Mac Shortcut: Command B]

- You now should see that the BOOKMARKS WINDOW is active. It
shows your bookmarks listed with an icon to the left of each
bookmark listing. [NOTE: the title of the Bookmarks window
dialog box may vary when it appears.]
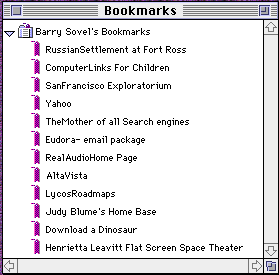
Rearranging the order of your listed
bookmarks
- Your first task will be to alphabetize the bookmarks you've
just imported.
Click and hold on the icon to the left of AltaVista.
Drag this bookmark until it is just above Computer Links for
Children.
Let go of the mouse button.
- Now, go ahead and drag the other bookmarks in the list until
they are alphabetically arranged.
Making a New Folder in the Bookmark
window
- Let's say you decided that your list is too long or confusing
or needs to be grouped in a different manner.
Go to the FILE pull down menu and scroll down to NEW FOLDER and
let go of the mouse button.
NOTE: your BOOKMARKS WINDOW must be the active window when you
perform this operation.
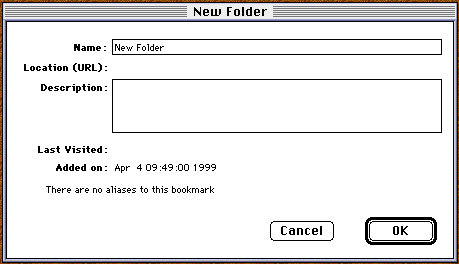
- A New Folder window appears. Notice the highlighted text
New Folder.
Highlight the words 'New Folder', delete, and type in the words
Map Folder;
then click on the OK button. The window disappears and you should
see the new title Map Folder listed in your Bookmarks
Window.
- DRAG Lycos Road Maps into the Map Folder.
Notice how the new location seems to be slightly indented from the
rest of the bookmarks and folders. This means that it is inside
the folder. You could now create more folders for your bookmarks,
in order to group them by category or type.
NOTE: if the new item does not show inside this new folder in your
bookmark window, click once on the little triangle to the left of
the label of this folder. This will then show the contents of your
folder.
- Close the Bookmarks window.
Go back up to the BOOKMARKS pull down menu bar at the top of your
screen, click and hold.
Notice that the item, Maps Folder, now has a triangle to
its right. Scroll down until this new folder is highlighted. What
happens?
[go back to top]
[go back to top]
|
Bookmark Instruction Sheet
3:
Annotating
Bookmarks
|
|
Prior to this lesson, you should have used Instruction Sheet 1 to
create and add a list of bookmarks to Netscape.
If you already have the Bookmarks window open, skip to step 3.
- Go to the BOOKMARKS menu at the top of your screen and scroll
down to EDIT BOOKMARKS.
[Mac Shortcut: Command B]

- You now should see that the Bookmarks Window is active.
- Inside the Bookmarks window, find the bookmark called
Lycos Road Maps, then single
click on it [so that it appears highlighted].
- Next, go to the EDIT pull down menu and scroll down to GET
INFO.
Scroll down until it is highlighted, then let go of the mouse
button. [Mac Shortcut: Command
I]
NOTE: GET INFO will not be active if an item has not been
highlighted.
- Notice that the following window appears
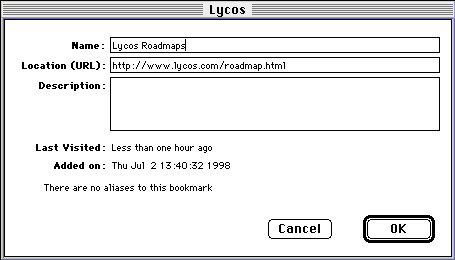
- Go to the description box either by hitting the tab key a few
times or by placing your cursor inside the box and clicking your
mouse button. Type in a description of the Road Map site.
If you haven't already visited Lycos Roadmaps, click on the Cancel
box. Double click on Lycos Road Maps in the Bookmark window and
Netscape will take you to the Road Map site.
Click in the Road Map site window and the Bookmark window recedes
to the background. Investigate what Road Map is about. Scroll down
the screen until you can enter a street address. Enter your home
address and click on Go Get It. When the new window
appears, scroll down to the map and see how close it came.
Retrace your steps back to open the Bookmarks Window, then the
EDIT menu --> highlight Lycos Road Map --> then GET INFO.
Now type in a description of the site.
NOTE: the description box can only hold a little more than 200
characters, including spaces, hyphens and periods.
- After you've filled in the description, click on the OK
button.
In the next exercise, you are going to learn how to save
Netscape's bookmarks as files. This will create an actual Netscape
document.
Please notice that when you create and open the Netscape document,
you will see what you just typed into Lycos Roadmaps.
[go back to top]
[go back to top]
|
Bookmark Instruction Sheet
4:
Creating a Netscape
Document
|
|
The "SAVE AS" method for saving bookmarks involves saving the
bookmarks in your bookmarks window to your desktop [or another
location of your choosing] by creating a Netscape
Document.
It should be noted that this action saves the entire contents of
your bookmark window. Instruction Sheet 6 will discuss how to remove
the items you do not wish to keep in this new document.
With your Bookmark Window open [and active]:
- Go to the pull down menu item FILE and highlight SAVE AS. When
the new dialog box appears, give this new file a name. There are
different naming conventions for Mac OS and Windows OS.
- For a Mac, use bookmark experiment or any
other title, up to 30 characters.
- For a PC, you must
- limit the title to a maximum of 9
characters
- do not have a space or a special key character in the
title
- In order to be read by a PC, the last four characters
must be
.htm
- Now, save this new document to your desktop.
What happens?
- Look on your desktop for a file that looks like one of those
shown below.

Open this new item, by double clicking on it?
What happens?
- Does the new page appear to have 'hot links'?
- Do you notice the original annotations that you made while it
was in the Netscape Bookmarks Window?
This method ["Save As"] , by creating a
document, makes your Netscape bookmarks file portable,
allowing you to take them with you or send them to another
location.
This new document
- will retain the annotations you inserted
- can even be imported back into Netscape's bookmarks window
[see Instruction Sheet 5]
- displays links as "hot" [that is, an active link]
- can be sent as an attachment, via email or saved to disk for
use at another location
- can be read just as well by Mac OS or PC Windows.
[note: if for PC's, follow the naming conventions by making
the title (name) one word, followed by
.htm]
NOTE: Save As is an all or nothing approach. The new document
contains all the bookmarks and folders that are in the Bookmarks
Window that you have open. It also creates a title, based on who is
listed in the email identity of your Netscape preferences. This
document may require further editing, which is discussed in
Instruction Sheet 6.
[go back to top]
[go back to top]
|
Bookmark Instruction Sheet
5:
Importing a Netscape Bookmark
File
|
|
- Find the Netscape document, that was created with Instruction
Sheet #4, on your desktop
- Open Netscape Navigator, if it is not already open.
- Once you're in Netscape, go to the BOOKMARKS menu and scroll
down to EDIT BOOKMARK. Let go of the mouse button.
[Mac Shortcut: Command B]

What happens to the main menu bar when the bookmarks window
appears?
- In the new menu bar, go to the FILE menu and scroll down to
IMPORT ... Let go of the mouse button.
- You are presented with a dialogue box. You now have to find
the file Bookmark Experiment or
bkmk.htm document
[or whatever name you gave to the new Netscape document that
you created and saved to your desktop].
HINT: Click on the DESKTOP button on the right side of the
dialogue box. In the scroll box, you should be able to find the
Bookmark Experiment file. Highlight the item, then click once on
OPEN button in the lower right corner.
[Mac Shortcut: Double click on
the item]
- Close the bookmarks window by going to the top left corner of
the screen and clicking on the close box (the little square in the
upper left of the window). [Mac
Shortcut: Command-W]
- You should be back in Netscape with its standard menu bar.
Return to the BOOKMARKS pull down menu. Move your cursor over the
menu item BOOKMARKS, then click and hold your mouse.
Observe the differences in your bookmark list. If you want a
closer look, go to the BOOKMARKS pull down menu and highlight EDIT
bookmarks, then let go.
- Has the bookmark list changed? How?
- Has anything remained? What?
- Summary: What does importing bookmarks do?
- You now have the ability to save, store and share specific
groups of bookmarks with other individuals or reserve them for
specific classroom lessons.
[go back to top]
[go back to top]
|
Bookmark Instruction Sheet
6
Editing an Annotated Netscape
Document
|
|
Now, lets begin a simple experiment. This experiment assumes that
you are using Netscape, version 4.0 or higher.
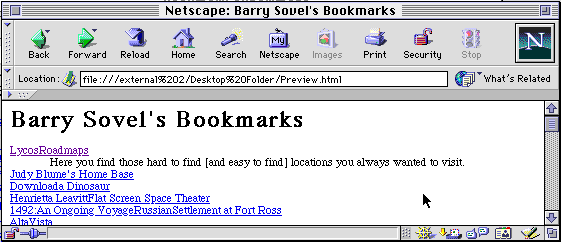
- Go to the desktop and DOUBLE CLICK on the Netscape document
you just created and saved.
The following page should open:
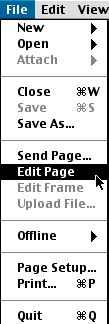
- Once the document has opened Netscape and appears on the
browser screen, click and hold on the FILE button, scroll down
until EDIT PAGE is highlighted. Let go of the mouse button.
- A new window appears over your regular Netscape window.
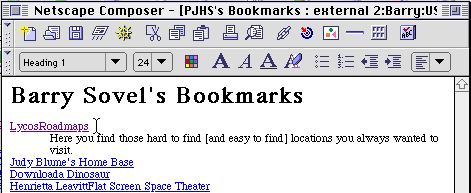
- This new window contains the page that had just been on your
regular page, except that...
- the menu bar and icons have changed
- when you click on any part of the window and then type,
etc., it can make changes on this page
- the pull down menu items FILE, EDIT, VIEW, INSERT, FORMAT,
and TOOLS have new items listed under them
- these new icons have different functions than the icons we
normally see on a regular Netscape page
- this new page is named COMPOSER; with it, you can:
- edit your existing documents
- create new documents
- add graphics, backgrounds, tables and new text
- create 'anchors' for moving between different parts of
the same page
- create links to other pages and to other parts of the
Internet
- You can now modify and edit a page that can be
read by any Internet browser.
You have created a homepage that can be uploaded to an Internet
Server site [published] or be transferred to
another computer.
The only difference between this page and what you usually see
on your Internet screen is that this page is on your desktop
[or diskette] rather than somewhere out there.
Bookmark Instruction Sheet 7 will now encourage you to
experiment with editing this page.
For some good examples of some simple teacher generated
lessons created at this stage of the instruction lessons, click
HERE.
[go back to top]
[go back to top]
|
Bookmark Instruction Sheet
7:
Exploring The Netscape COMPOSER
EDIT Menu Bar
|
|
The last part of Bookmark Instruction Sheet #6 instructed you to
open one of your Netscape Documents and then to go to EDIT PAGE under
the FILE pull down menu. When you did this, your menu and icons
should have changed to look something like the picture immediately
below.
You are now in Netscape's Web Page Editor status, known as
COMPOSER. This instruction sheet is simply to encourage you to begin
a simple exploration of some its features. Web Page creation,
composing and editing are the subject of another course.

Slowly move your cursor over each icon button. A small title will
appear, after about two seconds, over each of these buttons. It
describes or labels each button's purpose or title.
If the descriptive labels do not appear,
- go to the EDIT pull down menu
- click, hold and scroll to the bottom of it list and highlight
PREFERENCES
- a new window appears
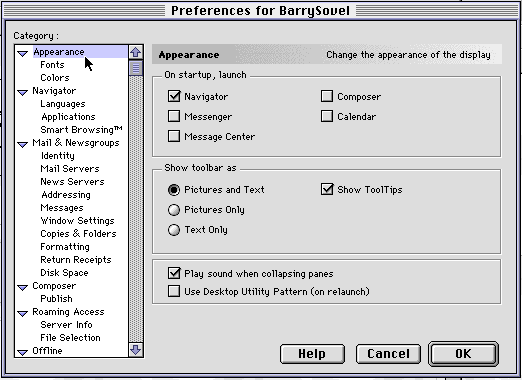
- go to the left side and click once on APPEARANCE
- a window will appear on the right that looks like the one
below.
In the Show toolbar as section, make sure the box next to
Show ToolTips is checked. Then click OK in the lower right
corner.
Experiment with your Netscape document while it is in the Edit
mode.
If you should want to see what it would look like
normally,
click on the Save icon  on the Composer ICON MENU BAR,
then, click on the View in Navigator icon
You may also go to the COMMUNICATOR pull down menu at the top
of your screen. Click and hold. Listed at the bottom are the two
active windows [one in Netscape and one in Netscape
Composer].
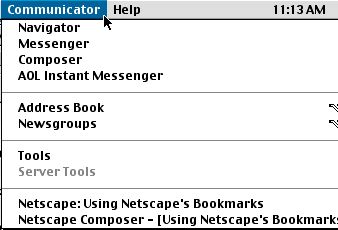
By moving back and forth between these two windows, you can see
what your edited page will ACTUALLY look like when seen in
Navigator.
You may treat this just like any other file or document you create
with a word processor, a spreadsheet, a page layout program, etc. It
can be saved, transferred or modified. In particular, the Netscape
document you create can be saved on a disk, your computer, uploaded
to an Internet server or attached to an email. It can be opened on
any computer with an Internet browser. You have created a portable
homepage.
For some good examples of teacher generated lessons created
at this stage of the instruction lessons, click HERE.
[go back to top]
[go back to top]
|
Bookmark Instruction Sheet
#8:
A little bit more: odds and
ends
|
|
Other ways to save a bookmark
[Before starting this Instruction Sheet, make sure your
Netscape Bookmark Window is open.]
There are basically two ways to save bookmarks, in order to move
them to another computer, to share them with an associate or to
utilize them as part of a lesson.
The first method is shown in instruction sheet number 3 [Save
As]. Another method simply involves saving them to your desktop
as an individual item or folder of items. This creates a Netscape URL
Pointer document.
- With your Bookmarks Window open, highlight an individual
bookmark [with a single click], then Drag it to your
desktop and let go. What happens?
NOTE: be patient; sometimes it takes a minute for you to know if
anything has happened.
- What is the name of the new item on your desktop?
- Double click on the item that is now on your desktop. What
happens to your active Netscape page?
- This method of saving a bookmark has certain limits. They
cannot be imported directly back into Netscape as a bookmark nor
does it show any annotation done to it before it was saved to the
desktop. It is not an editable item.
- This is item is for Mac
users:
A book mark pointer can be moved to the Apple Menu Items folder
inside the Mac System folder. Once it is placed here, it will
appear under the colored 'apple' in the upper left corner of your
screen. It then becomes a handy shortcut for quickly moving to a
certain page.
Opening Composer to a new page
You may also enter COMPOSER status by clicking on the
composer icon located at the bottom right of your Navigator
window. This will open a new [and blank] page. You may
begin typing text, adding graphics and tables or pasting materials
from other sources.

last updated July 5, 1999
Barry Sovel © 1998,
1999


