Saving and transferring Word
files
between Mac and PC
- Because the Mac can both read and
write to PC file formats, it can serve as a vehicle to move files
back and forth. All you need is:
- a Mac
- a PC
- a PC formatted
diskette
- a file title that can be read
by a PC
- If you do not already have a PC
formatted diskette, just follow the directions at Step
1 [below]. You
must use a Mac to create a PC formatted disk.
- It is important to understand
that this process is best for transferring files only. If
you plan to work on or modify these files, do the editing on the
actual computer that you are going to be working with; not while
the file is on the disk.
- For example, you
create a file at school on a PC. You SAVE it while it is on the
PC. When you are finished, you COPY it onto a PC formatted
diskette and take it home.
- At home, you have a Mac.
You must COPY it onto your Mac BEFORE you begin to make any
additions or other changes to the file.
- When you are done, you must
SAVE it on the Mac before copying [transferring] it
back onto the diskette.
- The same is true in moving
from a Mac to PC. SAVE while on computer, COPY to PC formatted
diskette, TRANSFER to the PC. Begin your work.
The key is to realize that
the diskette is just a transfer device.
Step 1: formatting a diskette
to a PC format
Note: this step must be done
on a Mac
- Locate your disk icon on the Mac
Desktop
- Click on the once, so that
it is highlighted
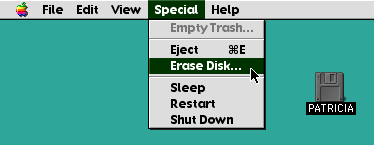
- Go to the pull down menu item
SPECIAL, click and hold
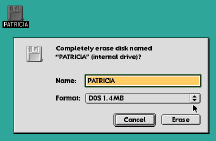
- Highlight Erase Disk and
let go of mouse
|
|
|
|
|
<----
- Place your cursor on the
format arrows
- Click, hold, highlight
the phrase DOS 1.4 MB
- Let go of the
mouse
|
|
|
<----
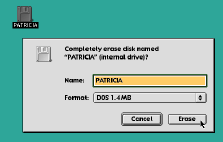
- Click in the
Erase box
- Follow the instructions
as they appear, until it has been 'formatted' as a PC
disk
- Your disk icon, on the
desktop, will now have a PC on it
|
This is the disk you will now
use to transfer your materials
Step 2: Saving the file so it may be
read by a PC
- Go to the pull down menu
item FILE
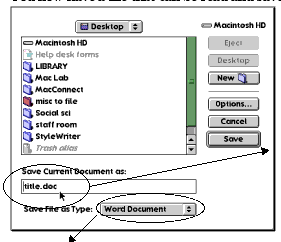
- Highlight SAVE AS and the
following window appears
|
|
With a MS Word file, make sure the tag
that follows the one word title is followed by the
tag .doc
or
.rtf
|
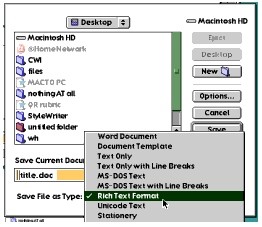
- Click and hold on the Save File as
Type: box
- As a variety of choices
appear
- Highlight Rich Text Format,
then release the mouse
- Click on the Save
command
|
|
|
|
You now have a file that can
be read and saved by both a Mac and a PC.
last updated 11 February 2000


