|
||
Click on a thumbnail to enlarge it. Use your browser's "BACK" button to return to this review when done. |
||
|
LiveMotion is a new Web graphic and animation design product from Adobe. It allows designers to work with vector and raster graphics in an easy-to-use environment. Its interface is extremely intuitive, familiar to those who have used related products such as Adobe Illustrator or Photoshop, and makes designing graphics and animations quicker and more fun than many of the other animation products on the market. LiveMotion allows users to create everything from a single graphic, a full Web page, a Flash animation, or a complete multimedia presentation. It offers a wide range of drawing tools, preset textures, styles, shapes, and helpful color management tools so elements can be created directly within LiveMotion or imported from other Adobe products. LiveMotion 1.0.2 is basically the first release with an additional upgrade that fixes some of the initial glitches and thus provides: faster performance; improved sound support; better import and export capabilities; more efficient SWF compression; tighter integration between Illustrator and Photoshop; and updates to the object-based Timeline. The product is available for the PC or the Macintosh and the price is $299. See Adobe's Web site for more information, tip, tricks, tutorials, and other goodies: http://www.adobe.com. |
||
| Advanced Beginner, Intermediate, and Advanced computer users. The program is an excellent choice for both entry-level and more advanced designers. Neophytes can start with pre-fab sounds, shapes, textures, and styles that ship with LiveMotion until they become more familiar with the program. Also on the CD are exercises and templates to complement the User Guide, and there are more tutorials on Adobe's Web site. The included User Guide is pretty straightforward, and for users who like more step-by-step instruction, they can purchase Adobe's LiveMotion Classroom in a Book with numerous tutorials. LiveMotion, though, has enough bells and whistles and robust features to entice the professional designers who want to streamline their workflow and increase productivity. | ||
|
Top LiveMotion features:
|
||
| Note: Flash .swf files convert non-vector or multilayer objects to bitmaps, which can increase file size. Also, if there are a lot of gradient or opacity animations, multi-layered objects, and bitmap images within a file, the SWF file may be very large and take longer to load, plus the SWF format will delay the playing of an animation until all the files have downloaded. Therefore, some of the examples below are provided in two formats: (1) a flatten GIF or JPEG image for older machines with slower modems; and (2) a LiveMotion composition exported as a Flash or GIF animation. Click on the small images which are linked to the larger versions. The links to the animated examples are placed on the right, and these animations can take one to three minutes to load with slower modems. If you have a DSL line, they load in a matter in seconds. I have included the larger SWF files because they do provide an excellent demonstration of the complex elements that can be created and included in your LiveMotion compositions. | ||
|
Intuitive User Interface |
||
Adobe
LiveMotion shares a common user interface with Adobe Photoshop, Adobe
Illustrator, and Adobe After Effects, which means a short learning curve
for individuals familiar with other Adobe products. The main Menu bar
runs along the top of the work area, plus there is a Standard toolbar
for Window users. There is a Status bar along the bottom that provides
notes and additional information
about various selection and task options. On the screen, you can show
just the composition or expand the window to see the entire work area--including
the "off screen" gray area where you can move objects off screen
in an animation. The toolbox contains tools for selecting, drawing, and
editing your composition. There are floating palettes that contain additional
controls and options for modifying and exporting compositions. A sliding
color palette displays the color values for the current foreground and
background colors and allows you to edit colors according to several different
color models. See image to the right for a view of the interface. information
about various selection and task options. On the screen, you can show
just the composition or expand the window to see the entire work area--including
the "off screen" gray area where you can move objects off screen
in an animation. The toolbox contains tools for selecting, drawing, and
editing your composition. There are floating palettes that contain additional
controls and options for modifying and exporting compositions. A sliding
color palette displays the color values for the current foreground and
background colors and allows you to edit colors according to several different
color models. See image to the right for a view of the interface. |
||
| Animating Masks | ||
When
multiple objects are grouped, the top object in the group can be turned
into a mask that 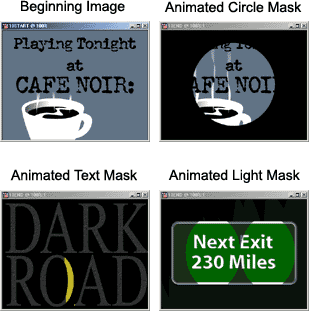 masks
the other objects in the group. The mask object is still independent of
all the other objects in the group, and as such, it can be animated as
well. You can create simple animated masks that change size over time;
create type masks that have an animated object moving under it; or create
an animated mask that shows a different version of the same object under
the mask. For instance, using a masks
the other objects in the group. The mask object is still independent of
all the other objects in the group, and as such, it can be animated as
well. You can create simple animated masks that change size over time;
create type masks that have an animated object moving under it; or create
an animated mask that shows a different version of the same object under
the mask. For instance, using a  LiveMotion
Classroom in a Book tutorial, I created an animation that consisted of
three sequences. See the image to the left for a flatten version of the
animation or if you have the Flash viewer, you can click on the image
to the right for an exported Flash animated version.
For the first segment, I created a simple animated mask that consists
of a circle that slowly closes over the opening title, "Cafe Noir."
I shrank the circle over time, and then changed the circle into a mask
for the sign under it. For the second segment, the mask consists of text
that slowly moves across the composition. Rather than have a static object
under the mask, as in the previous segment, you'll see an animation of
a road rushing past. For the third animated segment, I created a mask
that uses a set of headlights moving across an exit sign. Where the light
hits the sign, the sign looks lighter. This effect is created by making
two versions of the exit sign, one dark and the other light. The headlights
are a mask that displays the lighter sign within the shape of the headlights. LiveMotion
Classroom in a Book tutorial, I created an animation that consisted of
three sequences. See the image to the left for a flatten version of the
animation or if you have the Flash viewer, you can click on the image
to the right for an exported Flash animated version.
For the first segment, I created a simple animated mask that consists
of a circle that slowly closes over the opening title, "Cafe Noir."
I shrank the circle over time, and then changed the circle into a mask
for the sign under it. For the second segment, the mask consists of text
that slowly moves across the composition. Rather than have a static object
under the mask, as in the previous segment, you'll see an animation of
a road rushing past. For the third animated segment, I created a mask
that uses a set of headlights moving across an exit sign. Where the light
hits the sign, the sign looks lighter. This effect is created by making
two versions of the exit sign, one dark and the other light. The headlights
are a mask that displays the lighter sign within the shape of the headlights. |
||
| Creative Effects | ||
You
can apply a variety of effects to objects or images without leaving the
LiveMotion application. 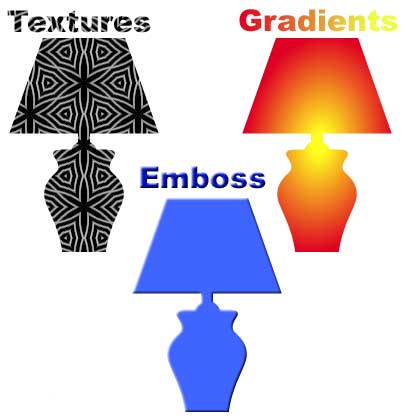 It's
possible to alter creations using Pathfinder operations (unite, intersect,
exclude); 3D effects (bevel, emboss, shadows, cutouts); Opacity; Textures; It's
possible to alter creations using Pathfinder operations (unite, intersect,
exclude); 3D effects (bevel, emboss, shadows, cutouts); Opacity; Textures;
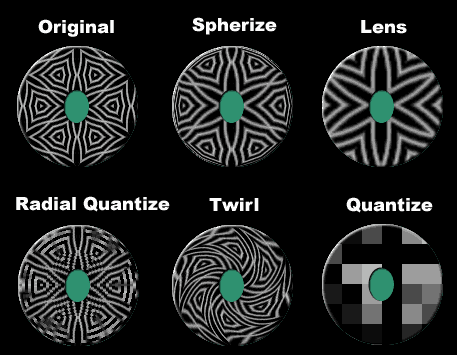 Photoshop Filter Effects; Gradients; Image Adjustments (brightness, contrast,
tints); and Distortions (displace, twirl, spherize, magnify, pixelate),
all of which are object oriented, non-destructive and editable at any
time. The graphic to the left shows three different effects (texture,
gradient, and emboss) applied to images and text. See image to the right
for view of various distortion effects.
Photoshop Filter Effects; Gradients; Image Adjustments (brightness, contrast,
tints); and Distortions (displace, twirl, spherize, magnify, pixelate),
all of which are object oriented, non-destructive and editable at any
time. The graphic to the left shows three different effects (texture,
gradient, and emboss) applied to images and text. See image to the right
for view of various distortion effects. |
||
| Integrated Content-Creation Tools | ||
LiveMotion
provides you with numerous tools and features that allow you to be creative
with shapes. The drawing tools in LiveMotion let you create geometric
objects, and draw the following shapes: (1) Rectangle Tool--draws rectangles
and squares; (2) Rounded Rectangle Tool--draws 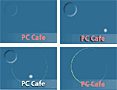 rectangles
and squares with rounded corners; (3) Polygon Tool--draws objects with
from three to ten straight sides, each side being the same distance from
the center of the object; (4) Ellipse Tool: draws ellipses and circles.
Once you've created a rectangles
and squares with rounded corners; (3) Polygon Tool--draws objects with
from three to ten straight sides, each side being the same distance from
the center of the object; (4) Ellipse Tool: draws ellipses and circles.
Once you've created a  basic shape using these tools, you can further modify it by using the
Properties palette. There is also a Pen tool to draw a freeform path.
It allows you to create straight lines and smooth, flowing curves with
precision. The shape of a path can be changed by adding, deleting, or
moving the path's control points. Using a tutorial from LiveMotion Classroom
in a Book, I created the PC Cafe image. The graphic on the left shows
the sequencing in a flat image, and if you click on the graphic to the
right, you will see the finished exported Flash
animation. The animation starts with a blue background with
a blue stripe and a blue circle. Over time, a meteor, text, and a yellow
band appear. The ellipse tool was used to create the yellow band, and
the composition elements have shadowing and 3D effects that change as
the meteor passes through the scene.
basic shape using these tools, you can further modify it by using the
Properties palette. There is also a Pen tool to draw a freeform path.
It allows you to create straight lines and smooth, flowing curves with
precision. The shape of a path can be changed by adding, deleting, or
moving the path's control points. Using a tutorial from LiveMotion Classroom
in a Book, I created the PC Cafe image. The graphic on the left shows
the sequencing in a flat image, and if you click on the graphic to the
right, you will see the finished exported Flash
animation. The animation starts with a blue background with
a blue stripe and a blue circle. Over time, a meteor, text, and a yellow
band appear. The ellipse tool was used to create the yellow band, and
the composition elements have shadowing and 3D effects that change as
the meteor passes through the scene. |
||
| Integration with Photoshop/Illustrator | ||
Graphics
created in Adobe Photoshop or Adobe Illustrator, can be easily imported
into Adobe 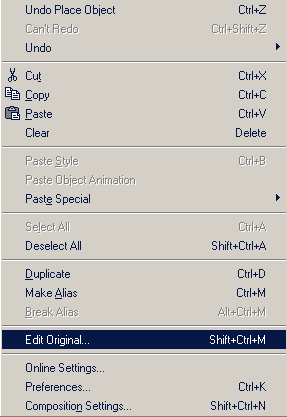 LiveMotion.
Once placed in a composition, you can modify imported work just as you
would objects created in LiveMotion. You can also scan images directly
into LiveMotion.
Once placed in a composition, you can modify imported work just as you
would objects created in LiveMotion. You can also scan images directly
into  the
program. The drag-and-drop feature lets you drag images from your desktop
or other open applications into LiveMotion--even files that have layers.
Once a Photoshop or Illustrator file is placed in the LiveMotion composition,
the Edit Original command lets you edit the native file in their native
application. Any changes that are made to the Photoshop or Illustrator
file are automatically updated in the LiveMotion composition. There is
no need to re-import the file. See image to the left for view of Edit
Original command option. See image to the right for a demonstration of
updating files. I opened the beginning image in LiveMotion; placed the
glasses image into the file; applied the Mercury style to the glasses
image; used Edit Original to go to Photoshop and remove the blue background
by using a path to create an alpha channel. LiveMotion read the alpha
channel I created as a transparency in Photoshop, allowing the Mercury
style to apply on the edges of the glasses after the background was removed. the
program. The drag-and-drop feature lets you drag images from your desktop
or other open applications into LiveMotion--even files that have layers.
Once a Photoshop or Illustrator file is placed in the LiveMotion composition,
the Edit Original command lets you edit the native file in their native
application. Any changes that are made to the Photoshop or Illustrator
file are automatically updated in the LiveMotion composition. There is
no need to re-import the file. See image to the left for view of Edit
Original command option. See image to the right for a demonstration of
updating files. I opened the beginning image in LiveMotion; placed the
glasses image into the file; applied the Mercury style to the glasses
image; used Edit Original to go to Photoshop and remove the blue background
by using a path to create an alpha channel. LiveMotion read the alpha
channel I created as a transparency in Photoshop, allowing the Mercury
style to apply on the edges of the glasses after the background was removed. |
||
| After Effects Timeline | ||
LiveMotion
has an object-based Timeline, which is modeled after the Timeline in Adobe
After Effects. The key advantage of an object-based Timeline is that you
can animate each attribute of an object independently. You can change
the position, opacity, rotation, scale, and skew over time; 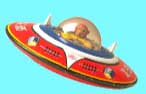 create
unique special effects by altering object attributes with distortions,
filters, and styles; and even reposition create
unique special effects by altering object attributes with distortions,
filters, and styles; and even reposition 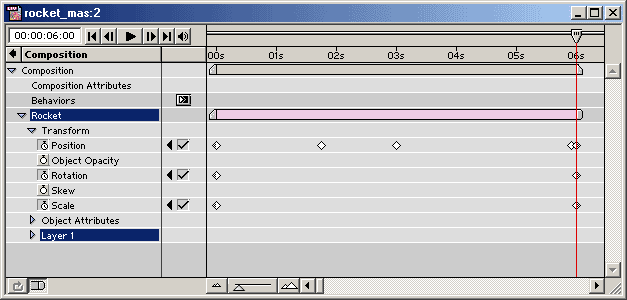 individual
attribute keyframes in the Timeline to fine-tune your composition. You
animate objects using the Timeline window, which displays Timeline tracks
for all objects in the composition and their properties, such as the size,
position, or color. By changing the values of these properties over time,
you create animation. individual
attribute keyframes in the Timeline to fine-tune your composition. You
animate objects using the Timeline window, which displays Timeline tracks
for all objects in the composition and their properties, such as the size,
position, or color. By changing the values of these properties over time,
you create animation. 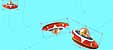 LiveMotion
supports auto keyframing and auto tweening. You simply insert a start
keyframe for the specific attribute you want to animate, specify the amount
of time for the animated effect, then change the object, and LiveMotion
will automatically insert the end keyframe and tween the effect between
the start and end keyframes. Any subsequent edits to the object at different
points in time will automatically insert new keyframes at those points
in time. Then these keyframes can be changed, repositioned or deleted
at any time with ease. See top image to the left for view of the rocket
Timeline. She bottom image to left for flatten view of animation, and
see the image to the right for an exported Flash
version. LiveMotion
supports auto keyframing and auto tweening. You simply insert a start
keyframe for the specific attribute you want to animate, specify the amount
of time for the animated effect, then change the object, and LiveMotion
will automatically insert the end keyframe and tween the effect between
the start and end keyframes. Any subsequent edits to the object at different
points in time will automatically insert new keyframes at those points
in time. Then these keyframes can be changed, repositioned or deleted
at any time with ease. See top image to the left for view of the rocket
Timeline. She bottom image to left for flatten view of animation, and
see the image to the right for an exported Flash
version. |
||
| Animate Photoshop/Illustrator Content | ||
Because
of LiveMotion's excellent integration with Photoshop and Illustrator,
it is easy to incorporate  native
layered .psd and .ai files to add motion, interactivity and sound. You
do not need to flatten your files or convert them into nonnative file
formats. LiveMotion lets you keep the layers you want to animate and get
rid of those you don't want with simple point and delete. Once the layers
are native
layered .psd and .ai files to add motion, interactivity and sound. You
do not need to flatten your files or convert them into nonnative file
formats. LiveMotion lets you keep the layers you want to animate and get
rid of those you don't want with simple point and delete. Once the layers
are 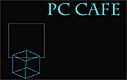 converted into objects or sequences, multiple attributes can be applied
and independently animated. Plus, you can even change the stacking order
of multi-layered Photoshop or Illustrator objects in the Timeline. LiveMotion
gives you several options when converting layers. You can convert the
layers into individual objects, into a group of individual objects, into
a keyframe sequence or into a keyframe sequence where the bottom layer
is distributed across the entire sequence. For the Flash
animated image to the right, I placed a layered Illustrator
file of a cube into LiveMotion. The file contains nine layers, each showing
a different angle of the cube. I animated this composition in LiveMotion
by converting the Illustrator layers into nine frames in an object's time
sequence. Click on the cube to see it move. See image to the left for
a flattened view of the original Illustrator cube file and the final Web
page.
converted into objects or sequences, multiple attributes can be applied
and independently animated. Plus, you can even change the stacking order
of multi-layered Photoshop or Illustrator objects in the Timeline. LiveMotion
gives you several options when converting layers. You can convert the
layers into individual objects, into a group of individual objects, into
a keyframe sequence or into a keyframe sequence where the bottom layer
is distributed across the entire sequence. For the Flash
animated image to the right, I placed a layered Illustrator
file of a cube into LiveMotion. The file contains nine layers, each showing
a different angle of the cube. I animated this composition in LiveMotion
by converting the Illustrator layers into nine frames in an object's time
sequence. Click on the cube to see it move. See image to the left for
a flattened view of the original Illustrator cube file and the final Web
page. |
||
| Multi-Object Based Animation | ||
Grouped
objects can be animated in the Timeline in much the same way that individual
objects can be. With a group, you are limited to animating only properties
that can logically be applied to the 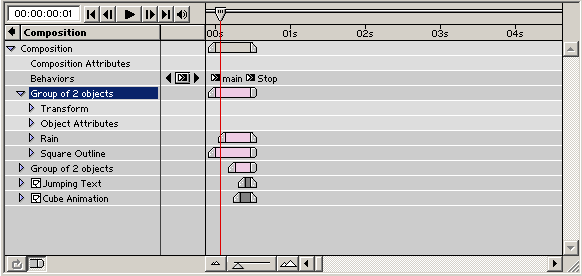 entire
group, such as position and rotation. You can still animate the individual
objects that make up the group normally. Groups can be animated regardless
of whether or not the objects that make up the group are themselves animated.
If the objects in the group are animated, their individual animations
will run along with the group animations. For example, letters in a title
could rotate individually while the whole title moves around the screen.
Even if you do not want to animate the group, grouping objects is an excellent
way to organize individually as part of the composition. For ease of identification,
individual objects within a group are listed as "subheadings"
under the grouped object. Clicking the group's triangle displays the individual
objects that make up the group, as well as the properties of the grouped
object. See image to the left for view of a Timeline showing groups. entire
group, such as position and rotation. You can still animate the individual
objects that make up the group normally. Groups can be animated regardless
of whether or not the objects that make up the group are themselves animated.
If the objects in the group are animated, their individual animations
will run along with the group animations. For example, letters in a title
could rotate individually while the whole title moves around the screen.
Even if you do not want to animate the group, grouping objects is an excellent
way to organize individually as part of the composition. For ease of identification,
individual objects within a group are listed as "subheadings"
under the grouped object. Clicking the group's triangle displays the individual
objects that make up the group, as well as the properties of the grouped
object. See image to the left for view of a Timeline showing groups. |
||
| Animation Productivity Features | ||
LiveMotion
provides an efficient work environment that minimizes repetition and maximizes
productivity. Some of the LiveMotion key productivity features that streamline
workflow and create  efficiency
include: (1) Break Apart Text; (2) Grouping separate animation components
for Timeline Management; (3) a Library Palette; and (4) an Animation Styles.
With the Type tool, you can create horizontal and vertical type, and it
is automatically anti-aliased. You can edit the text at any time using
the Type tool dialog box or Properties palette. You can also specify the
font, size, leading, tracking, and alignment of the type and edit its efficiency
include: (1) Break Apart Text; (2) Grouping separate animation components
for Timeline Management; (3) a Library Palette; and (4) an Animation Styles.
With the Type tool, you can create horizontal and vertical type, and it
is automatically anti-aliased. You can edit the text at any time using
the Type tool dialog box or Properties palette. You can also specify the
font, size, leading, tracking, and alignment of the type and edit its
 characters.
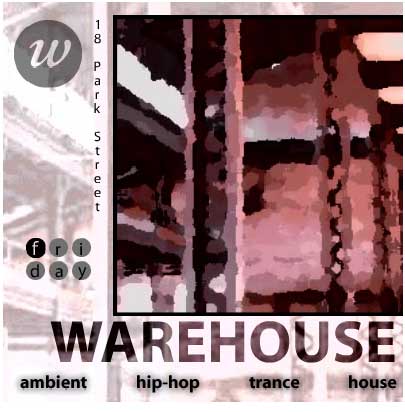
With the Break Aprt Text command, LiveMotion lets you create text objects
and separate the individual characters into distinct text objects in the
Timeline. You can then work with them like any other object, animate them
individually, and open them in the Type Tool dialog box to edit them as
text. For the image to the right, I characters.
With the Break Aprt Text command, LiveMotion lets you create text objects
and separate the individual characters into distinct text objects in the
Timeline. You can then work with them like any other object, animate them
individually, and open them in the Type Tool dialog box to edit them as
text. For the image to the right, I  created
a mask by grouping the text and the top image and the Top Object Is Mask
command. The text became the shape that you see the top image through,
and the bottom image in the file is the background. Then I created a style
for the smaller text and saved it to the Styles palette. Both horizontal
and vertical text alignment was used in the image. Also I combined the
circle and letter w to create a logo and changed opacity. With the Break
Apart Text command, I separated the letters in the word "friday"
and placed them in the circles. To enhance the smaller warehouse picture,
I applied the Palette Knife filter. Lastly, I adjusted the look of the
picture with the Adjust palette. See top image to left for view of Library
palette and bottom left image for view of Styles palette showing the Type
style I created for the warehouse image. created
a mask by grouping the text and the top image and the Top Object Is Mask
command. The text became the shape that you see the top image through,
and the bottom image in the file is the background. Then I created a style
for the smaller text and saved it to the Styles palette. Both horizontal
and vertical text alignment was used in the image. Also I combined the
circle and letter w to create a logo and changed opacity. With the Break
Apart Text command, I separated the letters in the word "friday"
and placed them in the circles. To enhance the smaller warehouse picture,
I applied the Palette Knife filter. Lastly, I adjusted the look of the
picture with the Adjust palette. See top image to left for view of Library
palette and bottom left image for view of Styles palette showing the Type
style I created for the warehouse image. |
||
| Rollovers | ||
Rollovers
are easy to create in LiveMotion. A rollover is any effect, such as a
glow, color change,  or
sound, that occurs when the mouse moves over an object. The term is also or
sound, that occurs when the mouse moves over an object. The term is also
 used
to describe an effect that is triggered by other mouse actions, or a button
or other object that has such an effect applied to it. You can attach
sounds to object states, and once you have created a rollover effect you
can save it for future use in the Library. Remote rollovers are effects
that are triggered by one object, but affect a target object. The trigger
object is the object that the user interacts with usually by pointing
to it or clicking it. The target object is the object that is actually
changed. See image to the left for an example of a regular rollover exported
in a GIF format, and see the image
to the right for an example of remote rollovers exported in a Flash
version. Click on the buttons to see the changes in the glasses. used
to describe an effect that is triggered by other mouse actions, or a button
or other object that has such an effect applied to it. You can attach
sounds to object states, and once you have created a rollover effect you
can save it for future use in the Library. Remote rollovers are effects
that are triggered by one object, but affect a target object. The trigger
object is the object that the user interacts with usually by pointing
to it or clicking it. The target object is the object that is actually
changed. See image to the left for an example of a regular rollover exported
in a GIF format, and see the image
to the right for an example of remote rollovers exported in a Flash
version. Click on the buttons to see the changes in the glasses. |
||
| Sound | ||
| To provide auditory as well as visual feedback, you can attach sounds to compositions and rollovers. Sounds are played when a state is activated (for example, a sound that plays when a button is clicked). You can apply a sound from the Sounds palette, or you can attach an external sound file. LiveMotion lets you import WAV, SND, AIFF, AU, and MP3 sound files. Then you can create background soundtracks, link sounds to specific animation events, or incorporate them into interactivity. Audio controls include panning, volume (fade-/fade-out), trimming, and more. LiveMotion exports to the MP3 file format. See image in section below for a composition with sound. | ||
| Interactive Animation Authoring | ||
| You
can make your LiveMotion animations interactive by using behaviors. Behaviors
are commands |
||
| Export Features | ||
The
final step in creating an Adobe LiveMotion composition is saving and exporting
it for use on the Web. You can choose from an array of exporting options,
which let you export to all common Web formats, including the Flash (SWF)
file format. If you export in the SWF format, you can also  choose
optimization settings for any bitmap images that are in your composition.
In choose
optimization settings for any bitmap images that are in your composition.
In  addition,
LiveMotion export features let you export an entire composition or just
selected objects; create an HTML page that references your image files;
or slice a composition and have LiveMotion generate an HTML table that
reassembles the parts. As you work, you can see how your composition will
look with the current export settings by using the Active Export Preview.
When you are working in Active Export Preview, selected objects have a
red border. To optimize a graphic, you change your export settings (reducing
colors, or quality) in the Export palette while keeping an eye on how
the image actually looks on screen. The Status bar at the bottom of the
LiveMotion window shows you the export file size for your composition
and for any selected objects. You can also preview your images in a Web
browser. See image to the right for a flattened view of a Web page, and
see the image to the right for an exported Flash
version saved with the AutoLayout option. addition,
LiveMotion export features let you export an entire composition or just
selected objects; create an HTML page that references your image files;
or slice a composition and have LiveMotion generate an HTML table that
reassembles the parts. As you work, you can see how your composition will
look with the current export settings by using the Active Export Preview.
When you are working in Active Export Preview, selected objects have a
red border. To optimize a graphic, you change your export settings (reducing
colors, or quality) in the Export palette while keeping an eye on how
the image actually looks on screen. The Status bar at the bottom of the
LiveMotion window shows you the export file size for your composition
and for any selected objects. You can also preview your images in a Web
browser. See image to the right for a flattened view of a Web page, and
see the image to the right for an exported Flash
version saved with the AutoLayout option. |
||
| LiveMotion will appeal to designers who are familiar with other Adobe's products, plus those who want to quickly add Flash animations without having to learn advanced scripting or complex interactivity. It might not have all the scripting features of Macromedia's Flash, but only the most advanced designers need that level of robustness. LiveMotion streamlines many of the common animation tasks. The automatic keyframes and automatic tweeing are a great timesaver and are perfect for beginners. The interface is clean, and the Timeline is easy to understand. LiveMotion fills a nice niche in the Adobe product line. It's an imaginative first version for a product that should have a great future. | ||
|
Windows Windows 98/Windows NT 4.0 Macintosh Power PC CPU and higher |
||
|
Graphics:
Adobe LiveMotion & Adobe Photoshop 6.0
Web Page Editor: Dreamweaver 4.0 Scanner: Hewlett Packard ScanJet 6250C Professional Series |
||
|
|
||
 Adobe
LiveMotion 1.0.2
Adobe
LiveMotion 1.0.2