| 1Projects - Overview |
1-2.5 PROJECTS |
|
Drawing
File Management comes to AutoCAD®
and Architectural Desktop
Architectural Desktop 2004 was the first release
to offer tools for drawing file relationship management that went well beyond the Xref Manager. For the 2005 release cycle some of these tools were
updated and adapted for use in the core AutoCAD program. Both
AutoCAD and Architectural Desktop users will find
these new tools within the Sheet Set Manager (SSM) whose primary purpose
is to assist users in managing print-ready Layouts. Architectural Desktop 2005
users, however, should avoid using the Sheet Set Manager and only work with the
Project Navigator ("AecProjectNavigator") because it includes
most of the tools from the Sheet Set Manager (those that apply to ADT project
files).
In the sections below I hope to demystify the
"Drawing Management System" in ADT 2005 by deconstructing the majority of the
tools that it employs. At the end of this "journey" you should be able
to extract all of the structure, configuration work and settings from an
example project to create a "Project Template" that will get you
going in seconds.
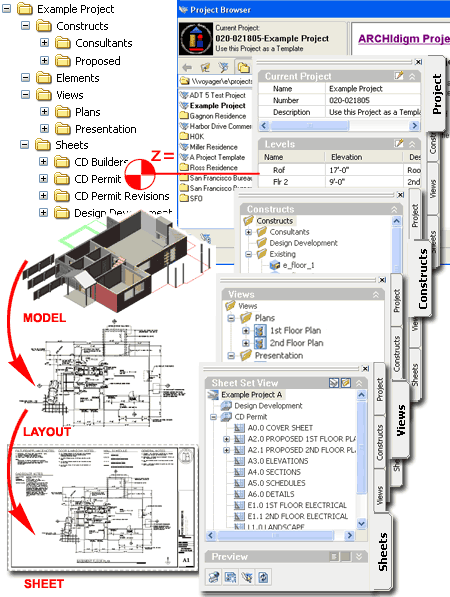
Illustrated to the right I show an overview
of how the "Drawing Management System" works to assist you in assembling
modeling work into print-ready documents. The System employs two tools
that you will need to interact with on a fairly regular basis: the
Project Browser and the
Project Navigator. The
Project
Browser Window serves as a specialized Microsoft Explorer with tools for managing
Project folders; including Opening, Creating, Copying, Archiving and more.
The Project Navigator serves as a highly sophisticated Drawing File Manager
with tools that range from Floor Heights to Sheet Numbers.
The Project Browser provides the basic Folder
Structure while the Project Navigator provides the tools for working within
it. You use the Project Navigator to define
Levels (
Floor-to-Floor Heights) and
Divisions (non-dimensional categorizations) that
are Assigned to Construct (Model) Files (Floors, Slabs, Roofs and so on)
which are collected into View Files (one or more Floors, Slabs, Roofs and so
on ) where they are dressed up with dimensions and annotation for their
final resting place on Sheet Files (Print-ready Layouts).
|
 |
|
Terminology in Architectural Desktop's "Drawing Management System"
When you look at the Project Navigator for the
first time I think it safe to say that it is the terminology that evokes the
greatest confusion: Constructs, Elements, Views, Sheets,
Categories, Subsets,
Levels, Divisions and so on. To help understand these
terms I created a list with some basic definitions but you will quickly
develop your own sense of purpose and function once you have used these
tools for a couple of Projects. One of the most important things to
keep in mind is that the "Drawing Management System" is just a set of
tools and as with AutoCAD or Architectural Desktop, you can use them as
creatively as you see fit. On some Projects, for example, I skip the
use of Views and go straight from Constructs to Sheets.
The secret behind the "Drawing Management
System" lies in some new files that most Architectural Desktop users have
never been exposed to. If you use Explorer to review your Projects
while work on them you will soon notice that every drawing file will now
have a companion file with the extension of ".xml". This file
is used to keep track of the individual drawing files but also interacts
with the most important new file in this System: the Project Properties (or
Data) file with the extension of ".apj". The Project Properties
file is also written in XML code making it very easy to edit without
the use of ADT. The last new file you will soon become familiar with
is the Sheet Set data file which is used to keep track of the organization
and structure you create for your Sheets. This file uses the extension
".dst" and cannot be edited outside of ADT. It can, however, be
read and modified with the Sheet Set Manager in ADT and AutoCAD.
Levels - an
organizational system on the Projects tab of the Project Navigator in which z-axis height
values are set and named for use throughout
the Project. Typical names might be "Foundation", "First Floor" and so
forth.
Divisions - another
organizational system on the Projects tab of the Project Navigator that only uses names but expands upon the use of
Levels. Typical names might be "Phase 1", "Existing" and so forth.
Constructs - a term used
for one of the tabs on the Project Navigator, the name for one of the
Folders on this tab and the term used to describe the primary drawing files
used to model a building. Typical Construct files might be things like
a Foundation Model, First Floor Model, Roof Model and so on.
Constructs are Assigned to Levels and Divisions.
Elements - the name of
one of the folders under the Constructs tab of the Project Navigator and the
term used to describe a variety of secondary drawing files often used
as repetitive components in building models; much like Blocks. Typical
Element files might be things like an office cubical, trees, cars, office
layouts and so on. Elements cannot be Assigned to Levels or Divisions
but acquire their Level and/or Division assignment by being Xref'd into
Construct files.
|

Views - a term used for
one of the tabs on the Project Navigator, the name for one of the folders on
this tab, the term used for the drawing files stored under this folder and
the term used for Model Space rectangular boundaries saved with a Name,
Scale, Display Configuration and Layer Snapshot. These Named Model
Space Views
have been categorized as General, Section/Elevation and Detail.
Typical View files might be things like an annotated and dimensioned first
floor plan, elevations, sections, details and so on.
Sheets - a term used for
one of the tabs on the Project Navigator, the name for one of the folders on
this tab and the term used to describe drawing files with a single Paper
Space Layout configured for Printing. Sheet Files are typically
comprised of one or more Named Model Space Views linked back to View files.
Project - a term used to
describe the complete folder system for managing all of the Architectural
Desktop files in one architectural project. A "Project" consists of
one primary folder (with the Project Name) and four secondary folders
(Constructs, Elements, Views and Sheets) within which you can create an
endless number of tertiary folders. A "Project" also includes two
extremely important data based files that monitor and record work done with
the Project Navigator: the Project Data (or Properties) ".apj" file and the
Project Sheet Set ".dst" file. |
|
File Structure in
Drawing Architectural Desktop's "Drawing Management System"
In addition to dealing with the new terminology
of the "Drawing Management System", some also find the file structure
rather
confusing. I say that "some" find it confusing because others have
actually been managing their AutoCAD and Architectural Desktop files in
identical or at least similar ways to how the Project Navigator does it. I believe that it was the work of
those people that served as the model for how Autodesk structured the tools
in the Project Navigator.
Because Architectural Desktop is really not a
Single Building Modeler (SBM) we have to rely on the practices and solutions
provided by the core AutoCAD program. This means that architectural
buildings are divided up into individual components that are brought
together as composite files using the External Reference Manager. The
floors of a multi-story building, for example, are kept in separate files
just as their 2D counterparts were in the days of 2D AutoCAD drafting.
These floor files, which are actually 3D Models, are stored as "Constructs"
in the Project Navigator but united as "View" files where they can be used
for things like Section and Elevation projections. View files are thus
unique composite files created with Xref's of Constructs to serve your needs for
producing data or linework ready for printing. View files can range in as great a variety as you
can image but are typically used for Plans, Sections, Elevations, Details,
Schedules and so on. Named Model Space Views in View files can be used as instant
Viewports by dragging them over to print-ready Sheet files. Sheet
files have been employed by AutoCAD users for many years and were often View
files with one or more Layouts set to print. In ADT's Project
Navigator, a Sheet file can be as simple as a drawing with one Paper Space
Layout configured to print with a Tileblock; the content comes from the View
file which is handled as an Xref. |
In the material below I discuss
the major components of the tools found with the "Drawing Management
System": form the Project Browser to each of the tabs on the Project
Navigator. In this discussion I refer to a Project that I have named
"Example Project" which I suggest you create as an opportunity to experiment
and learn.
Later in this material I discuss
how to use the knowledge gathered from your experiments to configure Project
Defaults that will make the process of creating new Projects faster and more
efficient.
Finally, I wrote up a
step-by-step outline for how to create a master "Project Template" that you
can use to create New Projects from using two different approaches.
You may actually want to jump to
this outline now and use it as your guide for using the greater body of
information provided below. |
|
2Project Browser |
2-2.5 PROJECTS |
Project Browser - Overview
Projects
| Menu |
File > Project
Browser... |
 |
On Project Navigator
Palette or ARCHIdigm's PowerSTRIP menu |
| Keyboard |
ProjectBrowser |
 You
can activate the Project Browser Window in a number of different
places such as from the File pull-down menu, by typing "ProjectBrowser" and
by using the "Launch
Project Browser" button on the Project Navigator. If you really
like this tool, you can set it to activate automatically every time you
start ADT; see AEC Project Defaults. You
can activate the Project Browser Window in a number of different
places such as from the File pull-down menu, by typing "ProjectBrowser" and
by using the "Launch
Project Browser" button on the Project Navigator. If you really
like this tool, you can set it to activate automatically every time you
start ADT; see AEC Project Defaults.
The primary purpose for this tool is let
users and administrators find, create and manage Project Folders (usually
referred to as "Projects"). The "Projects" pane (left) is almost
identical to Microsoft's Explorer but you will find that Explorer does not
display the same icons nor does it provide these unique tools.
Projects are pretty much self-contained
structures that can be "Set Current" or created at any location on
your local machine or network. Projects can reside as high or as deep
within an existing folder (or mapped drive) structure. You can "Move"
and "Rename" them but only with the tools available on the Project
Browser (actually you can pull it off with Explorer but it can get quite
messy that way and is just not a good idea). The Project Browser is
only a tool for accessing, working with and creating the primary project
folder; it is not for working within this folder structure where another
tool called the Project Navigator takes over. Projects consist of four
sub-folders and two data based files. The behavior and structure of a
Project as it is read in the Project Navigator is derived from a number of
default settings that you will find on the
AEC Project Defaults tab of the Options dialog. These settings can
also be acquired by using the "Copy Project Structure..." context menu option
illustrated to the right.
Set Project Current - use
this option to inform the Project Navigator which Project will be
active. Only one Project may be active, or current, at any given time
so you will not be able to use the Project Navigator to "cross-pollinate"
between different Projects. Running two concurrent ADT Windows does
not offer anything to circumvent this limitation. To make a Project Current,
you can also simply double-pick on
a Project icon and this is typically displayed by a
bold font.
Browse Project - use this
option to activate the standard "Open File" dialog set to look for .apj
Project file types within the current directory. This is similar to
using Explorer but with the graphic assistance for locating .apj files.
You can also use the Project Folder button on the Project Browser Navigation
Bar and the drop-down list to search anywhere on your local and network
drives.
Refresh - use this option
much as you would the Refresh option in Explorer; to see any changes to folders
or Projects that may have been created or modified by others in a networked
environment.
New > Folder - use this
option to create a Folder rather than a Project. A Folder is identical
to the Folder you create with Explorer. You would use this option when
you need to create a Project as a sub-folder of a more primary job folder.
New > Add Project - use this button to create a
new project folder name with all of the information that gets associated with it - see
illustration to the right. On the Add Project dialog you
can include a project Number, the folder Name, a Description and numerous template file
sources for the various components of the project system. In addition to that
information, you can use the Project Details button in the upper right to
add contact information and a multitude of other items that may you may want
to extract later on using Fields. This information will be stored in
the main .apj Project data file. Illustrated to the right I show an example of a mixed
project environment where some projects might have been done on past releases of ADT or
even AutoCAD while new ones are being introduced with the Project Browser. Since
"Projects"
are simply comprised of unique folder names, two data based files and one
.xml file for each .dwg file, you will not risk corruption or
damage to existing project folders or files by Adding new Projects within existing project
folder systems.
Where you Add Projects is a matter for you to decide upon
but I have found that for best success, you will need to think of a Project as the full
container of all ADT Project Files; from As-builts, to Schematic Design, Design
Development all of the way through to Construction Sets and Change Orders. For some
offices this just won't be feasible so you may want to experiment with Projects as
containers of these categories; i.e., As-builts, Schematic Versions ( one for each version
) and so on. The problem with expanding on their fairly narrow Project structure is
that it will make the task of using this tool more strenuous for the users
because they
cannot work in multiple Projects at the same time. For example, as a designer, I
will throw numerous conceptual mass studies together for my clients and in order to save
time, I often mix work from different phases or versions. If I keep all of my design
work under one Project this is easy but if I break each design version into separate
Projects this becomes a tedious process where I may end up having to manage a lot of
redundant data ( such as floor level height changes ).
Once again we are all presented with a brand new tool that
has not gone through years of careful scrutiny by many architecture firms so however you
attempt to employ it will probably be the first of its kind.
|
 Refresh Project - use this
button whenever changes have been made that don't appear to show up correctly.
Usually this is necessary in networked environments where other users
may be doing work while you are using the Project Browser. You may
also need to Refresh when using Explorer at the same time you are working
with the Project Browser.
File Navigator - use this
button to access a dialog that is very similar to the Open File dialog. You may want
to use this option when you know exactly what file you want but you don't want to go
through the project folder to get to it. At times, for example, you may want to open
a file that is not from the Current Project. Note: you can use the
regular Open command and dialog for the same purpose.
Copy Project Structure... -
use this option to make a duplicate of a Project Folder Structure but be aware that this
only copies the Folders and not the contents. This option allows you to think of any
Project as a Template Project. See
Copy, Move and Rename Project
for more information and examples about this subject.
Move Project... - use this
option to achieve results similar to Cutting and Pasting a Project Folder with Windows
Explorer. The primary difference in using this command to Move a Project is that it
also Moves Paths for Xref's ( Re-path). Should you or another user accidentally move
a Project Folder with Explorer, the Project Browser will reveal that the Paths need to be
fixed and there is a Re-path tool in the Project Navigator as well.
See Copy, Move and Rename Project
for more information and examples about this subject.
Close Current Project - use
this option to Close the Project Navigator and to be able to Close the Project Browser
without activating the Project Navigator.
Rename Project... - use this
option to change the name of any existing Projects, Projects Copied within the Project
Browser and Projects copied with Explorer. When you copy a Project with Windows
Explorer, even if you change the folder name, the Project Browser will see the Project
Name as the same as the original so you must use the Rename Project to remedy this error.
You will want to use this technique when wanting to copy a Project and All of the
Files within it. See Copy, Move and Rename Project
for more information and examples about this subject.
Project Properties... - use
this option to get back to all of the data set up on the Add Project dialog box.
Add
Folder - use this option to add a simple folder just as you would with
Explorer ( not part of a Project )
Project... - use this option
to create a true Project folder with all of the default sub-folders that the Project
Navigator uses.
Delete
- yep, you won't find this option anywhere in the Project Browser so if you need to get
rid of something you will have to do it with Explorer and then Refresh the Project Browser
to confirm the Deletion. |
Project Browser - Add Project -
Project Properties dialog
| Links |
AEC Project Defaults -
for more elaborate information on the default settings found on this
dialog. |
When
you Add a new Project using the Project Browser, the Add Project Window
will appear with numerous Properties. Most of these Properties will
already have been set to Values specified as "defaults" and you can find
most of these default settings under the
AEC Project Defaults tab of the
Options dialog. You must fill in the Name Value field in order to create a
Project. To Modify any of these properties after you have Added your
Project, simply use the Properties... context menu option on the Project
Browser to return to this Window. All of the information (data) set on
this dialog box will be stored in a Project-specific file with the extension
.apj that will be discussed in greater detail under
Section 8.
Number - use this Value field to
specify a Project Number using alphanumeric characters. You may use dashes, underscores and dots but you cannot use slash marks ("\" or "/")
because such values may be incorporated as a Prefix in filenames. I
thought it would be rather nice to have some programmable options for this
Value to help automate number sequences relative to previous project
numbers, dates and so forth but so far no such option exists. This
Value is displayed in the Project Header of the Project Browser and under
the Current Project section of the Project Navigator.
Name - use this Value field to specify
a Project Name using alphanumeric characters. If you want the Project
Number labeled as part of the Project Name on the Project Folder, as viewed with
Explorer, you will need to type your number here as you want the Name to
appear on the Folder. This Value is displayed in the Project Header of
the Project Browser and under the Current Project section of the Project
Navigator.
Description - This Value is displayed
in the Project Header of the Project Browser and under the Current Project
section of the Project Navigator.
Bulletin Board - the default location
and filename set here is typically derived from the same setting on the AEC
Defaults tab of the Options dialog. The bulletin board is simply the
first page in the Internet Explorer-like pane of the Project Browser and
must be in .htm or .html format. Even if this feature means nothing to
you, you should take the opportunity to remove the default one by Autodesk
and at least put a cool image there (for inspiration). See
Default Project
Bulletin Board and Project Image for more on this subject.
Project Image -
the default location and filename set here is typically derived from the
same setting on the "AEC Project Defaults" tab of the Options dialog.
This silly little option had to be some creation by a programmer bored
stiff. This feature offers the option to place a custom .bmp file in
the little 64x64 pixel space of the Project Browser. See
Default Project
Bulletin Board and Project Image for more on this subject.
|
 Prefix Filenames with Project Number -
[Yes/No] - Set this value to "Yes" if you want the value you
have specified for the Number to be a prefix (in front of) all your drawing
file names. In some firms this is a required practice allowing files
to use the exact same naming convention while remaining unique due to the
prefix. In my office, for example, I name all of my drawings in the
same way: "e_flr_1.dwg", or "p_flr_3.dwg". Using the Project Number as
a Prefix would eliminate the possibility of accidentally overriding a file
from one project with the file of another. Since my office is quite
small I don't use Project Numbers and thus don't use this option.
Default ... Templates - under the
templates you will find two primary types: those for drawing work and those
for data. In some cases you may wish to set these Values when creating
your Project but in most cases you should find that using the Project
Defaults or the "Copy Project
Structure..." context menu option will suffice. See
AEC Project Defaults for information on
this subject.
Display Only Project Detail Component
Databases - [Yes/No] - use the "Yes" option for this Value
when also using custom MDB files for your Detailer. This will ensure
that user will not inadvertently use another database for the task of
drawing detail components. I know of now firm to this date that has
gone this far with ADT so if you have no ideas what I am referring to, just
leave the value as the default "No". See
Project Details Component Databases
for more information.
Display Only Project Keynote Databases
- [Yes/No] - use this Value to achieve the same thing as discussed
above but for Keynoting . See Project Keynote Databases
for more information. |
|
Project Details
Project Details is a term used to
describe a subset of the primary Project data file (.apj) which I like to
think of as the "Project Properties" file because it stores the Project
Details and the other Properties discussed under Add Project (above). When you Add or Modify the Properties of
a Project you will find that there is a special section for Editing "Project
Details" which activates the dialog box illustrated to the right. All
of the Detail and Value columns on this dialog are completely
customizable. As you can imagine, it can take some time to create a
full list of of value fields that you may want to track on a Project so it
is highly desirable to be able to "recycle" some of this work.
If you look at the main Project Properties
dialog, see illustration above right, you will find a Property for "Project
Details Template". Once a Project has been created, this
Value will be gray and cannot be
changed; this also means that you cannot import Project Details once a
Project has been created. The default Value for this Property is set
on the
AEC Project Defaults tab of the
Options dialog. Outside of using this default template setting,
you can use the "Copy
Project Structure..." context menu option to copy the Project Details
from an existing job or you can take a more drastic approach and use an
XML editor or even Notepad to modify existing .apj files. Any of the information
entered into this file can be extracted by using Fields in ADT as
illustrated below. As the XML language grows in popularity you will
find that other software programs will also be able to extract data from it.
You can actually use Excel to open and read the Project data file and locate
the Project Details but it
might be better to use an actual XML editor.
Add Detail - this button allows you to
add a field to the current category where you must name the "Detail" but
leave the Value field to be filled in at another time. If you expect
to extract this new Detail in your Project drawings, such as in the Sheet
Files, be sure to use a Name that is easily recognizable. Notice that
I had to use "Project Address 1" and "Project Address 2" as a means to match
how I present this information on my Titleblocks - see below.
Add Category - this button allows you to
create a whole new category or group within which you can add your own
Details. |

Rename Detail - use this right-click
context menu option or double-pick on a Detail Name under the Detail Column
much like you would with Explorer. Do not
attempt to Rename Details once the Value has already been
"threaded" to Fields in one or more drawings or you will end up with the
notorious "####" value. If you must Rename a Detail that has already
been threaded then you will need to reset the Fields everywhere that they
were set to point to this Detail Name.
Note:
If you are like me and you have some
expectations about the order in which things should go, you may find Adding
Details and Categories rather frustrating because there are no tools for
moving the Fields or the Categories. When you Add Details, they will
automatically pop up under the Detail you currently have highlighted but if
you accidentally place it out of order, you will need to Delete it.
New Categories always end up at the bottom of the stack even if you use the
letter "A". If this is totally unacceptable to you, get an
XML editor. |
Project Details - Captured in a Field
| Menu |
Insert > Field |
| Keyboard |
Field |
| Mouse |
Inside
the Text or Mtext dialog, right-click and Select Insert Field... |
| Links |
Sheet Creation Template file
-
for more examples on using Fields to mine for data in Property files. |
In the discussion above I commented on how
Fields can be used to extract the data from the
 Project
Details subset of the main Project Properties (.apj) file. Illustrated below and to the right I show one example of
how you can use a Field to capture simple Project data like the
Project/Client Name and Address for use in a Titleblock. Project
Details subset of the main Project Properties (.apj) file. Illustrated below and to the right I show one example of
how you can use a Field to capture simple Project data like the
Project/Client Name and Address for use in a Titleblock.
Depending on how you prefer to configure your
Titeblocks, you would either embed the Field in one or more Attributes or
within simple Text (like Mtext). Using the "Insert Field..."
option found on
the Attribute Definition dialog, when right-clicking during Dtext and on the
Context menu during Mtext, you should find that you can activate the Field
dialog illustrated to the right.
On the Field dialog, use the Field category
drop-down list and set it to "AEC Project" which will allow you to
Select
"Project Details". Project Details should produce a list under the
Project Information pane that is identical the one found on the Project
Details dialog (see above) and all you have to do is Select the data field
for you drawing Field.
|

Note:
The reason I don't use the "Project Name" option under the Field names pane,
shown above, is that we often use Project Names that are not appropriate for
use on the Titleblock; i.e., it is more of an internal code for the actual
Folder in which the entire job is kept.
FieldDisplay - type this variable to turn
the gray On or OFF (0) under Fields.
UpdateField - type this command to Select one or more Fields for
immediate updating. |
|
Project Details Component Databases
This option is for custom databases - more to
come at a later date |
|
|
Project Keynote Databases This
option is for custom databases - more to come at a later date |
|
|
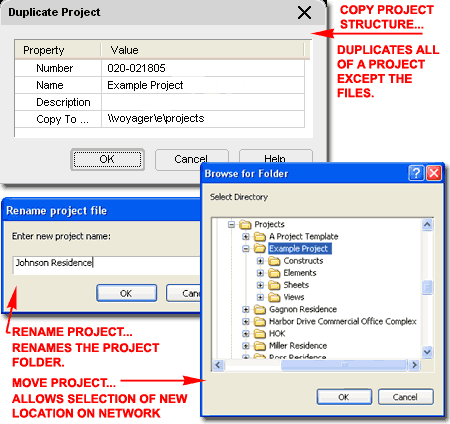
Copy, Move and Rename Project
Illustrated to the right I show the three
basic Project Editing Tools; Copy , Move and Rename. As stated
earlier, you must use the tools within the Project Browser to create and
modify Projects because this is the only way you will create and modify the
associated data files. In other words, if you Copy and Rename a
Project Folder with Explorer the Project Browser will not be able to
distinguish this new Folder from the original.
Copy Project Structure... - this
option provides a means to create a New Project by duplicating an existing
Project's Properties file (.apj) and all of its folders but not any of the
drawing related files within it. This means that you will inherit all
of the settings stored on the Project Properties dialog such as Template
Files, Bulleting Board, Project Image and most importantly, Project Details.
You will also inherit settings for Levels and Divisions but unfortunately
you will not inherit any of the Sheet Set settings except for any custom
folder you may have created as Categories. The Sheet Set (.dst)
information will be created from the "Project Sheet Set Template" Property
found on the Project Properties dialog. If you take the time to create
a "Project Template" this is probably the best way to create New Projects.
See
Project Defaults,
Templates and Configurations for more information on this subject.
Rename Project... - this option allows
you to physically Rename the Project Folder as seen by Explorer but unlike
Explorer this tool also updates all of the data files. Do not confuse
Renaming a Project Folder with Renaming a Project's Name. The Project
Name is stored as a Property of the Project but is not connected to the
Folder Name and thus if you rename the one you will need to manually rename
the other; i.e., the Project Folder could read as the "Jones Residence"
while the Project Name reads as the "William Residence" - that's not good.
Move Project... - this option allows
you to physically Move a Project Folder and all of its contents to a new
location anywhere on your local machine or network environment. As
explained under the "Rename Project" option, this action does more than move
files and folders so be sure to use this instead of Explorer.
|
Note:
Because I just have to see what happens when you do things you are not
supposed to do, I
 made
some experiments using Explorer to modify Projects instead of using the
tools inside the Project Browser. I found that if you use Explorer to
Rename a Project Folder it will still function properly within the Project
Browser and Project Navigator but the Name change will not be reflected in
either of these tools because the core .apj Project File has not been
changed. made
some experiments using Explorer to modify Projects instead of using the
tools inside the Project Browser. I found that if you use Explorer to
Rename a Project Folder it will still function properly within the Project
Browser and Project Navigator but the Name change will not be reflected in
either of these tools because the core .apj Project File has not been
changed.
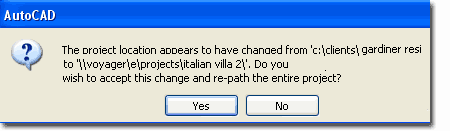
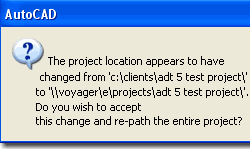
I also Moved an entire Project Folder from one
machine to another and received the message illustrated above left.
When I allowed the Project Browser to re-path the whole Project I found that
all Constructs, Elements, Views, Sheets and even some of my custom relative
path items adjusted perfectly. |
eTransmit
| Menu |
Do not use eTransmit from File pull-down |
| Keyboard |
N.A. |
| Mouse |
right-click in Project Browser and Select eTransmit... or
right-click in numerous places under the Project Navigator to create a
special selection set. |
| Links |
|
AutoCAD users should be familiar with the the
electronic transmittal tool particularly because of how useful it has been
in collecting vital Xref files. In ADT, with all of the structure
behind the "Drawing Management System", the need for a tool that maintains
vital file associations is even greater than it ever has been.
This is a big topic in itself and I will come
back to it later on... |
|
Archive Sheet Set
| Menu |
N.A. |
| Keyboard |
The
"Archive" command is for AutoCAD Sheet Sets only. |
| Mouse |
right-click in Project Browser and Select Archive... |
| Links |
|
The Archive tool is basically the same
thing as the eTransmit but without the option to transmit the final package.
This option only works on Sheet Sets.
More will be added as part of the expansion
on the eTransmit topic... |
|
|
3Project
Navigator |
3-2.5 PROJECTS |
Project Navigator Palette - Project Tab Overview
| Menu |
Window > Project
Navigator Palette |
 |
 |
| Keyboard |
AecProjectNavigator
or [Ctrl+5] |
Though you can activate the Project Navigator
Palette without using the Project Browser, there is no way to change or set
the current Project without using the Project Browser. If you prefer
to avoid starting ADT with the Project Browser Window, notice that the Project
Navigator Palette comes with a button to "Launch Project Browser".
Upon first inspection, most users find the
Project Navigator a bit daunting to comprehend but in reality it is far less
complicated than all of the panes and tabs suggest. If I were to
attempt to describe this tool in the simplest terms possible I would call it
an advanced External Reference (Xref) Manager. Because
Architectural Desktop is really not a Single Building Modeler (SBM) but
rather a Composite Building Modeler the Project Navigator has been designed
to manage numerous independent drawing files that can be assembled as
required to create composites of building data. Taking a queue from
the world of databases, this is similar to making queries where we point to
the drawing files we want assembled as one file in order to produce
something as simple as a Reflected Ceiling Plan or something more
data-driven such as Door and Window Schedules.
Illustrated to the right I show an overview of
the first or top tab of the Project Navigator, the Project tab, and some of the controls you can use to
maximize/minimize this tool. You will need to find a spot for this
Palette as it will become so important to you that it will inevitably
remain on your screen at all times (okay, I keep closing it to get more
space but then I end up activating seconds later).
Current Project - this pane points back
to the main Project Properties dialog to report on the Project Name, Project
Number and Project Description. I have not found any way to change or
expand what this pane displays so I don't think it is possible at this time.
Notice the double up "^" arrows on the header for this pane; you can use
this icon to minimize the pane. Using the rectangle with a pencil icon
you can activate the "Modify Project" dialog also accessed through the
Project Properties on the Project Browser Window.
Levels - this pane points to the
Levels
dialog where you can Add, Delete or otherwise manage the various
Floor-to-Floor Heights of your Project. I will elaborate on this
subject below but once again this sounds more complex than it really is.
If you understand Block or Xref Insertion Base Points then all you have to
do is think of this as a way of dynamically managing the Z-axis component of
the Insertion Base Point. That is, your files will still relate to
each other by the X and Y positions but now you can control the Z position
for one or more files and that is necessary because these are now 3D Model
Files. This also means that in the case of multiple floors, for
example, you draw each floor as if the base of your Walls are on the first
floor; at Z=0.
Divisions - this
pane points to the Divisions dialog where you can Add, Delete and Rename
"horizontal" divisions. The ADT help files refer to this as
"horizontal" but in reality "Divisions" are just non-dimensional groups.
They don't have anything to do with the Cartesian coordinate system but they
provide an option for "dividing" your files into groups that are matched
with Levels. How you employ this organizational feature is really up
to you. See discussion below for more information on this subject. |

Refresh Project - you will find the
Refresh Project button on every tab in the Project Navigator and that alone
should allude to how important this button is. There are several
reasons why refreshing is necessary and you should work on making it a habit
to pick this button whenever you make changes anywhere in the Project
Navigator. I have made some rather embarrassing mistakes based on
ghost images of files in the Project Navigator because I did not refresh and
these mistakes have typically corrupted one or more of the data files this
tool manages. If you work
in a networked environment where several users are actively participating in
the current Project, refreshing should be a "no-brainer" much like Reloading
Xref's when you know someone else is tinkering with the work you depend on.
Periodically you may notice that picking this button triggers an alert about
re-pathing files and this is due to movement in the overall file-linking
structure within the Project Navigator. Typically, you should accept
re-pathing unless you know that this shouldn't be necessary; then, see it as
a warning that you or someone else has done something stupid (like Moving
the whole Project). |
|
Project Navigator - Project Tab - Levels
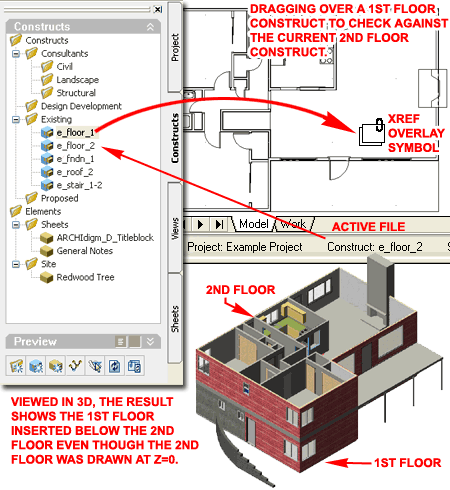
In Architectural Desktop Levels are primarily
used for Z-axis Xref Insertion Points. In other words, the value you
specify for each "Floor Elevation" determines the insertion height along the
World Z-axis for associated Object(s). In addition, Levels can be used to
feed Tags, Schedules and one Field with information derived from the Levels
dialog. Name - this field is
displayed on the Project tab of the Project Navigator Palette and is just a
tool to help you track what your Levels represent. By default, you
will find that the Names are numbered to match the ID values but you can
Rename the Level Names as you see fit. Illustrated to the right I show
that I changed the numbers to abbreviations for actual "Levels": "Rof", "Flr
2", "Flr 1" and "Fnd". I find that keeping the
Name field short is
easier to read on the Project Navigator and if you want a more "descriptive"
statement, you can use the Description field.
Floor Elevation - this value field is
arguably the most important setting on this whole dialog because this value
affects nearly every drawing file you create within the current Project.
As stated above, this value represents the Z-axis insertion point for files
that have been directly associated with it (the real term is "Assigned").
On the Constructs tab of the Project Navigator you will find a folder for
drawing files called "Constructs"; these drawing files are the only drawing
files that can be associated or assigned to Levels and thus they are the
only files that have a dynamic insertion base point. This means that
you can actually return to the Levels dialog during any point in your
Project's evolution and change the Floor Elevation values for a ripple
effect that could be quite extensive (so don't do it by mistake).
There are no rules to how you configure the Floor Levels for your buildings
and if you want to relate everything to grade = zero (0), you can. In
the illustration to the right I show that the finished Floor Elevation value
for my 1st Floor has been set to zero (0") simply because that's how I
think. Keep in mind that the information you specify here is mostly so
the Project Navigator can insert Constructs at the proper Z-axis heights
relative to each other. If you drag a 1st Floor into a current 2nd
Floor, the 1st Floor will actually be set to a negative Z-axis height in
order to compensate for the fact that the 2nd Floor is actually drawn at Z=0
in its own file; i.e., typically all floors are drawn at Z=0.
Floor to Floor Height - this field is
used by the "Auto-Adjust Elevation" calculator to set the next Floor
Elevation value. If you deactivate the "Auto-Adjust Elevation" tool,
this value really does nothing to your project. At present there are
no tools in ADT that read or use the Floor to Floor Height value. To
work with Floor Heights you will need to look into the Display Configuration
tools. See
Display Configuration - Cut Plane
in Part 1 - Display ID - this field is where the
real "Name" of the Level is stored so you will want to use caution when you
work with these values. "Project Based" Tags and Schedules will read
the ID value to incorporate the actual Floor Level in the numbering of
things like Doors, Windows, Spaces and so forth - see example in the upper
right corner. Description -
this field appears to be a convenience item and I have not found any place
where it affects tags, schedules or other items. On my personal
Projects I tend to leave this field blank. Auto-Adjust Elevation - use this
checkbox option to activate an internal calculator that automatically sets
the Floor Level values to match any specified Floor to Floor Height.
In other words, if you set the Floor to Floor Height of the 1st Floor to
10'-0" (3048mm), for example, the 2nd Floor will automatically be set to match
(10'-0" or 3048mm) but the calculator will continue to ripple up or down the entire
list as required. I recommend you use it until you find a reason to do
something unique. |

Add Level Above and Add Level Below
- these two context menu options work as substitute tools for the
inability to drag-n-drop Levels to other positions. In the illustration
above, for example, the only way to Add a Foundation Level later in a
Project is to use the "Add Level Below" which allows you to specify a
negative Floor Elevation height.
Copy Level and Copy Level and Contents
- the "Copy Level" context menu option duplicates all but one of the
settings for a Level, nothing more, while the "Copy Level and Contents"
option duplicates settings and all of the Constructs Assigned to the Level.
Constructs replicated in this fashion will automatically be named with a
"(2)" suffix and will be exact copies including linked Elements, notes, etc.
When you Paste (see below), notice how this action automatically changes the
Name but not the ID - watch out for that. See also "Copy Construct to Levels"
on the Constructs tab.
Paste Level Above and Paste Level
Below - these options are only available after you have use the Copy
Level or Copy Level and Contents options. These work just as the Add
Level Above and Add Level Below options. When Pasting, pay attention
to how the Name is automatically set to a number and that the ID value is
not changed at all. If you are using the Copy Level and Contents
option to create multiple floors, be sure to change the ID values to
correspond with the floor level.
Delete Level - this option does not warn you about the potential to
"orphan" Constructs so be aware that though you can Delete a Level, some
Constructs may be Assigned to it. Orphaned Constructs will simply
reside under the Constructs folder with no Level Assignment.
Rename Level - you can also rename by double-picking in the Name
field for any Level. Two Levels cannot have the same Name. Other
than that I have found no particular limits or special use for this value.
|
|
Project Navigator - Project Tab - Divisions
In Architectural Desktop Divisions offer
a way to augment Floor Level categorization by a simple naming convention.
You can exercise as much creativity about Division Names as you see fit;
ranging from terms like "Phase 1" to "Existing" and "Bldg A". The Help
files in ADT lead you to believe that Divisions are "horizontal" in nature and you
may wish to think of them as such but as yet they support no dimensional
constraints - I compare this to thinking of Layers as Physical while the
reality is that they are simply Properties (Names).
Name - this field is displayed on the
Project tab of the Project Navigator Palette and is just a tool to help you
track what your Divisions represent.
|
 ID - can be extracted by Property Set
Data for Schedules, etc.
Description -
as with Levels this is a convenience option but may be rather useful if you
are experimenting with odd Division Names or concepts. |
|
4Project
Navigator
- Constructs |
4-2.5 PROJECTS |
|
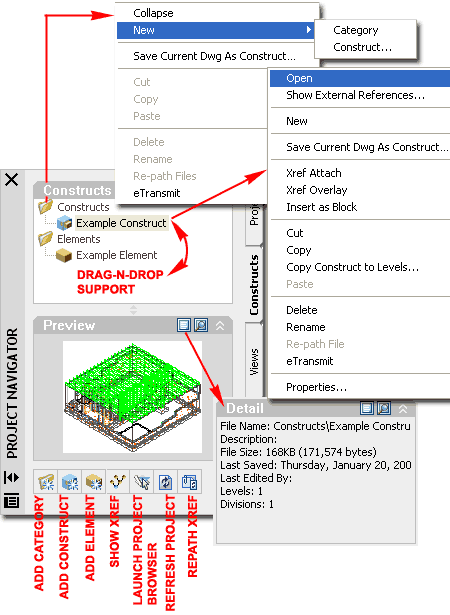
Project Navigator - Constructs Tab - Overview
On the
Constructs Tab of the
Project Navigator
you will find two Folders
that cannot be Renamed or Deleted. These folders, "Constructs"
and "Elements",
reflect actual folders as viewed with Explorer. They are also the
first two of four default sub-folders within the current Project Folder.
Some Users and CAD Managers are quick to complain about this structure and
naming convention but it is just something we all will need to adjust to;
there is room for some customization as will be discussed below.
In the
illustration to the right I show that the Context menu is obviously the best
tool for working with the folders and any drawing files within them. As you can
see from the Context menu for the Constructs folder, you have the option to
create a new Category
(Sub-Folder) or a new "Construct". You will find similar options for
the Elements Folder. In both cases, Categories are simply sub-folders
that you can use to separate "Constructs" or "Elements". The naming
convention you wish to employ for these sub-folders is entirely up to you.
 Constructs
- this term is simply the name for your primary drawing files in a project.
This is identical to how many offices have managed regular AutoCAD files for
years now and you may prefer to think of this term as "Plans". All
drawing files stored within the Constructs folder, including all
sub-folders, are labeled and managed by the Project Navigator as
"Constructs". Since Constructs are just regular drawing files (.dwg)
you can create them in many different ways but however you decide to create
them, they have to be coded or written into the Project Navigator by some
means of creation or importing; i.e., simply saving a file to the Constructs
folder does not make it a "Construct". When you use the Project
Navigator to manage files, it automatically creates tracking files in XML
code and without these files, the Project Navigator cannot read or list
them. The safest way to create a Construct file is to use the
Context menu, Select
New >
and cascade to "Construct".
When you take this approach to creating files in the Project Navigator, you
receive a new file based on the
default templates assigned to the Project. Constructs
- this term is simply the name for your primary drawing files in a project.
This is identical to how many offices have managed regular AutoCAD files for
years now and you may prefer to think of this term as "Plans". All
drawing files stored within the Constructs folder, including all
sub-folders, are labeled and managed by the Project Navigator as
"Constructs". Since Constructs are just regular drawing files (.dwg)
you can create them in many different ways but however you decide to create
them, they have to be coded or written into the Project Navigator by some
means of creation or importing; i.e., simply saving a file to the Constructs
folder does not make it a "Construct". When you use the Project
Navigator to manage files, it automatically creates tracking files in XML
code and without these files, the Project Navigator cannot read or list
them. The safest way to create a Construct file is to use the
Context menu, Select
New >
and cascade to "Construct".
When you take this approach to creating files in the Project Navigator, you
receive a new file based on the
default templates assigned to the Project.
Elements
- this term is also a name for drawing files but these are meant to be used
as parts that fit into the Constructs; these would not be equivalent to
"Plans" but more like "Blocks". The primary difference, technically
speaking, between Constructs and Elements is the connection these drawing
files have to Levels and Divisions (set on the Project tab). Simply
put, Elements don't care about Levels or Divisions. If you look through
the example files that come with ADT, you will find that one of the most
common Elements is an office workstation ("cubicle") because it is a
self-contained drawing that can easily be placed on any Floor and Copied as
many times as desired. As with Constructs, the safest way to create
one is to use the New >
Element Context
menu option because it ensures that you use a default template.
Open
- this will open the drawing file but you can also just double-pick on the
name or icon to produce the same results.
Show External References...
(Show Xref
button) - this option activates a separate dialog box in which you will see
a list of the Xref's that may have been
Attached
or
Overlayed
in the
Selected drawing file. One of the best aspects of this option is that
you don't have to Open the Constructs or Elements to see the Xref's within
them.
Look for this option under the Views tab as well.
Xref Attach and Xref Overlay
- these two Xref options can be used to import the Selected Construct or
Element into the current drawing file. You may drag-n-drop Constructs
or Elements directly from the Project Navigator over to the current drawing
file for similar results, however, the use of "Attach" versus "Overlay" will
differ depending on which of the two Folders the drawing files come from:
Elements -> Constructs are "Attached", Constructs -> Constructs are "Overlayed".
Insert as Block - this
option should be obvious and is basically intended to allow users to Insert
an Element into a Construct instead of importing is as an Xref. You
could, of course, "Insert as Block" from Construct to Construct and from
Element to Element but these options all defeat the purpose of using Xref's
and that's the primary purpose of using the Project Navigator.
Cut, Copy and Paste -
using these options on Construct and Element files is similar to doing it
with Explorer except that it is necessary to do this work in the Project
Navigator if you want it to see your files. In other words, this is
how the Project Navigator is able to know what you have done with the files
and can thus write those XML files to track the work.
|
Copy Construct to Levels
- this interesting option allows you to Copy the Selected Construct and
Paste copies of it to one or more Levels. Essentially, this is a way
to Copy one drawing file and Paste it as new drawing files while setting
them to different Levels. You could, for example, Copy a Construct of
a single floor that has been assigned to Level "Flr 1" and Paste it with
unique names (automatically assigned) while setting each to other Levels
such as "Flr 2", "Flr 3" and so on. Once complete, you can change the
Construct File Names to something more appropriate. See also
Copy Level and Contents
on the Projects tab.
Delete - this removes the Construct or
Element from the Project Navigator and from your computer. If you have
taken this action by mistake you should be able to recover by looking for
the .bak or .sv$ ( usually in the \Temp directory ) from a previous save.
Rename - this option can
also be triggered by picking twice on the file name much like you would in
Explorer. I recommend extreme caution using any form of file Renaming
despite the improved "Re-pathing" tools in the Project Navigator. In a
perfect world you can successfully Rename files inside the Project Navigator
and then fix the Path issues by using the Re-path tools but I find that it
is easier to break than to fix.
Re-path File - this
option must be used after Location or Name changes to Construct or Element
files as a means to reset the Xref links to other files such as Views and
Sheets. There are actually three types of Re-pathing: File-based,
Folder-based and Project-based. The first two are accessed by what you
Select while the full Project-based "Re-pathing" option is available on the
"Re-path Xref" button at the bottom of the Project Navigator. Each
type obviously seeks out a different scope of files to act upon and if you
are working in a networked environment it is safest to only Re-path the file
you just modified rather that Re-pathing the whole Project. In a small
office, like mine, I just hit the button to save time.
eTransmit - this option
is identical to the the eTransmit command that you can activate at any time
in any drawing file. In the Project Navigator, however, it can be
activated at different folder hierarchies to include or exclude multiple
drawing files. Because drawing files in the Project Navigator are
associated with numerous other sources of information and data, these will
appear in the eTransmit dialog; weird things like the Bulletin Board.
See eTransmit under the Project Browser section for
more on this topic.
Properties... - this
option takes you back to the original dialog box typically seen when
creating New Constructs or Elements through the Project Navigator template
files. You can change just about everything; from Levels to
Categories.
Refresh Project - this
option is similar to using the F5 in Explorer or Internet Explorer and
becomes a major tool for those working in networked environments where
multiple users are working in the same Project. |
Constructs Tab - Add Construct
- Assign Level and Division
| Mouse |
right-click over Categories or Constructs on the Constructs tab of
the Project Navigator, Select New and cascade to Construct... |
Though you
can Add Constructs by Saving the Current Drawing file as a
Construct or by Importing a
drawing file using drag-n-drop with Explorer,
I highly recommend that you force yourself to use the Add
Construct dialog. This
approach ensures that you start with a template file that should be
specifically configured for use as a Construct.
When you
activate the Add Construct dialog, the current Category
is listed but you can change it using the drop-down list as illustrated to
the right. In addition, you will find that the Default Construct
Template file has been set though this too can be changed using the ellipses
button. The primary information that you need to provide is a File
Name and a Level/Division Assignment.
Level and Division Assignment
- though there is no requirement
that you assign one of your Constructs to a Level or Division (no alert
message) failing to do so can be problematic in the overall assembly of
drawing information. View Drawings, for example, will not read files
that have not been assigned to Levels. Assigning one file to two or
more Divisions has no significant consequences other than what you might
expect but Assigning one file to two or more Levels creates a Construct
referred to as a "Spanning Construct" which may produce results you don't
want. In both cases, the file is likely to appear in multiple places
but ultimately the final say on this matter will be up to you when you
create your View Drawings. If you read over the View tab discussion
you will see that you can Select or Deselect files as you see fit.
Therefore, the worst thing you can do is not assign a Level/Division.
|
 Spanning Constructs
are typically employed when you create a unique drawing file designed to
hold content to be shared between one or more Floors; like Stairs.
Single Objects that need to be drawn (or modeled) across many floors, such
as Curtain Walls, are also good candidates for being set as "Spanning
Constructs".
|
|
Constructs Tab - Add Element
Elements are about as
simple as drawing files can get in ADT and you might think of these files as
something like Project Blocks. Elements are not Assigned to Levels or
Divisions but that is because they were designed for use in Constructs where
they will adopt their Assignments. The primary argument for using the
Add Element dialog as opposed to Saving the current Drawing as an Element or
simply dragging a drawing file into the Project Navigator via Explorer, is
the fact that this dialog uses the Default Element Template which may have
been configured for the most efficient and least "polluting" use.
When you activate the Add Element dialog, the
current Category is listed but you can change it using the drop-down list as
illustrated to the right. In addition, you will find that the Default
Element Template file has been
set though this too can be changed using the
ellipses button. The primary information that you need to provide is a
File Name.
Common
examples of Elements are things like office cubicles, general furniture
layouts and highly redundant objects like trees, cars or similar landscaping
objects. I continue to find new things that I consider Elements;
things like Titleblocks, general notes and similar sheet related information.
See
Automatic Xref'd Titleblock for Sheet Files
for an example. |
Note:
Though Elements can be Inserted as Blocks, I find that they serve me best as
Xref's and the more I use them the more I have started to see them as
replacements for Blocks. Even a simple Chair can prove to be a good
candidate for use as an Element; especially if used on many floors, if it is
a very detailed MvBlock and if some slight change is suddenly required -
think about it. |
|
Constructs Tab - Dragging Files Around
The moment I
created an
External Reference (Xref)
link between a 1st Floor and a 2nd Floor with a simple
drag-n-drop action was the
moment I was sold on the Project Navigator. To me, dragging is the
single most important operation you can make within the Project Navigator
and I am sure you will find some surprises with the number of things you can
do with this action.
Illustrated
to the right I show an example
 of how I begin work on a 2nd Floor Construct
by dragging in the 1st Floor Construct.
Because Constructs are
Assigned to Levels, they always assemble correctly; saving you from having to spend
time on moving floors, foundations and roofs up or down along the z-axis. of how I begin work on a 2nd Floor Construct
by dragging in the 1st Floor Construct.
Because Constructs are
Assigned to Levels, they always assemble correctly; saving you from having to spend
time on moving floors, foundations and roofs up or down along the z-axis.
This
drag-n-drop action can be applied to Constructs, Elements and Categories
(the Folder icons) but the results are not always the same.
Construct to Construct
- this produces an Xref set to the
Overlay
type
which means that the Xref
will not be passed forward into other files.
Element to Construct
- this produces an Xref set to the
Attach
type which means that the Xref will be passed forward much like a Block.
The reason this occurs is that the designers of this
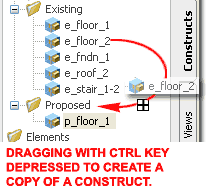 tool
see Elements as building blocks within Constructs. When you create
View Drawings that are comprised of Constructs you also acquire the Elements.
If you don't abide by this formula you could end up with Elements on the
wrong floors. tool
see Elements as building blocks within Constructs. When you create
View Drawings that are comprised of Constructs you also acquire the Elements.
If you don't abide by this formula you could end up with Elements on the
wrong floors.
Construct to Element
- this produces and Xref set to the
Overlay type.
If you are
unfamiliar with Overlay and Attach Xref types, the best way to understand
and remember the difference is that Overlays act exactly as their name
suggests but Attachments are really attached (hence the paperclip icon) and
travel with the file they are brought into. As you can image, using
Attachments for all Xref types would produce quite a mess in a project but
never using them would force users to repeat the process of bringing in Xref's
over and over. When we get to the discussion about View Drawings you
will see another example of how these Xref types play an important role in
bringing files together for Sheets. |
Drag Construct file down to an Element
Category - this action changes the Construct into an Element and blows
out all of the Level and Division Assignments.
Drag Element up to Construct
Category - this action changes the Element into a Construct and
automatically activates the "Add Construct" dialog so you can Assign a Level
and Division.
Dragging Categories
- this action produces some odd results that I may not have a full
understanding of. I have found that when you drag Categories whose
contents have been Xref'd to other files, the Category tends to remain while
producing a Copy. Ironically, however, all of the files are Moved. |
|
Construct Examples
Though I have been asked how a person or company
should structure a building with respect to Constructs, I never feel that the
question really should be posed to me. As with the structure of 2D
AutoCAD files each office has to consider the goal (such as CD's) and
evaluate the most appropriate process to achieve it. Ultimately I feel
that the more you break a building into individual Constructs, within
reason, the better. This is analogous to the use of Layers and in many
respects I see Xref's (Constructs, Elements and so on) as Layers for 3D
Objects.
Illustrated to the right I show an example of a
multi-story building with some of the primary Constructs that I used to
assemble it. Within each of the primary Constructs I also employed
other Constructs for things like Structure and Stairs. |
 |
|
5Project
Navigator -
Views |
5-2.5 PROJECTS |
|
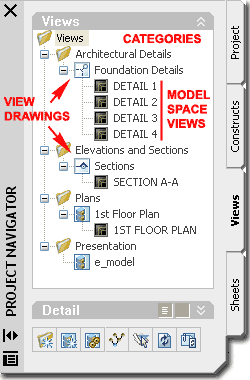
Project Navigator - Views Tab - Overview
On the
Views Tab of the
Project Navigator
you will find one Folder
that cannot be Renamed or Deleted. The View Folder is an actual folder
when viewed with Explorer.
 For
former AutoCAD users, View drawings may prove to be a bit perplexing because
they could easily be seen as the final destination for Constructs.
After all, View drawings were designed to be the recipients of one or more
Constructs where they are Dimensioned, Labeled and otherwise annotated with
things like Callouts and Titlemarks. Logic would suggest that you
configure a Paper Space Layout for a View drawing and stop there without
more forward passing of Xref files, but that's not the function they were
designed for. For
former AutoCAD users, View drawings may prove to be a bit perplexing because
they could easily be seen as the final destination for Constructs.
After all, View drawings were designed to be the recipients of one or more
Constructs where they are Dimensioned, Labeled and otherwise annotated with
things like Callouts and Titlemarks. Logic would suggest that you
configure a Paper Space Layout for a View drawing and stop there without
more forward passing of Xref files, but that's not the function they were
designed for.
I believe that
one of the best examples of how a View drawing can be employed as a highly
valuable asset is to look at a common set of four Elevations. To
produce Elevations in ADT you will need to pull most of your Construct files
together into one file ( the View drawing), where you use Callouts to
Generate the four Elevation Views. Once you Generate the four
Elevations, you also create Named Model Space Views set to a Scale, with a default
Display Configuration and a Layer Snapshot. Each Elevation becomes a
Named Model Space View and is listed below the View Drawing with a unique
Named Model Space View
icon. These icons can be dragged directly to Paper Space Layouts under
the Sheets tab of the Project Navigator allowing you to place one or more
per Sheet. Image having four or more Sheets for your Elevations while
being able to access them all in one View file.
For some, the example I just provided offers
little more than the clutter of an extra drawing file that exists somewhere
between the Construct files and the Sheet files. Users often complain
that they don't know where to edit something in this tangle of Xref's but I
believe this is just something that has to be resolved uniquely in
individual offices. As you may have discerned from my writing, I am
not a big supporter of rules set by programmers, especially when they don't
sit in my seat and do my work, but I highly recommend that you explore using
View drawings for the tasks that make sense. For other tasks, just
assemble your Sheet files as you see fit, but be sure to read over my
comments on how to work with Callouts and Titlemarks so you understand the
annotation-related consequences of doing things your way.
Illustrated
to the right I show the View tab of the Project Navigator and most of the
context menus that you can access from the Views pane. Many of the
options available on these menus are similar to those found under the
Constructs tab but the most important and most significant difference can be
found via the New View Dwg >
cascading menu:
General,
Section/Elevation
and
Detail. |

General View Drawing - this type
of drawing is meant for all of the drawings that don't fall into the
categorization of Section, Elevation or Detail. In reality you can use
this type of drawing for whatever you wish but I believe the primary purpose
for it was to configure Plans. This drawing type can be set to use a
unique Default Model View Template.
Section/Elevation View Drawing - this
type of drawing is obviously meant for Section cuts and Elevation
projections but can also serve as the source of detail callouts as they
relate to Sections and Elevations. This drawing type can be set to use a
unique Default Section/Elevation View Template.
Detail View Drawing - this type of
drawing is meant to correspond with the various default Detail Callout
symbols. Details can either be created in a Detail View or be the
result of work done in another drawing using a Callout symbol. This
drawing type can be set to use a unique Default Detail View Template. |
|
Views Tab - Add View
When you are ready to create a
General,
Section/Elevation
or
Detail View
drawing, the steps are basically all the same. From the Context menu,
Select
New View Dwg >
and cascade to one of the three
View Drawing Types. Each View
drawing
type will activate a matching Add ... View dialog but the only difference
between them is the word between "Add" and "View".
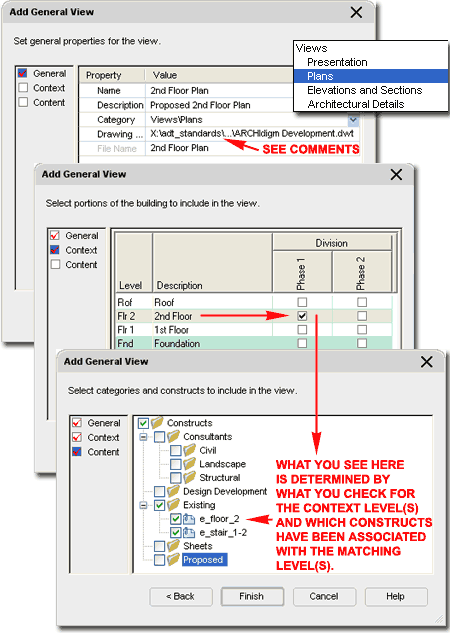
Illustrated
to the right I show the steps I have taken to create an example "2nd Floor"
View drawing using the Add General View dialog
boxes. By now you
should be familiar with the layout of the "General Properties" because they
are identical to those for Constructs. The Name you provide here will
also become the actual filename and the Category in which you store it will
be an actual sub-folder of the primary Views folder. You can specify a
unique Drawing Template but the Default Model View Template should suffice.
On the
second page of the Add General View dialog you specify which
Level(s) and
Division(s) you want to include in this View
drawing. This process is
actually a filter system to help you find Constructs that match your
criteria. This also reiterates the significance of
Assigning Levels
and Divisions to your Constructs.
On the third
page of the Add General View dialog box you get a chance to review the
results of your search criteria set on the second dialog box. In a
perfect world for example, if you specified that you only want the "2nd
Floor" Level" in one Division then all you should find as
Content are the Constructs that
have been Assigned to match this criteria. In the illustration to the
right I show that I found two items; one is the actual "2nd Floor" labeled
as "e_floor_2" but the second is a "Spanning Construct" of the stairs which
has been set to show up for "1st Floor" and "2nd Floor" requests (Contexts).
Now as far as I see things, it is not a perfect world and stuff will happen
so it would not be surprising to see multiple drawing files from Construct
Categories like "Existing", "Design Development" and "Proposed". If
you haven't used Divisions to filter them out, you will need to do so here.
Note:
As with Construct and Element files, you can create View drawings by using
the "Save Current Dwg As View
>" Context menu option.
You can also
Copy or
Cut Construct or Elements
and turn them into View drawings with the
Paste Context menu option.
You can even drag a drawing file from Explorer to a View Category and turn
it into a View drawing. The only |
problem with any of these alternate
approaches to creating View drawings is that they don't utilize any of the
default View templates and that could be a recipe for problems if your
office has taken the time to create highly customized templates.
Section/Elevation templates may contain configurations for custom
Display Properties and
Section/Elevation Styles that filter Colors to produce custom results. |
|
Views Tab - Add View - Other Options |
|
|
Views Tab -
Add Model Space View
Once you have
assembled a View Drawing
you will need to think about how this drawing will be used on one or more
sheets of paper. The most important task you need to perform at this
stage is to configure an actual "view" as it will appear on the paper
itself. For those familiar
 with
traditional AutoCAD techniques in drafting and presentation, you can think
of this work as defining a rectangle that represents the limits of your
Viewport
once it is placed in a
Paper Space Layout. The odd
thing about View Drawings is that they are typically not the Sheet Drawings
but merely a transit tool between the information you want to show and the
sheet you want to show it on. with
traditional AutoCAD techniques in drafting and presentation, you can think
of this work as defining a rectangle that represents the limits of your
Viewport
once it is placed in a
Paper Space Layout. The odd
thing about View Drawings is that they are typically not the Sheet Drawings
but merely a transit tool between the information you want to show and the
sheet you want to show it on.
To configure
or "define" a View in your View Drawing you can use the "New
Model Space View"
Context
menu option or you can take a
longer route by using the old AutoCAD "View" command. In either case
you must have the View Drawing Open and you must be in the
Model Space environment ( use
Model Tab ).
Illustrated
in the upper right corner I show the "Add Model Space View"
dialog where you
will need to Name your View, set a
Display Configuration,
Layer Snapshot and
Scale as you want to present the drawing in a Paper Space Layout. The
"Define View Window"
button must be used to create a rectangular frame
around the drawing information that you want to display in a Viewport that
will automatically be created in a future step (to be discussed under
Sheets).
Name
- when you specify the name for your "View" be sure to consider how you want
to label this drawing or drawing area because ADT's Annotation Symbols use
Fields to link to and report this name. On a common floor plan, for
example, a "Title Mark" can be used to report the name; saving you the
trouble of having to type it in later and automatically updating it if you
change it.
Description
- this is an optional field that you may never use. It does not appear
in the Detail view pane of the Project Navigator nor anywhere else I looked.
Display Configuration
- this value field uses a drop-down list to access any and all off the
current drawing's Display Configurations. What you set here will be
the default for the Paper Space Viewport once you drag this Named Model
Space View into
a Sheet file. If required, it can be changed in the Sheet file so this
setting is not entirely permanent.
Layer Snapshot
- this value field uses a drop-down list to access any of the Layer
Snapshots you may have in the current drawing file. As the name
implies, these can be used to control how you want the Layers to be set when
the Named Model Space View is dragged in to a Sheet file. See
Part 2 - Layers
-
Layer Manager - Snapshots
for more on Snapshots.
|

Scale
- this value field use a drop-down list to access the standard Viewport
Scale list. The scale you set here will be the default Paper Space
Layout Viewport Scale for the current Named Model Space View when dragged in to a Sheet
file. Be aware that despite the fact that you can change this value at
any time in the View drawing, the change is not passed on to the Sheet file
unless you Delete the old Named Model Space View and drag the changed one over to the
Sheet file.
Illustrated above I show the View dialog in
order to communicate a portion of what ADT's "Add Model Space View"
dialog
is actually doing for you. If you compare the two dialog boxes you
will see that the View dialog does not offer options for Display
Configurations and Scales which are rather important when working with ADT
drawings. For me, the Scale option is the most significant difference
because that information is read by most of the "Title Mark" Symbols and
needs to be set with the View in order to work properly. If you are a
fairly savvy user, however, you can use the View dialog and then return to
the Project Navigator to make Property changes on the Views with the "Modify
Model Space View" dialog. |
|
6Project
Navigator - Sheets |
6-2.5 PROJECTS |
Project Navigator - Sheets Tab - Overview
| Links |
Sheets Tab - Rename
and Renumber Sheet - to learn how to rename Sheets and Sheet Files. |
| Mouse |
When Opening Existing Sheet Files: double-pick on a Sheet File icon
to Open, double-pick on a Sheet File Name to Open and activate the Rename
and Renumber dialog. |
On the
Views Tab of the
Project Navigator
you will find one Folder
that cannot be Renamed or Deleted. This folder, named "Sheets", and its
contents can be presented in a "Sheet Set View"
or in a more traditional "Explorer View"
by picking on the corresponding buttons at the top of this pane - see right.
In the default Sheet Set View, the Sheets folder icon is not visible but it
is replaced by a main Sheet Set icon that usually displays the Project Name.
For most work you will want to view the contents of your Sheets in the
Sheet Set View because of the superior organizational features and file
information that is not available under the Explorer View. The
primary purpose for the Explorer View is to allow you to see and work with your Sheet
Files as actual files in Explorer. It is very important to recognize
this option and the distinction between the two views. The
Sheet Set View displays Paper Space Layouts
that may or may not belong to different drawing files (to avoid confusion
they really should belong to separate files). The
Explorer View displays drawing files
and their Paper Space Layouts. See
Sheets Tab - Subsets and
Categories for more on this subject.
Under the Sheet
Set View you can create Sheet Set Subsets
which are similar to the Categories you create on the Views and Constructs
tabs with the exception that no physical folders are created; i.e., these
are groups or "subsets". Within the primary Sheet Set or any Subsets
you can create New Sheets that will serve as "print-ready" documents
employing one and only one
Paper Space Layout. New Sheets should be
created from a default Template File that contains all of the information
required to make the drawing ready for printing with the exception of the
project files; i.e., the file should include a Layout configured to Print, a Titleblock and any other data typically associated with your finished
sheets.
To complete a
Sheet, you work with the Views tab (or in some cases the Constructs tab) of
the Project Navigator and drag over
Named Model Space Views that have already been configured
to produce a Paper Space (or Layout) Viewport at a specific Viewport Scale
using a specific Display Configuration.
Once several Sheets have been assembled, you
will find that there are numerous tools for managing your Sheet Sets;
including Renaming, Renumbering, Saving Selection Sets and Publishing
(Printing).
Collapse - this option should be
self-explanatory for subsets but try it on the main Sheet Set icon.
Because this icon offers no indication that it can be expanded some users
might mistake this for an incomplete Sheet Set. To Expand, you
have to right-click and Select the Expand Context menu option.
Insert Sheet List - this option is only available from the main
Sheet Set Context menu and will thus read your entire collection of Sheet
files; including those in subsets. To me this is so serious a design
flaw that I find that I cannot use the Sheet List tool. We need to be
able to filter out subsets. Assuming you don't have the same problems
with this tool that I have, you will find that it produces a customizable
Table with Fields that you can set to report on "Sheet" or
"Drawing" Properties (including custom Properties). The
default Sheet Set List produces a column of Sheet Number and a column
of Sheet Titles with a default Table Header.
New > Subset - this
option should not be confused with folders. When you add a Subset you
are simply adding a group for Sheets. However, you can add a Category
which is a folder and then set the Subset to place Sheet files in that
folder. See Sheets Tab
- Subsets and Categories for more information.
New > Sheet
- this option activates the New Sheet dialog where you can specify a Sheet
Number, Sheet Title and actual filename. The Properties of the parent
Sheet Subset determine the Path and Location for the Sheet file. Sheet
added through this option will utilize a template file which is highly
desirable for sheet files considering that they have Titleblocks.
Import Layout as Sheet... - this option
activates the Import Layouts as Sheets dialog which offers a Browse for
files tool and a "Select Layouts..." pane where you can pick one or more
Paper Space Layouts to import as Sheet files. Using this approach
makes it rather easy for users to create multiple Sheets that point to one
Sheet file and that could be a potential for disaster. This is not to
say that there is anything particularly wrong about having two or more
Sheets point to one Sheet file but hopefully you can see that it could be
problematic given how this system was designed.
Import Current Layout as Sheet... - this
option reads the active Paper Space Layout tab of the current drawing file
and imports as a Sheet under the current Sheet Subset. This option has
the same potential for problems as the previous option. In addition,
both options allow users to create Sheets from files anywhere on the local
drive or network environment and though there are times this might be
incredibly useful, I believe that most of the time this is another recipe
for disaster.
Refresh Sheet Set - this option updates
the Sheet List and should be used after making changes to Sheets or when you
believe others have made changes. On some networks that suffer from
occasional slowdowns, I have found that if you don't Refresh, you can
actually work on "ghosts" of Sheets and create such a terrible mess that the
Sheet Set (.dst) file becomes corrupted and unusable. |
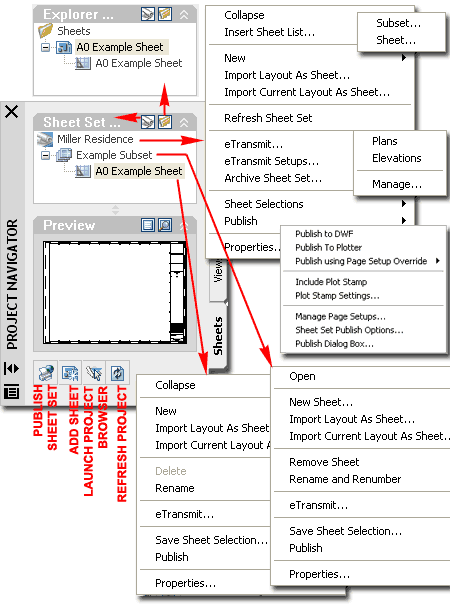
eTransmit... -
this option is similar to the the eTransmit command that you can activate
manually in any drawing file but offers a unique "Sheets" tab
in addition to the "Files Tree" and "Files Table" tabs. When using
this Context menu option (don't type the command) under
the Sheets tab of the Project Navigator, you can activate it for the entire
Sheet Set, Subsets, Saved Selections or individual Sheets. You can
even activate it under the Explorer View. Sheet based transmittals
typically generate the largest collection of Project information due to the
number of files associated with Sheets; such as Constructs, Elements and
Views. This is the reason you will find that using the eTransmit
Context menu option from the Project Browser uses Sheet Sets by default.
See eTransmit under the Project Browser section for
more on this topic.
eTransmit Setups... - this option
activates the "Transmittal Setups" dialog where you can create New,
Rename, Modify or Delete existing Setups. The
"Modify Transmittal Setup" dialog offers options for how you want to process
your collected files in the transmittal; location of files, as a .zip and in
what version of .dwg, for example.
See eTransmit under the Project Browser section for
more on this topic.
Archive Sheet Set...
- this option is almost identical to eTransmit but without options for
e-mailing. You can also Archive an entire Sheet Set from the Project
Browser. See Archive under the Project Browser section for
more on this topic.
Sheet Selections > - this option will
only offer the "Manage..." cascading menu option if no Sheet Selections have
been Saved (See Save Sheet Selections, below). When Sheet Selections
have been Saved, the Names appear on this cascading menu and Selecting one
will highlight the list. The Sheet Selections dialog simply
offers two option: "Rename" and "Delete".
Publish > - this
option is one of the main reasons Sheet Sets exist and is such an extensive
subject that I will defer information on it to another section in this
chapter.
Properties... - this option accesses
different dialog boxes depending on the set you have activated it from.
The Properties for the main Sheet Set
offers a large dialog box with options that should be similar to those for
the whole Project including a Sheet Set Name, Custom Properties, Template
files and so on. The
Properties for Sheet Subsets offers a small dialog box with the options
for Name, Location for Sheet files and default Template.
Remove Sheet - this option is
incredibly misleading and frustrating. Removing a Sheet is not the
same thing as Deleting a file and thus when you Remove a Sheet all you do is
remove the listing of a Paper Space Layout tab in some drawing file.
This means that if you also wish to Delete the Sheet file, you will need to
switch to the Explorer View where you can use the Delete option on the
Context menu. I think it would have been much better if a dialog
appeared with the option to "Delete Sheet" or "Delete Sheet and File".
Yea, and lets add a checkbox for "Don't ask this question again".
Rename and Renumber -
this option is rather useful because it provides a Next > button
to help you sequence the Renumbering and Renaming of Sheets.
Save Sheet Selection - this option should
be used after Selecting two or more Sheets. Once you have Named your
Selection, you can retrieve it via the Sheet Selection > cascading menu
found via the main Sheet Set icon. When a Sheet Selection is
highlighted for you, you can right-click over any of the Sheets to invoke a
short context menu whose primary option is the Publish > cascading menu;
i.e., the main reason for Sheet Set Selections is to Publish.
Note:
Notice that there is no option for Cut/Copy and Paste which also means that
you cannot drag-n-drop with the Ctrl key depressed and expect to create a
Copy of a Sheet File. If you must make an exact Copy for another
sub-set/Category try this: Open the Sheet File, Rename the Layout Tab,
Save As with a unique Name and then use the "Import Current Layout As
Sheet..." Context menu option. |
|
Sheets Tab - Subsets and Categories
As stated
above, it is very important that you understand the difference between the
Sheet Set View
and the Explorer View
of the Sheets tab in the Project Navigator. Under the Sheet Set View
all you really see is a collection of Layouts that may or may not belong to
a set of drawing files that reside in one location. Subsets offer a
practical solution for organizing Layouts but they are not folders - I fear
that
many will see them as folders, however.
 It has been
my experience in most offices and it continues to be the standard in my
office that print-ready drawing files (sheets, if you prefer) are always
stored in individual folders that match specific functions. Early on
in a job cycle, for example, we may assemble a set of drawings for client
and/or contractor review/bid and all of these files will be saved in a
unique folder with a name such as "Review Plots - 01-16-05". As a job
evolves, these files are simply part of the project history and it is
unlikely that they will be used again. It has been
my experience in most offices and it continues to be the standard in my
office that print-ready drawing files (sheets, if you prefer) are always
stored in individual folders that match specific functions. Early on
in a job cycle, for example, we may assemble a set of drawings for client
and/or contractor review/bid and all of these files will be saved in a
unique folder with a name such as "Review Plots - 01-16-05". As a job
evolves, these files are simply part of the project history and it is
unlikely that they will be used again.
By switching
to the Explorer View,
you will find that you can create "Categories"
which are actually Folders.
In this "view" you can actually Move files around and re-organize them by
folders. Under the Sheet Set View, however, you will not see any
folders and though you may have Moved files into folders under the Explorer
View, their original Subset organization will not be affected (because
subsets are just "groups").
|
 To make a
Subset function as an
actual Folder,
you can change its Properties
so that the "Store new sheet DWG files in"
field points to an actual folder created under the Explorer View. The
result of this setting means that when a user creates a New Sheet under the
current Subset, the drawing file will actually be stored in a unique folder
which is a sub-folder of the main Sheets folder. |
|
Sheets Tab - Add Sheet
Though you can
create or Add New Sheets to a Project by Importing from another drawing file
or Importing from the current drawing file, I recommend that you employ the
New Sheet dialog
for best results.
On the New
Sheet dialog, illustrated to the right, you can set a Sheet Number, a
Sheet Title and specify the actual
File Name that you want for the drawing.
You do not have to provide both a Number and a Title but you will need to
provide one of them. You can specify whatever you wish for the Number
and Title but to take advantage of numerous default Annotation Symbols in ADT, it is best to see these value fields as sources of information that you
want reported in one or more places.
Illustrated
to the right I show that on my custom Titleblock I have employed
Fields to automatically
report the
Sheet Number,
Sheet Title and even the File Name.
You will find similar examples in the default template files that come with ADT.
See Project Details - Captured in a Field
for an example of how Fields can be set to report this type of information.
|
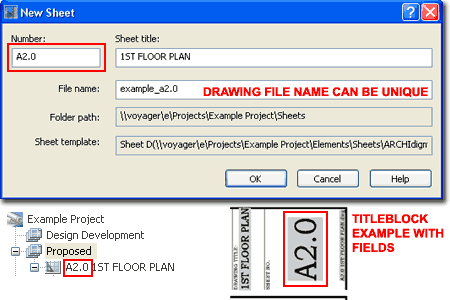 Note:
By default, the New Sheet dialog box will create a File Name by combining
the Sheet Number with the Sheet Title. In my office and in most
offices that I have worked in, special file name rules have been designed
for better file management and you may need to remind yourself to type in an
appropriate File Name. Should you forget, as I do all of the time, you
can use the Explorer View (not the Sheet Set View) to rename the actual
File. Do not attempt to do this with Explorer outside the Project
Navigator. |
|
Sheets Tab -
Importing Sheets
To Import drawing files
as Sheet Files you can use the Import Context menu options under the Sheet
Set View of the Sheets tab in the Project Navigator - see Overview
discussion above. The Import Layout as Sheet... and Import Current
Layout as Sheet... Context menu options may prove to be a bit to tedious so
you may want to use a drag-n-drop method.
Illustrated
to the right I show how you can Import drawing files as Sheet Files using
Explorer. In order to be able to drag drawing files from Explorer, you
will need to set the Sheets tab to the Explorer View.
You can drag one or more files in one act but for each file you will find
that the "Add Sheet" dialog pops up providing you with the option to Name
(or Rename) the Sheet, add a Description and Categorize it.
Once a
drawing file has been Imported, you should find that the first Layout from
that drawing will be listed as a Sheet. When you use this method you
you cannot choose which Layout to use or how many of them to use.
Under the Sheet Set View you may find that you will need to organize your
Imported files and/or Rename them. |
 |
|
Sheets Tab - Add Sheet View
In basic terms
a Sheet is simply
a Paper Space Layout a drawing file (typically referred to as the Sheet
file). This Layout should be configured for Printing to an appropriate
device and contain a Titleblock that may or
may not need to be filled in with data. To bring the actual drawing
information into the Sheet, you need to Open the Sheet file and then
drag-n-drop
Named Model Space Views (from the Views
tab of the Project Navigator) right onto the Sheet's Layout. Though you
can successfully drag-n-drop a View file to a Sheet, it is best to use
actual Named Model Space Views because they contain data that will save time; data like Viewport Size, Viewport Scale and Display Configuration.
 Illustrated
to the right I show that I have my new Sheet file Open and that I have
dragged a Named Model Space View ("Proposed 1st Floor Plan") from my "1st Floor Plan" View
file to it. As you take this action, you should feel a slight lag in
the cursor as the file is brought in and then you should see the whole Viewport frame and its contents much like a Block. When you place this
Named Model Space View in the Paper Space (Layout) environment you should find that you get
a Viewport with Model Space content. Illustrated
to the right I show that I have my new Sheet file Open and that I have
dragged a Named Model Space View ("Proposed 1st Floor Plan") from my "1st Floor Plan" View
file to it. As you take this action, you should feel a slight lag in
the cursor as the file is brought in and then you should see the whole Viewport frame and its contents much like a Block. When you place this
Named Model Space View in the Paper Space (Layout) environment you should find that you get
a Viewport with Model Space content.
For all of the intriguing drag-n-drop work, all
you are doing here is what most AutoCAD users have been doing for years now.
You Xref-Attach a drawing file into Model Space and create a Viewport in
Paper Space to see it.
Illustrated in the lower right and to the left I
show that once you have dragged in a Named Model Space View, it is automatically Numbered and
Labeled. In the "Sheet Set View" pane of the Project Navigator you will
now see the Named Model Space View as a "Sheet View" where you can employ the "Rename
and Renumber" Context menu option to affect things like
Title Marks. |
 |
Sheets Tab - Insert Sheet List
| Mouse |
Highlight
main Sheet Set icon, right-click and Select Insert Sheet List... |
Once you
have created your Cover Sheet or Cover Page for your Project, you can use
the Insert Sheet List
tool to create a Drawing Index. This Sheet List uses an AutoCAD Table
Style with a list of predetermined Fields that can report data from the
Sheet Set; such as Sheet Number, Sheet Title and even Drawing Total Editing
Time.
 To
Insert a Sheet List Table you must have a Sheet File Open and you must
Insert the Table in a Paper Space Layout.
Though you can get a Sheet List Table to insert in Model Space, it will not
offer options for Updating. The Table will automatically report on all
of the Sheets in the main Sheet Set and there are no options for Selecting
or Limiting this report. For me, the fact that I cannot control what
Sheets are listed in the Sheet List Table almost makes this feature
pointless. Though you can Delete Rows to remove unwanted Sheet
Listings, they will reappear whenever you use the Update
Sheet List Table Context menu
option. The order of the list is determined by the order of the Sheets
and you can drag-n-drop the Sheet Files in the Project Navigator to change
the Table. To
Insert a Sheet List Table you must have a Sheet File Open and you must
Insert the Table in a Paper Space Layout.
Though you can get a Sheet List Table to insert in Model Space, it will not
offer options for Updating. The Table will automatically report on all
of the Sheets in the main Sheet Set and there are no options for Selecting
or Limiting this report. For me, the fact that I cannot control what
Sheets are listed in the Sheet List Table almost makes this feature
pointless. Though you can Delete Rows to remove unwanted Sheet
Listings, they will reappear whenever you use the Update
Sheet List Table Context menu
option. The order of the list is determined by the order of the Sheets
and you can drag-n-drop the Sheet Files in the Project Navigator to change
the Table.
Note:
To add your own fields under the Data type list on the Insert Sheet List
Table, see Sheet Set Properties - Custom Properties. |
 |
Sheets Tab - Rename and
Renumber Sheet
| Mouse |
Highlight
a Sheet File, right-click and Select Rename and Renumber |
Should you find that you need to Renumber
and/or Rename one or more Sheets in any Sheet Set (or Subset),
Select the Sheet, right-click and Select the
Rename and Renumber Context menu option. If you
Select the top Sheet in a Set, you can use the Next> button on
the Rename & Renumber Sheet dialog to run through every Sheet in a Set.
To Rename a Sheet's actual
File Name, switch the Sheet Set View to Explorer View where you
can pick twice on any filename or use the Rename option on the Context menu.
Be sure to note that most Sheet Files will be displayed with their Layouts. |
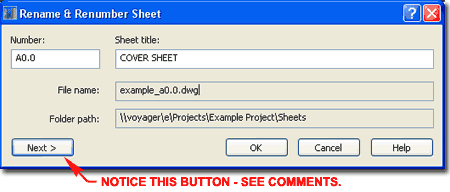 |
| |
|
|
7Project
Navigator -
Annotation |
7-2.5 PROJECTS |
|
Project Files and Annotation - Overview
One of the most significant questions that many
wonder about when taking their first run through ADT's "Drawing Management System", is
where to place annotation such as Labels, Dimensions, Tags and Notes.
If you haven't already figured out where the makers of this tool think you
should place your annotation then I will spell it out: in View
drawing files.
Though this may be the intent, you are not restricted to working that way
and you should feel free to place your your annotation in any of the files
within the Project Navigator as long as you are willing to deal with some of
the consequences.
|
Of all the various types of
annotation, it is the ones that employ Fields that you have to be concerned
about. Standard AutoCAD or Aec Dimensions, for example, could be
placed in Constructs, Views or Sheet files because they relate directly to
Objects. Section bubbles, Elevation symbols, Titlemarks and Detail
Callouts, on the other hand, do not derive their values from the Objects but
from associations between Named Model Space Views and Sheets. If you
don't utilize the system that has been designed into the Project Navigator
for working with the value Fields in these "Callouts", you may find that you
will need to fill in the Attributes manually. |
Views, Title Marks
and Sheets
| Menu |
N.A. |
 |
Callouts tab |
| Keyboard |
N.A. |
| Browser |
Load from
Documentation Tool Catalog, Callouts |
| Links |
Part 17 -
Documentation - for
more information Title Marks and other Callouts. |
Architectural Desktop's default Title Marks have
been designed for optimum performance when used with Named Model Space Views and Sheets.
These Named Model Space Views, even in plain AutoCAD,
provide a Name but under the Views Tab of the Project Navigator they also
provide a Viewport Scale, Display Configuration and Layer Snapshot.
Illustrated to the right I show that I have a
View drawing open with an example of a " Proposed 1st Floor Plan" and in
this View drawing I have already created one
Named Model Space View for how
I expect to present this plan on a Sheet. Though I cannot see the
Named Model Space View, it will highlight on my screen when I drag in one of the
default
Title Marks. This highlighting effect only occurs if you actually
have a Named Model Space View, you are in Model Space and your current screen
display is near the Model Space View Boundary. When you move your
cursor inside this Boundary, you should notice a red outline as illustrated
to the right. When you move your cursor outside the Boundary, you
should still see it but in a black color.
If you place your Title Mark while
the Named Model Space View is highlighted in red, the Title Mark
will automatically be associated with the data stored in the Properties of
the View. Should you accidentally or deliberately place the Title Mark
outside of the Boundary, you can still force the Fields to fill in as they
should - use the drag-n-drop solution discussed in the section below.
In the second phase of my example, illustrated
to the lower right, I show that I have Opened a Sheet File. I
also show that I have completed the task of dragging the Named Model Space View,
discussed above, over to this Sheet file creating a Sheet View. When I
dragged the Named Model Space View to the Sheet file, the Project Navigator
automatically assigned a Number to the Sheet View and this number is
reported in the example Title Mark. The really fascinating aspect of
this result is that the Field actually resides back in the View drawing and
if you return to that file, you will find the number there as well (where
the "?" used to be). |
 |
Title Marks, Sheets and Views
| Links |
Callout Marks
and Fields - to learn about how the Fields within these Marks actually
do what they do. This is really good information if you find that
the drag-n-drop solution fails to make the associations because you can
do it manually by working with the Fields. |
In some cases you may prefer to place your
Title Marks directly on the Sheet files instead of in View files. I
actually prefer this option because I place my Titles in Paper Space so I
don't have to think about their position relative to Viewports and drawing
linework.
In the illustration to the right I show that
I have Opened a Sheet File where I have already dragged in a
Named Model Space View but without any Title Marks. In the first
example, illustrated to the upper right, I show that I am in the process of
placing a Title Mark directly in Paper Space over or
outside the Viewport. As with the example discussed above,
this action highlights the Sheet View allowing me to associate the
Title Mark with the Properties of the Xref'd View. Notice that when I
placed this Title Mark, I was able to acquire the Name of the Sheet
View (typically the same as the Model Space View Name) but the View
Number and the Viewport Scale Fields remain "raw" and
disconnected from the data they need.
In the second illustration, lower right, I
show a similar set of steps but wanted to show how a Title Mark behaves when
you place it inside a Paper Space Viewport or directly in
Model Space. In this case, no Sheet View highlighting occurs and no
automatic associations so the Title Mark is completely "raw".
The amazingly simple solution:
In both examples illustrated to the
right, the Fields of the Title Marks remain disconnected from the Named Model
Space Views they are supposed to link to. To fix this problem, all you
have to do is make the association for the Fields and they will report what
you expect to see. To do this, Select the whole Title Mark,
carefully reselect the Selection Set with the left mouse button,
hold this button depressed and drag the entire Selection Set
right over on top of the matching Named Model Space View. When
you release the Selection Set on top of the Model Space View you should find
that the entire Title Mark fills in as illustrated in the lower right.
Now that you know this trick, keep it in mind
when working with other Annotation Symbols and whenever crazy question marks
appear where they didn't before. When Fields get disconnected they
typically report a question mark "?". |
 |
|
Callouts |
|
|
Labels, Tags and Dimensions |
|
|
Schedules |
|
|
8Project
Defaults, Templates and Configurations |
8-2.5 PROJECTS |
|
Projects and Templates - Overview
By the time you have come to this section of my writing on Architectural
Desktop's "Drawing Management System", you should have enough
experience with both the Project Browser and the Project Navigator
to realize the importance of template files. If you are jumping
straight to this subject, planning to get everything perfect before you start
your first Project, I suggest you do some playing/experimenting first.
In the sections above I used a Project that I named "Example Project" hoping
to inspire you to create a prototype as well. In this section I will
elaborate on how to improve your "Example Project" and ultimately turn it
into a complete "Project Template" that you can employ to create New
Projects. My definition of a "Project Template" is different from
the default template settings for a Project (to be discussed below) because
what I am referring to is a way to copy a complete project structure using
the "Copy
Project Structure..." context menu option as illustrated to the right.
In the discussion below I will go through the default template settings
for a Project and then return to the subject of Copying a full Project
Structure. I will start by discussing the AEC Project Defaults tab of
the Options dialog where you can define most of the default settings for
your Projects. After reviewing the options available for "default
settings", I will elaborate on the variety of Drawing Templates and Data
based Templates. It has been my experience that you will inevitably
return to subject matter like this and refine both your knowledge and what
you want to achieve with it so don't feel overwhelmed by the desire to get
everything perfect the first time; all of these settings can be refined over
time.
|
 |
AEC Project Defaults
| Menu |
Tools> Options...
("AEC Project Defaults" Tab) |
| |
|
| Keyboard |
Options (OP) |
| Links |
|
Once you are ready to fully implement Architectural
Desktop's "Drawing
Management System" you will need to use the Options dialog box to access the
"AEC Project Defaults" tab where you can specify default Project Paths,
Project Template Files, a "home-page" for the Project Browser and a graphic
image for your projects.
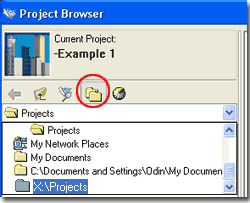 AEC
Project Location Search Path - by using the Add... and
Browse... buttons you can add specific folders to this search path which
is similar to the search path options found under the Files tab of
the Options dialog. Though I have read documentation on ADT
that claims this search path is important, I have not found any evidence to
support that claim. Illustrated to the right I show that I have added
a new path to a mapped drive on my server where I created a folder called
"Projects". Illustrated to the left I show how this path
becomes easier to find within the Project Browser using the Folders
drop-down list. I also show the default path that was created when I
installed ADT and this is a path I should use the Remove button for because
it is the last place I will ever place my drawing files (" ...\Autodesk\My
Projects"). AEC
Project Location Search Path - by using the Add... and
Browse... buttons you can add specific folders to this search path which
is similar to the search path options found under the Files tab of
the Options dialog. Though I have read documentation on ADT
that claims this search path is important, I have not found any evidence to
support that claim. Illustrated to the right I show that I have added
a new path to a mapped drive on my server where I created a folder called
"Projects". Illustrated to the left I show how this path
becomes easier to find within the Project Browser using the Folders
drop-down list. I also show the default path that was created when I
installed ADT and this is a path I should use the Remove button for because
it is the last place I will ever place my drawing files (" ...\Autodesk\My
Projects").
Default Project Template Files - this
section is not only the largest but the most important and I will need to
cover this subject in greater detail below. This is where you specify
the template drawing files to be used inside the Project Navigator when you
create new Constructs, Elements and Views. In addition to
these drawing files you have the option to specify two default data files
that are used for Sheet Sets and
Project Details ( information like client
name, address, etc.). When you get to the subject of Sheet Sets, you will
find that there are other template files to work with just for print-ready
sheet drawing files.
Default Project Bulletin Board - by
using the Browse... button you can specify a custom .htm or
.html file for the Project Browser's window pane. Things like this
are "cute" to me but not really worth a lot of speculation. The idea
behind this feature is that managers can utilize web technology to
communicate with users about the project and that certainly has its merits.
See Default Project Bulletin Board and
Project Image for more on this subject. |

Default Project Image - by using the
Browse... button you can specify your own custom default project image
in .bmp format. This image appears in the Project Header of the
Project Browser and is even more "cute" than the option above. If you
wish to create your own image, use a 64x64 pixel ratio in .bmp format.
Show Project Browser at startup - check
this box if you want to remind yourself or your user base that the Project
Browser is a tool that must be a part of Project work now. If you
check this box you will find that it is similar to having the old "Today"
Window appear in earlier releases of AutoCAD; most hated it so much that it
finally disappeared. I don't think it is really necessary to have the
Project Browser appear at startup when it is rather easy to activate from
the Project Navigator or File pull-down menu.
Sheet Set Template - Create button
- selecting this button is the same thing as using the "NewSheetSet"
command or activating this Wizard from the Tools pull-down menu. In
structure, Sheet Sets are little more than a list of groups called
Subsets that may or may not refer to actual Folders (also known as
Categories), but the templates also include a list of
Properties. To learn more about this subject be sure to read up on the
Sheet Set Wizard and review the the bigger
story under Project Navigator - Sheets. |
|
Default Project Template Files - Drawing Based
As anyone who has ever created their own drawing
template file knows, the work can be daunting and endless; you can input too
much, too little or the wrong settings and there are always opportunities
for improvements. I say this because you may feel overwhelmed by the
fact that there are six unique drawing template file options on the AEC
Project Defaults tab.
If you explore the default configuration
offered by Autodesk, you will find that they kept it pretty simple by using
one drawing template file for all of the drawing/modeling files and one for
the Sheet files. I think this is a great place to start and you
may wish to adopt the same system.
CAUTION!
If your ADT knowledge is
fairly limited, particularly with respect to drawing file settings
for Display and Layer data, you are better off using one template as
the source for all of the others. In other words, get one
right and if you want unique ones, Copy it and Rename it. This
will ensure that you pass on things like Display and Layer settings
which are not passed forward with Xref's. The reason for this
caution is that a person could easily use a Construct template file
that produces perfect Display results but find that those results
cannot be reproduced in the final Sheet file. There is the
option to employ the Xref Display Override but that locks you to one
Display. Keep this information in mind as you make
improvements because one template can get ahead of others if you are
not careful. |
CONSTRUCT TEMPLATES:
Default Construct Template - this template file will be used for the
majority of your modeling (drawing) files that represent the primary
components of you buildings; everything from Floor Layouts to Roofs and
Stairs. I like to think of these files as the ones AutoCAD users have
been drawing for years and years now. The information you will need to
put into the template file for this type of work will obviously vary
dramatically from office to office but the one thing you should definitely
not but into this file is sheet-related information like Titleblocks and so
forth. This file is meant for use as a model file and as such needs
very little. You will need to set your Layer Standard, Layer Key and Display
Configurations. The default "Aec Model (Imperial Ctb).dwt", "Aec Model
(Imperial Stb).dwt", "Aec Model (Metric Ctb).dwt" and "Aec Model (Metric
Stb).dwt" template files can be a good place to start your own template
creations.
For Spanning Constructs, like Stairs, you may
want to create a separate Construct template that users will need to select
when creating these unique Construct types. For these Construct types
you are likely to want custom Display settings such as
Up-Down Display Configurations to make Stairs display properly on different
floors.
Also, if you find that you often print early schematic design
work like I do so I can scribble all over it with markers, I like to add a
Print-ready Layout.
Default Element Template - this
template file will be used primarily for self-contained components (to be
used like
Blocks) of your primary Construct files; things like work-stations,
conference room tables and chairs, trees, cars and so on.
The information you will need to put into this file may be exactly the same
as what you put into your Construct Template file (meaning, you could use
the same file) or it may contain less information. I am currently
using my Construct template for both just because it is easier to manage and
I find no detrimental results from doing this. It would be worse to
have a template file that introduces more unwanted data, like odd Layers and
so forth.
|
VIEW TEMPLATES:
Under the View Templates Category you will find that there are currently
three types that may expand in a future release or we may be able to define
our own (who knows). So far, however, I have yet to find any
significant value to these categorizations other than the fact that you can
use different template files and that they do use different icons on the
Views tab of the Project Navigator. Callout symbols, for example, don't care
if you use a Detail View for an Elevation.
Default Model View Template - this
template file should actually be renamed to match the title you will see on
the Project Navigator's context menu: "General...". The term "General"
probably explains what this template is supposed to be used for better; it
is simply for View files that are not Section, Elevation or Detail types.
You will probably find that this will be the template you will be using for all of
your Plan files ( Foundation Plan, 1st Floor Plan, Roof Plan, etc.).
If you follow the guidelines set by Autodesk you will use this file to do
everything that will make the work in one of these files ready for
presentation on a sheet of paper; including labels, dimensions, leaders,
callouts and so forth. As such, you will probably want to load the
template file with your standard annotation settings like Text Styles,
Dimension Styles and so forth. If you always use the same size paper
and viewport, you may also want to add a rectangle in Model Space that
defines the actual limits set by the final sheet file.
Default Section/Elevation View Template -
this template file is obviously meant for Sections and Elevations which
are actually the same thing if you think about it for a second. If you
want to take advantage of this template offering, you may want to load it
with your standard Callouts for Sections and/or Elevations. If you are
up on your Section and Elevation tools, they can be set to produce unique
results using options like Color Filtering and Subdivisions.
Default Detail View Template -
this template file is obviously meant for Details but you can easily broaden
the definition as far as you need to. If you are an old AutoCAD user
like me you will probably find this whole concept a bit irritating but
perhaps you can find compromises that provide new opportunities. The
main thing you need to know is that Sheet files only display Named Model
Space Views in
Paper Space while View files only display Named Model Space View in
Model Space.
The Named Model Space View is the key to managing the Fields that hold the data like
Sheet Number and Detail Number. A detail created in the model space
view of a View file using a View Name can be dragged to a Sheet file's paper
space. If you wanted to circumvent this "automation" you would need to Xref your Details to the Paper Space of a Sheet
file and then create
Named Model Space Views for each one. If you follow the guidelines set by Autodesk you
might want to add a standard detail grid to your template as you would
expect to show your collection of details on a sheet of paper. You
could even predefine Named Model Space Views for each grid with numbers and labels.
Default Sheet Set Template -
this template file is actually not found on the "AEC Project Defaults" tab
though you might be mislead by the "Default Sheet Set Template"
option. You will need to create an actual
Sheet Creation Template file with one
Paper Space Layout configured for printing with a Titleblock and so on.
This template file will be set on the Sheet Set Properties dialog and stored
in a separate Sheet Set data file with a ".dst" extension. In other
words, you will need to create a Sheet Set Template in which you set your
Sheet Creation Template and then you can assign the Sheet Set Template under the
"AEC
Project Defaults" tab. That might sound crazy but that's because
AutoCAD has Sheet Sets but not Projects. To read more about Sheet Sets
and templates, see discussion directly below and under
Sheet Sets.
|
|
Default Project Template Files - Data Based
- Sheet Set Template File
The two data based template files under the "AEC
Project Defaults" tab of the Options dialog do not use .dwg files as a source but unique files
types specifically designed for working with the Project Navigator.
 Sheet Set Template File - this
template file uses a .dst ( Drawing Sheet Template, I
think) format which is coded and illegible outside the Project Navigator and
Sheet Set Manager; i.e., you cannot open and edit it with other software.
Because Sheet Sets are also a feature in AutoCAD this file acts as an
independent component of Projects but one could easily get confused and see
it as part of the primary Project data file which handles everything else.
A Sheet Set Template File starts off with the basic structure of how you
want to organize your print-ready sheets ( in subsets and/or Categories) and
then may grow as a unique file under a Project. See discussion below
under Sheet Sets for more information on this subject. Sheet Set Template File - this
template file uses a .dst ( Drawing Sheet Template, I
think) format which is coded and illegible outside the Project Navigator and
Sheet Set Manager; i.e., you cannot open and edit it with other software.
Because Sheet Sets are also a feature in AutoCAD this file acts as an
independent component of Projects but one could easily get confused and see
it as part of the primary Project data file which handles everything else.
A Sheet Set Template File starts off with the basic structure of how you
want to organize your print-ready sheets ( in subsets and/or Categories) and
then may grow as a unique file under a Project. See discussion below
under Sheet Sets for more information on this subject.
The Sheet Set data file is similar to a the
Project data file but only for Sheets. If you think about the fact
that Sheets are all that AutoCAD users have, this makes a bit of sense.
Take a look at their Sheet Set Manager (type "SSM") if you are curious
enough.
|
 |
|
Default Project Template Files - Data Based - Project Details Template File
Project Details Template File - this
template file is actually a subset of the primary Project data file which uses a .apj (Aec ProJect,
I think) format but is written in XML code. I found this aspect rather
confusing because the idea of a template file suggests that you are
actually specifying a unique and individual file; but, in fact, all you are
doing here is specifying that you want to extract the user customizable
component of an existing Project data file. Personally, I would have
preferred that the customizable portion had been an independent XML.
This portion of the Project data file is reserved for customizable
Properties and Values that you can organize
 by Categories. This is
where you would create and store information like the project address,
client name, project manager and anything else you can see as relevant to a
Project. This information can then be extracted with Fields to
automate Cover Sheet data, Titleblock data and so on. by Categories. This is
where you would create and store information like the project address,
client name, project manager and anything else you can see as relevant to a
Project. This information can then be extracted with Fields to
automate Cover Sheet data, Titleblock data and so on.
Though it is fairly obvious how you specify a
source .apj file to be used as a template for your custom details, it may
not be so obvious how you create this file. As stated above it is
actually a component of a Project data file so you will either need to
create a Project just to define your Project Details or use a "Project
Template" that will also act as a source for everything else you need in your
Projects (I prefer the latter method).
|

Illustrated above I show where the Default
Project Details Template file is picked up on the Project Properties
dialog. At the time of creating a New Project, you can change this
value to another should you wish to but after a Project has already been
created, that is no longer possible. Project Details, are managed
through the Project Details dialog which is accessed by the Edit
button on the "Modify Project" dialog.
Illustrated to the left I show how you can use
Notepad or something a bit more appropriate, like Microsoft
XML Notepad (free download), to Open, Read and Edit the Project (.apj)
data file. In this file, for any Project, you will find a section for
the Project Details. |
|
Default Project Bulletin Board and
Project Image On the "AEC Project Defaults" tab
of the Options dialog you can specify a default Project Bulleting
Board (.htm or .html file) and default Project Image (.bmp file 64x64
pixels). At the time of creation or later you can use the Project
Properties dialog to specify another Bulleting Board file and/or Project
Image.
To be perfectly frank, neither of these two
options mean much to me because they don't do much while taking time to
create. You may find that you have a different opinion regarding these
two options.
If your experience with .html code is
limited, you can actually create these file types with Word and
Excel. Illustrated to the right I show an example of a standard
default Bulletin Board I created with Word. By using the Save As...
option in Word, you can set the "type" to "Web page (*.htm;
*.html)" and that's basically all you have to do. You can use
Word's Insert pull-down menu to add Hyperlinks that lead to
other .htm pages in your intranet or the whole internet. You can also
add Hyperlinks to other documents in any format that apply to the user's
machine; i.e., a Hyperlink to a CAD file in .dwg format will open that
drawing file their AutoCAD or Architectural Desktop.
Neither the Default Bulletin Board nor the
Default Project Image files are copied to New Project Folders and thus point
back to the default location. Though this may have its advantages,
overall I see this as a flaw. For CAD Managers who want to use one
Default Project Bulleting Board but allow for individual Bulletin Board
growth for each project, you can create a generic cover page with relative
path Hyperlinks to .htm pages that can be placed under individual Project
Folders later on - this will require manual work to create or copy those
files. |

The Project Image file can be created
with just about any graphics software program, including AutoCAD and ADT (
type "bmpout"), but using a program that allows you to set a 64x64
pixel ratio will produce the cleanest results. If time was not a
factor in our daily lives, these images help to distinguish one project from
another when viewed on the Project Browser but other than that, they do
absolutely nothing for you. If you want to change the default image to
something that is of greater interest to you, you can use any image in the
.bmp format regardless of the ratio but whatever you select will be squeezed
into a 64x64 pixel rectangle. |
|
Sheet
Creation Template file The
Sheet Creation Template file can probably be classified as the first or
second most important template file you have in your collection.
Because of the odd terminology in ADT you can easily confuse this file with
the Sheet Set Template File but the Sheet Creation Template file is actually
a component of the Sheet Set Template File; i.e. it is specified on the
Sheet Set Properties dialog rather than under the
"AEC Project Defaults" tab of
the Options dialog. This means that when you specify your
Default Sheet Set Template File you must consider what it points to for the
Sheet Creation Template file. One of
the first observations you may make when preparing to do all of the work
required to take advantage of this feature, is that you can only specify one
Sheet Creation Template. The problem is that most offices use more
than one Sheet Size and Print to a variety of Printing devices ranging
anywhere from 36x48 to 8.5x11 and thus need ready access to a list
of common Sheet Sizes. CAD Managers can use a Project Template, as discussed
below, to configure Sheet Categories that point to different default Sheet
Templates or set the Sheet Categories to "Prompt
for Template" as a means to assist with this limitation.
Some CAD Managers have already developed one
template file that offers one Paper Space Layout for each Sheet Size and
corresponding Titleblock. Illustrated to the right I show an example of
one Sheet Creation Template File with several Layouts configured for
different sheet sizes with different titleblocks, Fields, and so on.
When this type of template file is specified for the Sheet Set Template only
one of the numerous Layouts can be employed for the Sheet Creation default.
However, as illustrated below right, when a Project has been created you can
use the Sheet Set Properties to change the default Layout to any
offered in this Sheet Creation Template File.
You will find that you can also use the
Properties dialog for Sheet Sub-sets. This means that you can actually
have one Sheet sub-set using a different Layout from the same Sheet Creation
Template file as another. In my office we tend to do most work on
24x36 ("D") size sheets so that is our default but in those cases where
unusual paper sizes are needed, we simply change the default Layout, create
the Sheet and then set the default Layout back to the standard paper size. |
 |
|
9Sheet
Sets |
9-2.5 PROJECTS |
Sheet Set Wizard
| Alt.Menu |
Tools>
Wizards> New Sheet Set...
- if using the AutoCAD Tools pull-down menu |
| |
Create
button on AEC Project Defaults tab of Options dialog |
| Keyboard |
NewSheetSet |
| Links |
|
The Sheet Set Wizard, in my opinion, is
actually more of a tool for AutoCAD users than for Architectural Desktop
users. Though it can be used to solve interesting problems that I will
discuss below, I feel that its primary purpose is to migrate legacy files
into a Sheet Set format as illustrated to the right.
PAGE 1
Illustrated to the right I show the steps involved for using the Create
Sheet Set dialog pages to collect a legacy set of drawing file Layouts and
assemble them into a new Sheet Set (.dst) file. On this first page of
the Sheet Set Wizard I show that I have Selected the "Existing Drawings"
radio button and then used the Next> button to access the second page.
As you can see on this page, you can also choose to create one from "An
example sheet set" and I will discuss that approach in the next cell
below.
PAGE 2
Name of new Sheet Set - On the second page of this Wizard I show
that I have typed in a Name for my new Sheet Set. Be aware that the
Name you specify here is exactly what the ".dst" filename will be so in this
example the file will be named "Example Sheet Set.dst" when viewed with
Explorer.
Store sheet set data file (.dst) here
- You can actually store this (.dst) file anywhere on your system or Network
but I recommend you place in a logical location like the same folder where
your project files are being stored. When you create Projects with the
Project Browser, the .dst file is always placed in the root folder for the
Project.
Note:
If you are one of those clever CAD people trying to use this tool to fix a
bad .dst file in an existing Project, be aware that if the .dst filename is
already present in the designated location, this tool will not allow you to
overwrite it.
Sheet Set Properties - use this button
to access the Sheet Set Properties dialog which is the same dialog that you
can access on the Sheet tab of the Project Navigator. See comments
below under Sheet Set Properties for
more information.
PAGE 3
Browse... - use this button to access folders on your local system or
network. Be aware that when you Select a folder this tool will
automatically include all sub-folders and any drawing files within them.
Also, this tool automatically accumulates Selections made with the Browse...
button so you can browse numerous times to be very specific about the
various folders that you want. In the illustration to the right I show
how you can use the "Remove" context menu option to
deselect folders and
drawing files. Though you can include multiple Paper Space Layouts
from one drawing file, Architectural Desktop's Help menu strongly
discourages you from doing so because that could create a situation where
two or more users access the same file without knowing it (due to the
fact that Layouts look like separate files on the Sheets tab of the Project
Navigator).
Import Options... - use this button to
access the small Import Options dialog illustrated to the right. This
dialog offers the option to "Prefix sheet titles with file name"
which simply means that when the Paper Space Layouts are presented as Sheets
in the Project Navigator, they will also show the drawing's filename.
I am not sure I like the extra clutter with this option but it sure helps
for clarity. This dialog also offers the option to "Create subsets
based on folder structure" which means that if you Select files from
different folders they will be organized into logical subsets on the Sheets
tab. Subsets are not physical folders but simply organizational tools
for grouping and should probably be used if you are Selecting files from all
over the place. The final option to "Ignore top level folder" is
only available under the "subsets" option and helps to remove one level of
folders when creating subsets so you don't have subsets of subsets (which
may occur anyway depending on how and where you are Selecting drawing
files).
|
 PAGE 4 (last page)
Sheet Set Preview - the last page in this Wizard provides a "Preview"
of what the Sheet Set might look like in the Project Navigator and some
statistical information that you can review for accuracy. There are no
changeable options on this last page but you can use the < Back
button to go all of the way back to the beginning.
Note:
When you have completed the work of creating a new Sheet Set you have
actually only created the .dst file. To truly complete the work and
create .xml files for each drawing associated with the Sheet Set, you must
Open each file in the Sheet Set and Save it
In my opinion, ADT users are
better of using the Project Browser and the Project Navigator with its
access to Sheet Sets as a means for creating new Sheet Sets than to bother
with this "Wizard". When you create a Project, you can use the Sheets
tab of the Project Navigator and drag-n-drop drawing files to it and
organize them on-the-spot. To do this, switch the Sheet tab
view to the Explorer View so you can interact with the Microsoft
Explorer and the Sheet folder(s). See
Sheets tab - Import Sheets for
a graphic example of how to do this. |
|
Sheet Set Wizard - Create from an Example
Sheet Set You can use the Sheet Set
Wizard to create a new Sheet Set based on any that already exist. In
essence, this is really a method for using one Sheet Set as a template for
another.
PAGE 1
On the first page of the Create Sheet Set dialog, illustrated to
the right, I show that I have Selected the "An example sheet set"
radio button and then used the Next> button to access the second page.
PAGE 2
On the second page of this Wizard I show that I have used the "Browse
to another sheet set to use as an example" radio button which I
recommend that all Architectural Desktop users employ as a default. If you
Select any of the example Sheet Sets on this page you will find that they
have all been configured for use in regular AutoCAD and though the
information stored in those Sheet Sets probably won't harm your ADT work, they tend to contain data you don't need. If you want
examples to start from, use the "Browse..." option and look for the "Aec
Sheet Set...dst" templates that come with ADT. These are typically
found under the following path: "C:\Documents and Settings\All
Users\Application Data\Autodesk\ADT 2005\enu\Template
PAGE 3
See discussion for PAGE 2 (not PAGE 3) above.
PAGE 4
See discussion for PAGE 4 above. |
 |
|
Sheet Set Properties
Sheets Set Properties, accessed by
right-clicking over the main Sheet Set icon in the Project Navigator (Sheet
View not Explorer View), provide a multitude of options specifically for
these print-ready sheets. As with View drawings, Constructs and
Elements, Sheet drawings use a "Sheet creation template" in which you should
place things like a Titleblock. Another important feature of the Sheet
Set Properties dialog, illustrated to the right, is the option to add unique
"Custom Properties" that are similar to Project Details but
meant for tracking data relative to Sheet Sets or individual Sheet files.
SHEET SET
Name - use this value field to change the name of the current Sheet Set
but be careful not to create confusion for yourself and others. When a
Project is created, the Sheet Set is automatically Named and a matching data
file (.dst) is created. Renaming the Sheet Set does not rename the
data file so you can see how this might cause some unnecessary confusion.
Another important aspect of this Name field is that it is not
the name of the folder in which the Sheets are stored. The root folder
for all Sheets is named "Sheets" and cannot be changed but you can create
unique sub-folders (referred to as Categories) with unique names and then
create unique Sheet subsets that point to these sub-folders.
Sheet set data file - though this field
is not open for change it does indicate where the current Sheet Set (.dst)
file is stored allowing you to check for errors. In ADT, this file
should always be in the root folder for your Project.
Resource drawing location(s) - this field
is actually tied to the Resource Drawing Location dialog in which you
can Add and Delete folders. These folders represent the
path locations in which the Sheet Set Manager (SSM) will operate for the
current assembly of Sheet files. Since the Sheet Set Manager is
primarily for AutoCAD users who don't have the Project Navigator and don't
have to live by its rules, they can use this to define "path boundaries".
For Architectural Desktop users, I have not found any need to use this
feature but you never know what might come up in the future. I
recommend leaving this field blank.
Label block for views - this location
field provides AutoCAD users with the ability to set a path to a unique
folder in which their Label Blocks with Fields are kept. Architectural
Desktop users pull their Labels from the Content Browser and the data is
typically derived by interaction with View drawings. I recommend
leaving this field blank.
Callout blocks - see comments for "Label
block for views" above. I recommend leaving this field blank.
Page setup overrides file - this file
field provides the option to set a special template file for use when
Publishing Sheet files. Because Sheets are derived from Template
files
they will only offer the option to print according to the current Layout
configuration but by using Page Setup Overrides you can change how one or
more Sheets are Printed. See "Publish
- Page Setup Overrides" for more.
SHEET CREATION
Sheet storage location - though this location field offers the option
to place your sheet files anywhere on your system or network, that would not be
such a good idea when working with the Project Navigator. This
location field is really designed for AutoCAD users using the Sheet Set
Manager (SSM) who have the freedom to place sheet files wherever they want
because they don't have a Project Navigator and all of its features.
To check this field, make sure it points to the "Sheets" Folder under the
current Project. |

Sheet creation template - this is
probably the most important setting on the whole dialog box because it sets
the default template file for all of your sheets. To optimize your
productivity, you will need to create a template file (.dwt) with a single
Layout that is completely configured for the most common printing you do.
This file should contain all of your standard titleblock information
including company logo, company address and numerous attributed Fields for
things like Client/Project Name, Date, Scale, Sheet Number and so on.
In the event that you need a different template when you create some of your
Sheet Files, you will find that you can Override this setting by working
with the Properties of
Subsets. See Sheet
Creation Template file for more information on this subject.
Prompt for template - this option can be
set to "Yes" or "No" only. When set to "Yes" users will
find a terribly annoying "Select Layout as Sheet Template"
dialog box
every time they create a New Sheet. Now if this dialog could be
programmed to contain a set of pre-selected template files that an office
might typically use, it would be far more helpful. My suggestion is to
not use this option but to create Subsets that have been set to other Sheet
Template Files if you want something like this option.
SHEET CUSTOM PROPERTIES
These value fields are available as unique fields for individual sheet files
unlike the "Sheet Set Custom Properties" which affect all Sheet files equally. To test
how this actually works, Select a Sheet file on the Sheets tab of the
Project Navigator, right-click and check its
Properties. Here you should find the same list of value fields and you
can set them uniquely for the current Sheet file. You can also extract
this information using Fields that point to the "Sheet Set" field category
and the "CurrentSheetCustom" field name.
SHEET SET CUSTOM PROPERTIES
These value fields are available as unique fields for all of the Sheet
files so you would use these fields for things common to all your sheets;
things like "Issue Date", for example. With these value fields you can
affect the entire collection of sheet files from one point at any time.
To extract information from these value fields you will need to create a
Field that points to the "Sheet Set" field category, "Current Sheet Set
Custom" field name and then look under the "custom property name" drop-down
list for matching names. |
|
Sheet Set Properties - Custom Properties
From the Sheet Set Properties dialog you
can use the "Edit Custom Properties..." button to access the "Custom
Properties" dialog illustrated to the right. Though the
button refers to "Edit",
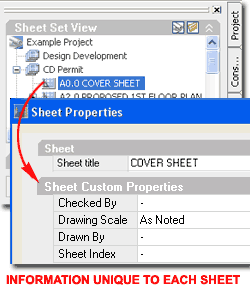 the only thing you can modify after you have Added a Property, is the
Default Value - double pick in the Default Value field as if you wanted to
Rename it.
the only thing you can modify after you have Added a Property, is the
Default Value - double pick in the Default Value field as if you wanted to
Rename it.
To "edit" other components of a custom Property
you will need to "Delete" it and use the Add... button to create again - thanks a lot to the programmer who wrote this feature ;)
When you decide to Add Custom Properties, be
sure to recognize that this dialog box stores Properties for "Sheet Sets"
and for individual "Sheets" - see comments above for explanation of
the difference. Be sure to set the correct radio button under "Owner"
before picking the OK button.
Illustrated to the left I show how Custom
Properties set for individual Sheets are access and modified via the
Sheet Properties dialog.
|
 Note:
In many cases I prefer not to have those odd "." or "-" characters on my
drawings wherever some Attribute or Field needs to be filled in. I
attempted to use blank "Default values" under the Add Custom Property dialog
only to discover that this produces "- - - -" on my drawings which is even
worse. Therefore, I suggest you use as single dash ("-") or dot (".")
and hope that someday we can have true blanks. |
|
10Creating
A Full Project Template |
10-2.5 PROJECTS |
|
Configure a Project in 15 Steps
Because there is so much information to think
about in the sections above I decided to create a more simplified
explanation in a step-by-step approach. The only problem with this
tactic is that in order to keep the steps simple I have to refer back to the
sections above and that may have you yo-yoing a bit.
|
|
|
1
|
Folder Structure
Use an existing "Template" folder or create a
new folder for storing and managing all of the Default Project Template
Files. CAD/IT Managers will want this folder to be on a Network
Server while non-Network users may wish to continue using the default folder
found at: "C:\Documents and Settings\All Users\Application Data\Autodesk\ADT
2005\enu\Template".Decide on where you
will want to store all of your Project Drawing Files. This can easily
be the same folder you have been using in the past or you may want to create
a new one. |
 |
|
2 |
Constructs Template File
Create a new drawing based on your current
standard template or use one of those supplied with ADT; like the "Aec
Model (Imperial Ctb).dwt" file or the "Aec Model (Metric Stb).dwt" file.
You can update this template file over time and improve it as you start to
see the need.Save this file to the
Template folder in Step 1 as a template using the .dwt extension (found on
the Save As... dialog). You may want to use a Name like "Your_Company_Name
- Construct.dwt" |
 |
|
3 |
Elements and Views Template Files
In this step you will need to address all of the
other drawing template files you can assign as defaults for use in the
Project Navigator. The problem is that you may not have the time or
the knowledge to make them at this time so you can either use the same
template file created in Step 2 or use the Save As... option to quickly
create Copies with unique Names. If you take the second option you can
assign the individual template files later on (below) and then modify any of
them when you find the need and knowledge to make appropriate changes. |
There are four of these template files: one for
Elements and three for the General, Section/Elevation and
Detail Views.
You may want to use a Names like "Your_Company_Name - Element.dwt", "Your_Company_Name
- General View.dwt", "Your_Company_Name - Section-Elevation View.dwt", "Your_Company_Name
- Detail View.dwt" |
|
4 |
Sheets Template File
Create a new drawing based on your current
standard template for printing or use the file created in Step 2.
For this file you will need to work on one Paper Space Layout and configure
it for the most common Paper Size and Plotter in your office. You may
also want to create other Page Setup Configurations if you print the current
Paper Size to different printing devices; even .dwf or .pdf.
On the single Paper Space Layout draw your
Titleblock or Paste it from an existing drawing file. You may want to
take this opportunity to include Fields for extracting data from the Project
Properties, Sheet Set Properties and Sheet Properties.
|
Save this file to the Template folder in Step
1 as a template using the .dwt extension (found on the Save As... dialog).
You may want to use a Name like "Your_Company_Name - 24x36 Sheet.dwt"
If you use multiple Paper Sizes and Plotters,
you can create unique Sheet Template Files for each requirement that users
can Select when creating their Sheets. You can also have different Sheet Set
Templates and different Project Templates depending on how serious your
needs are. I recommend keeping it simple in the beginning. |
|
5 |
Optional:
Create another Sheet Template File
that will store all of the various Page Setup Configurations that you may
use in your office. This file can be used as the source of "Page Setup
Overrides" later on and can prove to be quite useful when Publishing large
jobs. You may want to use a Name like "Your_Company_Name - Sheet
Overrides.dwt" |
See
Publish - Page Setup Overrides
for more information on how to create these and how to use them in a
Project. |
|
6 |
AEC Project Defaults
On the Options dialog (OP) go to
the AEC Project Defaults tab and expand the "Default Project
Template Files" section.Assign the
Template Files you created in Step 2 and 3 for the Construct,
Element, Model View (General), Section/Elevation View and
Detail View templates. If you only created one Template File
for the Constructs, assign it to each of the categories listed above.
|
Don't worry about the Sheet Set and Project
Details Templates because we will return to that subject later in these
steps. See
AEC Project Defaults for more
information on this tab on the Options dialog box. |
|
7 |
Project Browser
Activate the Project Browser (ProjectBrowser) and use the
Folders icon to point it to your primary Projects Folder - discussed in
Step 1. While in the Project Browser, create a New Project, Name
it "A Project Template" so it will stay near the top of the stack
in Explorer.
Note: you can name it whatever you want but I will refer back to this name.
While on the "Add Project" dialog, review the
"Default Template...File" assignments and confirm that they match what you
set as "Defaults" in Step 6.
Keep the Project Properties dialog Open.
If you accidentally used the OK button, return to this dialog by
right-clicking over the Project Name and Selecting the Project Properties...
context menu option. |
 |
|
8 |
Project Details
On the Project Properties dialog, use the Edit button to access the "Project
Details" dialog and spend a few minutes creating some the basic information
you will want for your Projects; such as Client information, address, etc.
The most important information will be the items that you will use Fields to
extract on your Titleblocks. With time, you may
also be able to create some information that will help to fill out your Cover Sheets but this can be improved upon later. |
Use the OK button and exit the
Project Properties dialog. Use the Close button on the
Project Browser.
See Project Details
for more information on how to add details and categories.
See
Project Details - Captured in a Field
for information on how to use Fields to extract the data stored under the
Project Details. |
|
9 |
Activate Project Navigator
Closing the Project Browser in Step 8 should automatically
activate the Project Navigator Palette for the current Project.
Confirm that your Project Navigator is set to "A Project Template" as
created in Step 7. If you did not activate your Project Navigator,
return to the Project Browser, double-pick on the "A Project Template" and
use the Close button. |
See
Project Navigator Palette - Project Tab Overview
for more information on the Project Navigator Palette. |
|
10 |
Levels and Divisions
On the Project tab of the Project Navigator you may or may not want to Add anything.
At the end of these steps I will discuss two options for creating new
Projects based on templates; one will not read any of the information you
may specify for Levels and Divisions and the other method will reproduce all
of the information you specify here. |
Most of my projects, for example, involve working on a 1st Floor so I have
one Level with a Name of "Flr 1" and an Elevation of "0". Since I am
still experimenting with Division settings I have not decided on a default
and leave this feature blank.
See
Project Navigator - Project Tab - Levels
for information on working with Levels.
See
Project Navigator - Project Tab - Divisions
for information on working with Divisions. |
|
11 |
Constructs
On the Constructs tab of the Project
Navigator you will most definitely want to Add some standard
Categories (Folders) for organizing your primary building components.
Since most of my work involves existing structures I have one Construct
Category for "Existing". Because I usually take the existing files and
try a variety of design options with them, I have another Construct Category
for "Design Development". For the final phase of work I have another
Construct Category for "Proposed" but depending upon the complexity of the
structure, this Category may be branched into sub-Categories such as
"Floors", "Stairs", "Slabs", "Roofs", "Structural" and so on. |
Under the Elements Folder you may want to
Add some standard Categories (Folders) as well but these can
be more difficult to predict and usually develop over time as a building
evolves. In one of my customizing and tricks examples below, I show
that I use an Element Category for "Sheets" that stores items that I
typically drag to my various Sheet Files; like the Titleblock, general notes
and so on. You may want to create Categories for "Furniture", "Site"
and so on.
Note:
You should also consider how you have been using Folders in Explorer to
manage your Projects before using this "Drawing Management System".
You may want to Add Construct Categories for sub-contractors such as
Structural Engineers, Landscaping and so on.
See
Project Navigator - Constructs Tab - Overview
for examples of Categories. |
|
12 |
Views
On the Views tab of the Project Navigator you will probably
want to Add one or more Categories (Folders) that you may use for View Files.
The problem is that the Categories you will need will not be obvious until
you have used them on several jobs so don't feel pressured to figure it out
now - this can be improved upon later.
View drawing files have been designed to act as a preparation stage between
your actual model files and print-ready sheets. One of the best
examples of how to employ a View drawing file is to consider what it takes
to create Sections and Elevations; you need to create a composite file of
all the Constructs and then cut or project the "view". If you use a
View drawing file to do this work, you can drag one or more of these Section
or Elevation "views" to a print-ready Sheet.
|
When you create New View Drawings, you will
find that you can choose between three types: General, Section/Elevation and
Detail. You may want to Add Categories to match those types. For
my work I typically have Categories (Folders) for "Plans", "Sections and
Elevations", "Details", "Schedules" and so on. The organization has
everything to do with how you manage your drawings in your office so don't
be concerned about what others tell you "should" be done. One Category
that you will probably be sure to Add is one that I call "Presentation" and
this is where I store my master composite file(s) for general study and for
linking to VizRender.
See
Project Navigator -
Views Tab - Overview for examples of Categories. |
|
13 |
Sheets
On the Sheets tab of the Project
Navigator activate the Sheet Set Properties dialog and assign the "Page
Setup Override File" if you created it in Step 5. Otherwise, you may
want to set this path to the same template file as that for your Sheet Files
(created in Step 4). The "Default Sheet Storage Location" should point to
the "Sheets" folder of the current Project so no changes should be
necessary there. For the "Sheet Creation Template", assign the Template file
created in Step 4. The "Prompt for Template" would typically be set to
"No" mostly because it confuses the heck out of users who don't understand
any of this stuff.
You may need to use the "Edit Custom
Properties..." button to create a list of Properties with or without default
Values that are specifically meant for use on your Sheet Files. Again,
you can add complexity like this later once you have the time.
|
Use the OK button to exit the
Sheet Set
Properties dialog. While still on the Sheets tab, change the View to
the "Explorer View" and Add Folders that you would like to use for different
print-ready Sheet Files. Change the View back to the "Sheet Set View",
Add
Sheet Subsets that match the Folder Names and use the ellipses button to
point the "Store new Sheet DWG Files in" to the correspond Folders that you
just created under the Explorer View. This work is incredibly useful
to maintain separation between print-ready sheet files as they are created and
used during a Project Cycle. For me, for example, it is not uncommon
to have Sheet Files with the exact same names as they were used during phases
such as Client Reviews, Structural Consulting, Permit, Permit Revisions and
so on - this is only possible by using separate Folders.
See
Sheets Tab - Subsets and Categories
for more information on Subsets and Categories; how to create them and how
to associate Subsets with Categories. |
|
14 |
AEC Project Defaults
All of the work done in the Steps above was saved into two important files
under the active Project that I referred to as "A Project Template".
You should be able to find this Folder with Explorer and see the two files I
will discuss below.
On the Options dialog (OP) go to
the AEC Project Defaults tab and expand the "Default Project
Template Files" section. We set some of the default template
file paths in Step 6 but now we can add more.
|
For the "Project Details Template File"
path assign the "A Project Template.apj" file from the "A Project
Template" folder.
For the "Sheet Set Template File" path
assign the "A Project Template.dst" file from the "A Project
Template" folder. Note:
See AEC Project Defaults for information
about the "Default Project Bulletin Board" and the
"Default Project Image" settings. |
|
15 |
Testing
If you did not make any mistakes in the 14 Steps outlined above, you now
have a completed "Project Template" that not only serves as a place to
improve your settings as you find better solutions but acts as a source for
two approaches to creating new Projects.
Because of the work you did on the "AEC Project
Defaults" tab, you should now find that when you create a New Project
on the Project Browser all of those templates will be used to create
the new Project. What this approach to creating new Projects will not
provide are the settings you made on the Projects, Constructs and Views tabs
of the Project Navigator because those settings are considered unique to
that Project. You can, however, use another approach and acquire all
of those settings.
|
On the Project Browser, highlight
the "A Project Template" Project, right-click to activate the Context
menu and Select "Copy Project Structure...". This action
will invoke the "Duplicate Project" dialog where you can set a
Project Name, Number and "Copy to..." location. When you use this
approach to creating a new Project, you "duplicate" all of the custom
settings including Project Properties, Categories, Folders, Levels and so
on. See Copy, Move and Rename Project
for an example of how the "Copy Project Structure" option works. |
|
11Publish |
11-2.5 PROJECTS |
|
The Publishing tools in Architectural Desktop
2005 are extensive. I will attempt to add more information under this
section in the future. |
|
Publish - Page Setup Overrides
| Alt.Menu |
Tools>
Wizards> New Sheet Set...
- if using the AutoCAD Tools pull-down menu |
| |
Create
button on AEC Project Defaults tab of Options dialog |
| Keyboard |
NewSheetSet |
| Links |
Sheet Set Properties - for
information on where to set this Template file for use on Sheets. |
When you Select the Publish >
Context menu option for one or more Sheets on the Sheets
tab of the Project Navigator, you should find an option for "Publish
to Alternate Page Setup". From this menu option you should find a
list of one or more Print-ready Page Setups that you can apply to one or
more Sheets. If you don't have any Page Setups to choose from or if the
list does not apply to your office, you will need to create a custom Page
Setup Override Template file. If you don't want to manage yet another
Template file you could simply add Page Setups to the Default Sheet Creation
Template File.
 Create
a new drawing file or open your Default Sheet Creation Template File. On
the command line type "PageSetup" and create a New one. Specify a
logical Name that clearly indicates how this Page Setup will affect the
current Layout and what it has been configured to Print to. Set the
Printer, Paper Size, Plot Style Table and everything else you normally use
when printing. Be sure to use the "Layout" option for "What to
Plot" because this is the only option that will allow you to use this Page
Setup as an Override (or "Alternate Page Setup"). Create
a new drawing file or open your Default Sheet Creation Template File. On
the command line type "PageSetup" and create a New one. Specify a
logical Name that clearly indicates how this Page Setup will affect the
current Layout and what it has been configured to Print to. Set the
Printer, Paper Size, Plot Style Table and everything else you normally use
when printing. Be sure to use the "Layout" option for "What to
Plot" because this is the only option that will allow you to use this Page
Setup as an Override (or "Alternate Page Setup").
The problem with being limited to the
"Layout" Plot Area is that you cannot use the "Fit to Paper" Scale option or
the "Center the Plot" Offset option and you need those to create Page Setups
that allow for things like Reductions - this is a very disappointing
limitation. The thing you can use these Page Setup
|
Overrides for is when you want users to be able
to choose among different Printers to output the same Sheet on the same
Paper Size. In my office, for example, having a Page Setup that is
configured to create PDF documents is a fantastic use of this feature.
When you have created one or more custom Page
Setups, Save the current drawing file as a Template (.dwt) and place in an
obvious location. You can now set this Template File for use on the
Sheet Set Properties dialog and begin using this feature. If you find
that no Alternate Page Setups show up on the Publish list, confirm that you
used 'Layout" for your Plot Area. Also, try closing your whole program
and restarting - something I have actually found necessary on some office
networks. |
|
11Projects
- Customizing and
Tricks |
11-2.5 PROJECTS |
|
Automatic Xref'd Titleblock for Sheet Files
Back before the days of Architectural Desktop's
"Drawing Management System" I created a system of folders and default
drawing files (including templates) that I set up in numerous offices.
Illustrated to the right and below I show how you can adapt an older system
for managing Titleblocks within the new Project System. Be aware that
this is not a solution that appeals to everyone but it is of particular
value to those who still prefer to link one Titleblock to all Sheet files.
To start, you will need to use an existing
Project like the "Example Project" discussed above or the "A Project
Template" illustrated to the right. On the Constructs
tab of the Project Navigator you will need a new Category (or folder) under
Elements that has a name of "Sheets". You may want to use another name
but that is what I will be calling it in this example.
Create a New Drawing by either using the
New
Element option or simply by starting a drawing from Scratch. In the
Model Space of this drawing file create your standard Titleblock layout with
all of the things that you know will be common to all of your Sheet files;
things like the company logo, address and so on. If you know your
stuff by now, you could also add Fields for Project Start Date, Project
Number, Project Name and so on. Save this file to the "Sheets"
subfolder of the "Elements" folder using a name that is clearly indicative
of its function; something like "Your_Company_Name_24x36_Titleblock.dwg".
The next part can be a little tricky because it
involves establishing a "Relative path" using the External Reference Manager
and this "Path type" is not allowed inside the Project Navigator. What
you will need to do is use the "Close Current Project" context menu option
on the Project Browser and then create a New Drawing File that will be used
as a "Sheet Creation Template File". With all Projects Closed, Create a New
Drawing and Save it to the Sheets folder of the Project you just Closed; in
this example it would be under the "A Project Template" Folder.
Activate the first Paper Space Layout and configure it for printing with a
Paper size that matches the Titleblock you just created.
Use the Xref Manager (XR) to Browse... for the Titleblock located under the
Sheets folder of the Elements folder, use
Overlay, Scale of 1 and Set the Path Type to "Relative Path". Place
the Titleblock on your Layout as it should sit for best printing results.
In this file I would add things like Attributed Fields to capture the Sheet
Number, Drawing Title and so forth. Save this work to the real Sheets
folder under the same Project Folder where you placed the Titleblock.
Close this drawing. |
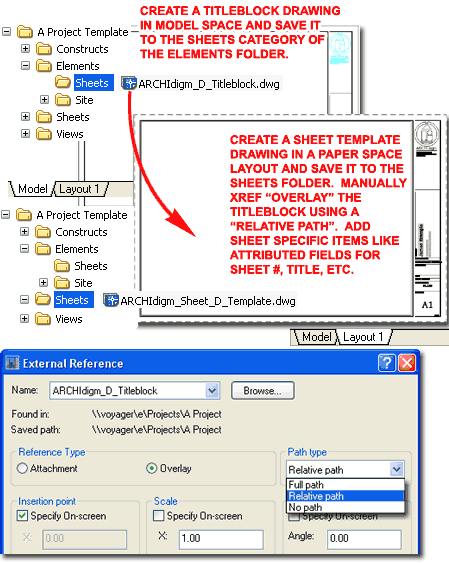
Note:
Using the "illegal" Relative Path in a Project may be problematic for the
Project Navigator and some Project Browser tools, like those that allow for
Category (Folder) Renaming but otherwise this trick will work well.
When things are configured properly, all new Sheet Files will automatically
pull in the Xref of the Titleblock. |
|
To finish the work we started on the Sheet
Creation
Template File, you will need to Move it to a logical location where you
store all of your other Template Files; such as those for Constructs,
Elements, Views and so forth. Once you have Moved this file, Rename it
so that it will be read as a Template file; you can do this by simply
changing the three letter extension from ".dwg" to ".dwt".
After you have completed all of the work
outlined here, you will need to test the results. A good way to do
this is to use the Project Browser and create a temporary Project that will
only be used for testing purposes and then Deleted later.
In your New Project, create a Category under
Elements and name it "Sheets". Using Explorer, locate the Titleblock
drawing created earlier and drag it directly this new folder. I like
to think of this as my Sheet Elements and not only keep Titleblocks there
but General Notes and other items that are commonly used on my Sheets.
On the Sheets tab of the Project Navigator
use the Sheet Set Properties dialog to assign the new Sheet
Creation Template File as
the source for "Sheet creation template". If you have Subsets, as
illustrated to the right, you will need to make this assignment for each
subset that you want to use this Sheet Template.
If all has been put together correctly you
should now be able to Create a New Sheet and find that it automatically
pulls in the Titleblock from the Sheets folder under the Elements Folder.
To make this system a more permanent part of
your Project Structure, you will need to assign this Sheet Creation Template to your
master Sheet Set Template. If you created a Project Template as
discussed in this material, all you have to do is Open it and repeat the
steps outlined here for the Sheet Set Properties (and remember those
Subsets).
The only irritating aspect of this system is
that each time you create a new Project using the "Copy Project
Structure...", you have to place the Titleblock drawing manually as
illustrated above. |
 |
|
|
|