Dry'n Yer Wood
HOME ORDER ONLINE PRODUCTS REGISTER CONTACT US

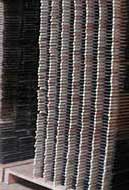
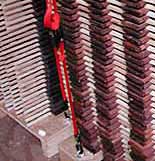
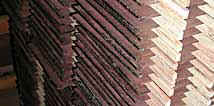
Indian rosewood sets stickered for drying
We’re not going into the science of why and how it works, because you can find most of that out easily enough by going to the library or by using the internet. Besides if you read all the stuff that you find “out there” it seems like it’s too daunting a task, and you’ll end up just thinking about doing it. Really, for pieces as thin as backs and sides, you don’t need to consult the wet bulb and dry bulb temperatures, figure decompression, or refer to any kind of drying schedules. It’s mostly a matter of common sense.

When you get wet Brazilian rosewood from us, the ends will be waxed and the sets will be strapped together and wrapped in plastic. “Wet” means simply “not dry,” because some of the sets we send out are in the 10 to 12 percent moisture content range, which is nearly dry. At our shop, with an average relative humidity of 45% the equilibrium moisture content is 9%. If we dry the sets in our dehumidification kiln we would dry them to 7 or 8 percent, but when we store them on the shelf they will equilibrate to 9% in a short time. (Interestingly, as in the case of many hardwoods and depending on local conditions, wood in the stump may never dry. It has to be opened up first.)
Sometimes we send sets out right off the saw, and these sets are usually as wet as 20%. If you don’t have a moisture meter, how do you know what the MC (moisture content) is of the wood you just received? If it’s in the 20% range, you’ll see several signs of this. The plastic wrap will show condensate, the wood will probably be of different colors, orangish where it’s starting to dry, dark violet where it’s particularly wet, mauve to pinkish when it’s in between. Take a look at that the 5A Brazilian page at the far right image of the first row. This is a good example of a back in transition. It will dry and oxidize to shades of orange with black lines. Other signs include wet to the touch, cool to the touch, no tap tone, and when scraping, the wood fibers tend to bend over and do not cut well, leaving a fuzzy appearance. Of course if you leave the wood free of straps or weight, and it’s allowed to rest on your bench top, it will begin to curl upward. The exposed top surface loses moisture more quickly than the underside of the piece and shrinks, while the unexposed side shrinks much less in response to much less moisture loss. If for some reason you have some sets that have been allowed to curl, if you have a cement shop floor, you can lay the set on the floor, curl side down where it will quickly pick up moisture from the cement and flatten out (and then begin to curl upward again). Before you unwrap and unstrap the wood, have both weight and/or stickers handy. Stickers should be 1/2" X 3/8" and of a wood that will not stain the Brazilian rosewood. We use plywood stickers, but fir or pine will work. Also have enough plastic, preferably clear polyethylene, available to cover the stack that you are stickering. (You can see the condensate with the clear plastic.) The number of stickers you will need depends on the type of sets you are getting i.e., straight grained, fully quartersawn, or partially quartersawn, or curly, etc. You’ll be safe placing stickers every 6" with straight grain quartersawn sets, while for partially slab, or curly wood, stickers every 3" is a very safe. You should also have plywood or hardwood sheets available of the dimensions, 34” X 6” X 1” (or whatever thickness you have on hand, but at least ¾”), and 24” X 10” X 1”. These will be used to cover the top layer of stickered wood. AND if you will be placing the sets on a concrete floor you will need the same size board to go on the bottom, as a moisture barrier. Note that sides and backs should be stickered separately so that the weight placed on the sets can be distributed evenly across the panels.
What is the relative humidity of your shop or where the wood will be stored? It helps if it’s around 45%, the same as our shop. When introducing the sets to your environment, it’s preferable in terms of coddling the wood to have a more humid environment, rather than less. If you build at an RH of around 30%, and assuming you get wood from us right off the saw (20% MC), take the plastic wrap off the set(s), but leave them strapped together. Place stickers under the strapped sets, and place stickers on top of the strapped sets. Place a board sized as above, over the top. Cover the whole package with polyethylene, and place a weight on top of that. The plastic enclosure need not be air tight. In fact, you want some air exchange.

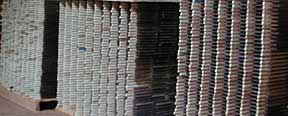
Our Brazilian rosewood stock, pre-processing stage, covered with plastic
In about a week, take the sets out and unstrap them. Take a close look at the ends for any signs of checking, and while you’re at it, look the entire set over. If there are any dry checks that could continue into your pattern, fill the crack with cyanoacrylate and use a catalyzer; ditto if you find any incipient end checking. Above, we use cement piers sometimes, and the yellow-strapped cardboard boxes are truss rods. Below, right, Our stickering jig prevents ideally placed stickers. Best if they are placed right at the ends of the plates, but since this is Indian rosewood, one of the more stable instrument woods, no worries. Below, another method we use to place pressure on stickered woods, fingerboards in this case. Screws eyes in the pallet base secure geared belt clamps.
Sticker all the sets, now, cover them with plastic, and weight the sets again. When stickering, as much as possible try to place the stickers at the very ends of the sets; this helps prevent end splits. Make sure the stickers are directly on top of one another so that they, rather than the set plates, bear the weight of the load. Leave the sets covered for a week. After a week take the plastic off. Keep the sets away from drafts or any strong air movement. Allow them to stay this way for a week. After that you can either place a fan on the sets directly, with not too strong a breeze, moving it around, at least twice a day so that no one area gets more exposure to the fans than another. Or you can make a small enclosure using the plastic and have the fan pull the air out and through the sets. You’ll have to experiment with this. It’s been a long time since we’ve done this ourselves and we were drying enough wood that our plastic chamber was not a quick and dirty project. In about a week’s time, the sets are darn near ready to go. Feel the top sets to see if they are still cool to the touch. If they are, continue the process, keeping in mind that the top sets will be the driest.
Address General Information Sales/support Telephone:
707-431-3760 POB 217, 101 C Grant Avenue, Healdsburg, Ca. 95448 USA info@alliedlutherie.com sales@alliedlutherie.com Fax:
707-431-3762 Price List
Download in PDF Format, 4 pages tabloid size.