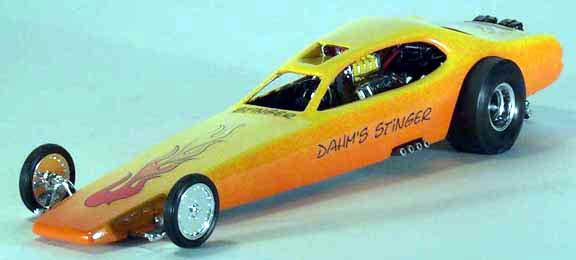
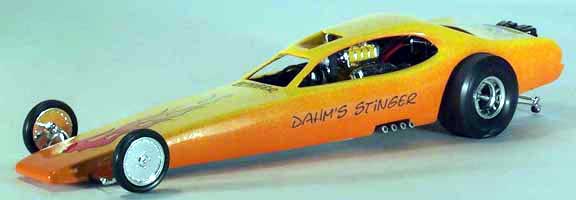
DAHM'S STINGER
AMT 1971 DUSTERS & MONOGRAM
STINGER KIT BASH
BUILT BY IRA DAHM (8/03)


FIRST PLACE WINNER IN THE
COMPETITION CLASS AT THE HOBBYTOWN PETALUMA CONTEST (4/05)
MORE COLOR PHOTOS BELOW!
This project was inspired by the winner of
Car Model Magazines 1968 National Funny Car Contest, Jim Keeler's "Dodge
Fever". The "Dodge Fever" model is displayed at the International
Model Museum and can be seen on the Museums website. Jim Keeler's futuristic
1968 design still looks great 30 years later, and its still one of my favorite
models. I finally got around to building my own version in 2003, "Dahm's
Stinger". The "Stinger" body is made from 2 AMT 1971 Dusters
and the main chassis components are from Monograms Stinger. Many of the
chassis detail parts including the dual parachutes are from a Revell Fuel
Dragster kit. The "Stinger Bee" decal on the rear is from a MPC
Dodge Charger kit from the '60s.
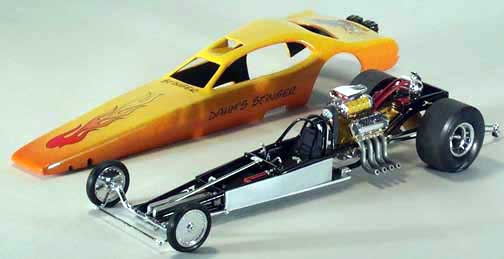
First I put together the chassis so that
I could custom fit the body to it. The Stinger chassis is mostly stock with
a few modifications. A Revell dragster kit supplied, the fuel tank, fire
extinguisher, gas pedal, brake pedal, oil pump with lines, oil filter, steering
wheel, and the drivers roll cage. The Moon tank is from the parts box. The
rear axle was narrowed 1/4". The front engine mount was attached below
the frame tube to lower the engine. Sheet plastic was used to add protective
panels on the sides and back of the driver cockpit. The frame rails were
painted gloss black, the engine and rear end gloss yellow and the flat panels
Testors Metallic Silver.
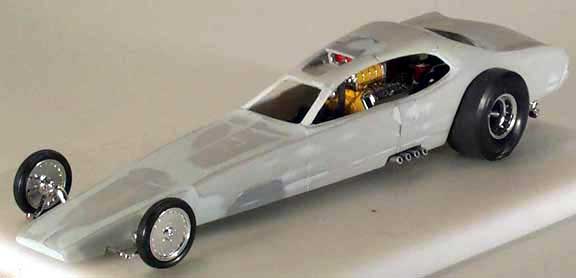
The body is made from 2 Duster bodies. See
the construction photo below. Duster body #1 was cut off, in about the center
of the drivers compartment. Duster body #2 was cut off 3/8" further
back than the cut just made on body #1. Next the back of body #1 was attached
to the front of body #2 with Zap-A-Gap glue. This makes the new drivers
compartment for the new Duster/Stinger body 3/8" longer than stock.
One of the hoods was then attached in place on the new body. About 3/8"
was cut off the front of the Stinger body, so that the front area is flat.
A hood was also attached to the front of body #1. About 2 1/2" was
then cut from the front of body #1, and attached to the front of the new
Stinger body. This made the Duster/Stinger body about 9 3/4" long.
A straight line was then marked on each side
of the body, from 1/4" down from the front fenders to the front bottom
edge of the rear wheel wells. the marked line was then cut creating the
wedge shape for the sides. A rear bumper was dechromed and attached in place.
The wedge shape for the top of the body was done by marking a triangular
shape with the point at the rear/center of the Stinger body, and the base
of the triangle on the front edge, about 1/2" in from each side. The
triangular shape was then cut out of the top of the body. The rear of the
body was cut in the middle following the point of the triangle down through
the bumper, and the front was cut down to 1" wide following the line
set by the base of the triangle. The 2 outside body sections were then sanded
smooth by, holding 1 side at a time and sliding it back and forth on a sheet
of 100 grit sandpaper, on a flat surface. The body sides were then attached
with Zap-A-Gap glue. Pieces of sheet plastic was used to reinforce each
glue joint. The bottom of the new body was then leveled out on a sheet of
100 grit sandpaper.
By the way I use a Dremel tool with a "cut-off
wheel" for most of my rough body cuts. Its fast and easy, but be sure
to wear eye protection because these "cut-off wheels" do break
sometimes when you are cutting.
I chopped the top about 1/4" at the
front, and then cut the top across just in front of the rear window, leaving
the rear at stock height. Strip plastic was used for the new windshield
posts. The front wheel wells were filled with sheet plastic. A small front
roll pan was made with sheet plastic and the gap was filled with strip plastic..
Next I fit the new body to the chassis. The
rear wheel wells were cut out to fit and then the body was cut out to clear
the front axle and exhaust pipes. The roof scoop was cut out, and two triangular
pieces of sheet plastic were cut to fit the inside scoop sides. These pieces
were glued in place and then the base of the scoop was cut out and glued
in place. The body was then rough sanded with a sanding board and filled
with putty inside and out. The body was then sanded and primed.
The body was primed with Krylon White Primer,
then sprayed with Krylon Yellow and fogged with Krylon Orange. The body
was the sprayed with Testors Glosscote. The inside of the body was painted
flat black. The "Dahm's Stinger" stickers were made on the computer
and the flame sticker is from Autographics.
It took me quite a while to get around to
building "Dahm's Stinger", a tribute to the orignal "Dodge
Fever", but I'm glad I finally did. It looks good in the showcase and
it will always remind me of a great design from the past.


 I just finished a new body
that also fits this frame. The new car is called the "WILD RIDE".
Click on this small photo for more information and photos!