Astronomy 103
Telescope Manual
- Telescope Overview
- Setting Up the Telescope
- Moving Parts on the Telescope
- Finding and Looking at Astronomical Objects
- Taking Down the Telescope
Basic Warnings
- NEVER, EVER POINT A TELESCOPE AT THE SUN. You
will blind yourself if you look through even the finder scope at
the Sun. Even if you don't look through it, just pointing the telescope
at the Sun can heat the telescope up enough to damage it.
- All of the telescope parts should move smoothly and easily. If you
experience resistance, do not push harder; you'll probably break
something. Resistance means that something is clamped, you've reached
the end of the range of motion of something, or something about the
telescope needs to be fixed. If you don't understand what is going on,
ask a TA to help you. Never force anything on the telescope. If it
isn't easy to move, don't move it!.
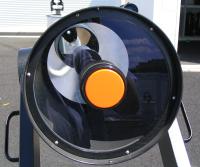
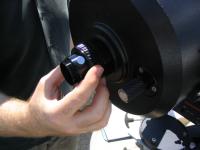
 Never touch the optics! Don't touch the glass on the front
of the telescope, don't touch the lenses on the eyepieces. Never put
eyepieces in the same box compartment with bolts, as that could damage
the optics. The picture to the right shows you what might happen if you
touch the optics.
Never touch the optics! Don't touch the glass on the front
of the telescope, don't touch the lenses on the eyepieces. Never put
eyepieces in the same box compartment with bolts, as that could damage
the optics. The picture to the right shows you what might happen if you
touch the optics.- Telescopes are expensive and delicate. Treat them with care. Don't
drop them, don't bang them around. If you turn a knob when it feels
stuck, you may break a part on the telescope that renders it unusable
for you and other students for the duration of the semester.
Telescope Overview
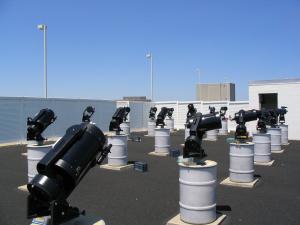
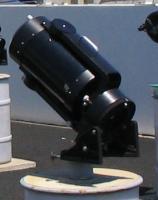
The telescope lab facility has 20 mounts for 8" Schmidt-Cassegrain telescopes (pictured to the right). These telescopes are of a sort commonly used by amateur astronomers, and are easy-to-use yet reasonably powerful "backyard" telescopes.
The light is imaged mainly by the primary mirror, which is at the base of the telescope. At the front of a telescope is a thin lens; this lens is actually not doing the main focusing of light, but is a simple "corrector plate" that takes out some of the abberations of the primary mirror. In the middle of the corrector plate is a secondary mirror; light from the primary mirror bounces off of the secondary mirror and back through a hole at the back of the telescope. It is at the opening of this hole that you mount eyepieces and other instruments in order to see the light collected by the telescope.
These telescopes are called 8" telescopes because the primary mirror is 8 inches in diameter. The most important number of any telescope is the size (width) of the primary mirror, or the "collecting area" of the telescope. If you are young, under a fully dark sky your pupil may dilate to roughly 7mm wide. This means that the telescope can collect 850 times as much light as your eye can under a dark sky. By focusing all that light down into your eye, you can see objects that are much dimmer than you can see with your naked eye.
Telescopes also magnify. With the 25mm eyepiece, the magnification of your telescopes is about 80x. With the 100mm eyepiece, the magnification is about 100x.
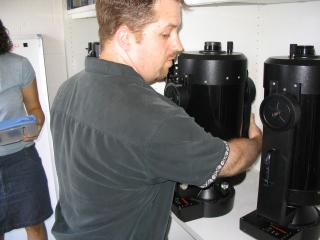
There are two very similar types of telescopes used in the lab. Most of the telescopes are Celestron; a few are Meade. There are different "parts boxes" and mounts for each telescope. Make sure you get a parts box and use a mount that matches the telescope you are using. Your TAs can direct you to the proper mount.
The smaller tube mounted on the side of the telescope is the "finder scope". This is a lower-magnification, smaller telescope that is aligned with the main telescope. Because it has a wider field of view (can see more of the sky at once), you can use it to find an object you're looking for. (The main telescope's field of view is so small that directly finding an object is very challenging.)
Setting up the Telescope
To set up the telescope, follow these steps.
Acquire a telescope, a box of parts, and an equipment sign-out form. Make sure that your box of parts matches your telescope type (a Celestron box for a Celestron telescope, a Meade Box for a Meade telescope). Take these things over to your station.
Verify that all parts in the parts box are accounted for, and indicate this on the equipment sign-out form. If you are sharing the telescope with another person for this lab session, both of you should put your names on the form.
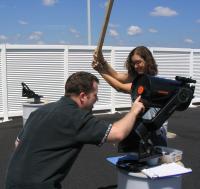
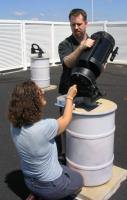
 One person should hold the telescope so that the rounded side of the
base is up, and the square side of the base is down. The other person
should start screwing one bolt into the top bolt hole, as shown.
Only screw in the bolt a couple of turns.
One person should hold the telescope so that the rounded side of the
base is up, and the square side of the base is down. The other person
should start screwing one bolt into the top bolt hole, as shown.
Only screw in the bolt a couple of turns.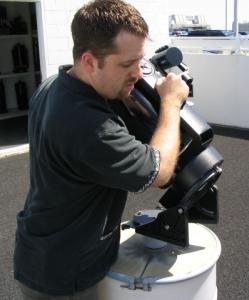 The person holding the telescope should slide the telescope on to the
mount so that the first bolt rests in the slotted hole at the top of the
mount. If he can't get it on, then loosen the first bolt a half-turn or
so. The person holding the telescope should not let go of it until
the telescope is fully mounted.
The person holding the telescope should slide the telescope on to the
mount so that the first bolt rests in the slotted hole at the top of the
mount. If he can't get it on, then loosen the first bolt a half-turn or
so. The person holding the telescope should not let go of it until
the telescope is fully mounted.- While the first person holds the first bolt flush with the mouting
plate (on the thing called the "wedge"), the second person should screw
in the first bolt until it to is flush with the plate. Do not tighten
the first screw at this point.
- Put in the other two bolts. The person holding the telescope may
need to rotate it a little on the mounting plate, pivoting it around the
first bolt, in order to get the holes lined up for the other bolts.
This takes some experience to be able to do it easily; ask a TA for help
if you are having trouible.
- Tighten all three bolts. Use an allen (hex) wrench if you have a
Celestron telescope; the Meade telescopes have bolts which can be fully
tightened just with your fingers.
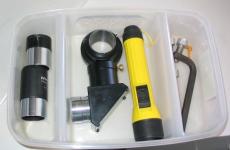
 Remove the small cap from the back of the telescope. Screw the
eyepiece adapter on to the threads. (This is called either an eyepiece
adapter or a visual back, depending on which telescope you have.)
Remove the small cap from the back of the telescope. Screw the
eyepiece adapter on to the threads. (This is called either an eyepiece
adapter or a visual back, depending on which telescope you have.) Loosen the set screw on the eyepiece adapter. Insert the silver end
of the star diagonal into the eyepiece adapter. Tighten the set screw
on the eyepiece adapter. The star diagonal should be oriented so that
it is pointing between the fork arms, toward the side of the
telescope where the finder scope is. Never rotate the direction of
the star diagonal without first loosening the set screw on the eyepiece
adapter. Otherwise, you will damage the star diagonal!
Loosen the set screw on the eyepiece adapter. Insert the silver end
of the star diagonal into the eyepiece adapter. Tighten the set screw
on the eyepiece adapter. The star diagonal should be oriented so that
it is pointing between the fork arms, toward the side of the
telescope where the finder scope is. Never rotate the direction of
the star diagonal without first loosening the set screw on the eyepiece
adapter. Otherwise, you will damage the star diagonal!- Loosen the set screws on the star diagonal. Insert the eyepiece
(always start with the 25mm eyepiece) into the star diagonal. Tighten
the set screws.
- Remove the cover from the front of the telescope. With the
Celestrons, you need to rotate it a little bit counter-clockwise before
pulling it off.
- Congratulations! You've set up the telescpoe.
Moving Parts on the Telescope
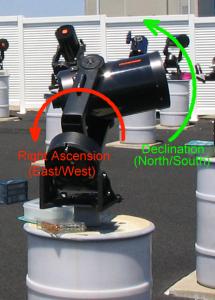
The telescope can move in two directions. The first is along Right Ascension. This is east-west, and is a rotation of the telescope around an axis parallel to the two fork arms; you rotate the telscope base around in order to swing it from East to West. The second direction is Declination, and is north-south on the sky. This is a rotation of the telescope about an axis that connects the ends of the two fork arms. When the telescope is pointing "up" parallel to the fork arms, it is pointing directly at the North Celestial Pole. Assuming that the telescope mount is aligned well, the telescope should be pointing at the star Polaris.
Never force the telescope to move. If you have all of the clamps properly disengaged, it moves very smoothly and easily. If you experience resistance, make sure that you don't have a clamp engaged. If you can't figure out what is going on, ask a TA! If you force a telescope to move against resistance, you could damage the telescope. (You will also lose serious points on your telescope practical.)
The image below shows the various knobs and clamps on the telescope:
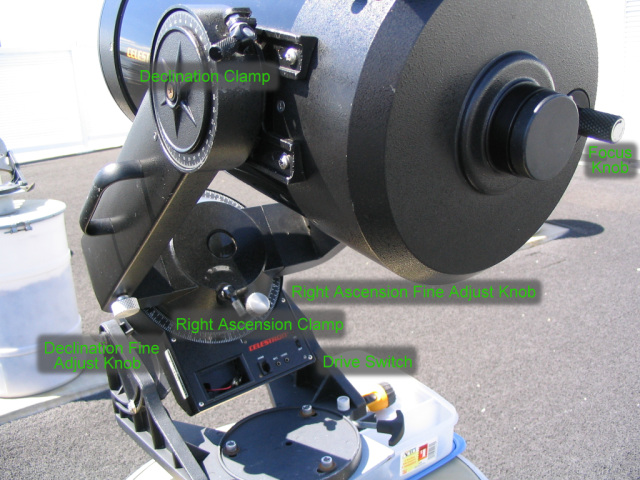
The rules for the use of these controls are as follows:
Always unclamp the Right Ascension (RA) knob before slewing (moving a long way) in RA (east/west). Reclamp it when done.
Always unclamp the Declination (Dec) knob before slewing in Dec (north/south). Reclamp it when done.
Always unclamp the RA knob at least part-way before turning the RA find adjust. If you experience resistance from the RA fine adjust, then the camp is to tight. Do not force it to turn! You will break things!.
You may turn the declination knob while the declination clamp is engaged!
Never turn the declination knob when you feel resistance. The declination knob has a limited range of travel. When it reaches a stop, you can't use the knob to go farther in that direciton. What you must do is move it a good way in the other direction to recenter the fine adjust between the stops, and then slew the telescope a bit in dec to offset the move you just made with the fine adjust. If you try to turn the declination knob past the stop, you will break the "dec arm" in the telescope. We have a very limited number of replacement dec arms. Students who break dec arms run the risk of being denied access to the telescopes for the remainder of the semester (and therefore of failing the lab)..
Finding and Looking At Astronomical Objects
To find an object, do the following:
Locate the object in the sky. You may use your star wheel, SC-001 chart, or SC-002 chart to help you figure out which star you're looking for.
Sight along either the telescope or along the finder to get the telescope lined up pretty close to the direction of this object. You will want to slew the telescope at this point; don't try to use the find adjustment knobs here. You may find it easier to only move in one direction at a time. Remember to unclamp an axis before slewing along that axis!
If you performed the previous step well, the object should now be within the field of view of the finder scope. Look through the finder scope and figure out where your star or planet is. Move the telescope so that the crosshairs are centered on top of the object. You will want to slew the telescope to get it close, and then use the find adjust knobs to get the crosshairs right on top of the object.
NOTE: You want to have the star diagonal oriented in the direction shown in the image to the right. While you can rotate the star diagonal to other directions for convenient viewing, the finder scope may not be aligned if the star diagional is in another direction!

Now look through the telescope. Your object should be somewhere within— ideally near the center of— the field of view. Always start with the 25mm eyepiece. It has a larger field of view than the 10mm eyepiece. Adjust the focus so that the object is as sharp as you can get it. If you see big faint donuts, your telescope is way out of focus. If you aren't able to get the telescope to good focus, as your TA or the professor to look at it.
If you are nearsighted or farsighted, take off your glasses when looking through the telescope. Glasses can prevent you from getting close enough to the eyepiece to get a good view. You will be able to adjust the focus of the telescope to get the object in focus for you. (The telescope at this point will also be serving as a very high-end glasses lens.).
If you are having trouble finding what you're looking for, go to a very bright star that you can't mistake. If you get it aligned on the crosshairs in the finder, but can't see it through the telescope, your finder scope may be out of alignment. Ask a TA or professor to help you in this case.
You can find dimmer objects in the telescope than you can see with the naked eye. The procedure for doing this is described in the Star Hopping Lab.
Which Way is North? East?
When you look through the eyepiece, it is difficult to know which way in the field of view is north, south, east or west. The eyepiece inverts the image (e.g. rotates it by 180 degrees). The star diagonal gives the viewer a mirror image. However, the direction in which the star diagonal is rotated determines which way the mirror image acts. Therefore, it is difficult each night to know which direction is which in the eyepiece.
There is a trick you can do to figure this out. While looking through the telescope, very, very gently nudge the telescope in one direction by pushing very lightly on the tube of the telescope with one finger. For instance, if you push "down" on the telescope near the end (where the corrector plate is), you will be nudging it South. When you nudge the telescope in a given direction, all the stars will appear to move in the opposite direction:
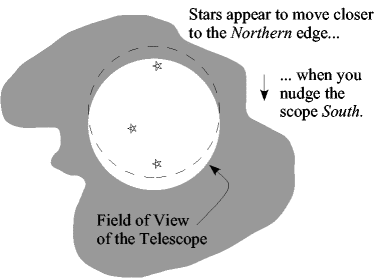
You will need to do this in both the north/south and east/west directions. Reflections in the star diagonal mean that what you see through the telescope is (or may be) a mirror image of what you'd see directly on the sky. (If you look at a non-full moon, this will become obvious.) (The view through the finder scope is rotated 180° from what you see on the sky.)
Taking Down the Telescope
Turn off the telescope drive.
Remove the eyepiece, star diagonal, and eyepiece adapter from the back of the telescope. Place them in your parts box. Put the cover back on the hole where there was the visual back.
Put the cover back on the telescope. For Meade telescopes, it just fits on and is held by pressure. For Celestron telescopes, align the notch on the cover with the notch on the ring around the end of the telescope. Push the cover in all the way, and turn it a short turn clockwise.
Move the telescope to its parking position (see right). This is with the tube turned "down", aligned with the two fork arms. Rotate the telescpe in East-West so that the fork arms are on the top and bottom. If only one of the two fork arms has a handle, you will want the handle on the top.
While one person holds on to the telescope, the other person should undo the lower two bolts. If you have a Celestron telescope, you will need to use an allen (hex) wrench to do this.
Loosen the top bolt enough so that the person holding the telescope can lift the telescope off of the mount, sliding the bolt out of the upper slot on the mount. Remove the last bolt from the telescope.
Return the telescope to the storage shed. Make sure to put the telescope down so that the fork arms are front-and-back, and the control panel is facing outwards. Do not put the telescope on the front of the shelf and slide it back; place it directly down in the spot where it is going to go. When you slide the telescope along the shelf, it will "hop and skip", which vibrates the telescope and can knock the mirrors out of alignment.
Make sure all of the components are in the parts box. Never put bolts or the allen wrench in the same compartment of the box with any optics. Put the box on the shelf.
Fill out the return side of your equipment check-out form, and make sure that you've got everything returned. Note down any problems with the equipment at the bottom of the form.