
I had a hard time finding
good tools for doing what I needed to do here. Everything from assemblers
to dissemblers to simulators was lacking in one way or the other.
The closest were some of the assemblers, like AS11, that worked but were
to sensitive to syntax and not very good at reporting errors. One
extra space on a line and they would stop parsing the line, generate some
off the wall code and never squawk that there was extra characters on the
line. A few more error checks would be nice here guys. Being
this was the first time I have ever dealt with Motorola code I needed all
the help I could get (I'm an Intel,Zilog, 85xx,87xx kind of guy).
So I wrote my own 68HC11 cross assembler (in Intel assembly of coarse).
The dissemblers and simulators out there all had problems from missing
opcodes to not testing the flags correctly. Not taking the appropriate
branches (sim68 looked good if you weren't to particular about when it
would decide to take a branch) when certain flags were set made it very
difficult to figure out how things were supposed to work. So I also
wrote my own dissembler and debugging tools. I also wrote a simulator
that simulates all the key hardware and sensor inputs of a Chevy 350 running
a Pro-Flo EFI. You can actually run the ECU code on your PC (depending
on your pc fast than real time). By modifying the sensor inputs you
can see the immediate effects on timing and fuel PW generation in a controlled
environment than in the vehicle. Setting breakpoints and stepping
through the code with real world values really helped in understanding
what is going on.
| Note: | Most of the files on this page are ZIP'd because some browser corrupt .COM and .S19 files on download. |
|---|
| as_hc11.com | This is the assembler I wrote.
Pretty straight forward. Does have much more thorough error checking
than some I found. It uses the standard Motorola (AS11) type syntax
plus a few extra assembler directives to make a little easier. By default
it creates an S19 file but
a binary file can be created if desired. I've pretty much stayed
with the S19 format because
it can be easily overlaid in memory. This is because the S19
records define where the binary code goes in memory. This can become
handy when using the debugger or simulator. You can load the main
EFI code in then also load in some code you've generated in an unused area
in the memory map. This code snippet can then be run calling something
in the main body and grabbing it's output value. Your code can then
store this output in an unused area of memory for retrieval with a DOS
debugger for processing. This is a technique I used at times when
trying to figure out what a piece of code was doing. Feed it what I wanted
and see what it returned.
The input switches are (note: the Cross ref is not implemented yet): ; ; Switches: ; -S - don't create S19 file as output (default creates S19 file) ; -B - create binary output file ; -L - create a complete LST file ; -Y - Symbol listing only ; -C - Cross ref listing ;NOTE: This assembler expects strict ASCII source code. No soft linefeeds here. Each line must end in a CrLf sequence or you will have trouble ! |
||||||||||||||||
| un68.com | This is the dissembler.
Pretty archaic interface (hacked from something else) but it does work.
Just invoke it and answer the questions. It only can handle S19 or
binary input files (S19s are better because it will know where to start
dis-assembling).
What the questions mean:
|
||||||||||||||||
| ddt68.com | Well for those who remember CPM or played with DOS's Debug you are going to right at home here. With this is a debugger you can run/trace/single step/modify to your hearts content. Type a '?' at the prompt will display a help screen. Type a command followed by a '?' will display help for that command. Here is a short little Readme. There is a couple short cuts available. If you type 'ddt68 e' the debugger will automatically load the file 'ecu_8000.s19'. This is the name I gave the ECU S19 code I wanted to load most. The same applies for 'ddt68 c' will load 'cm1_c000.s19'. The '8000' and 'C000' are the starting offsets of each code set. | ||||||||||||||||
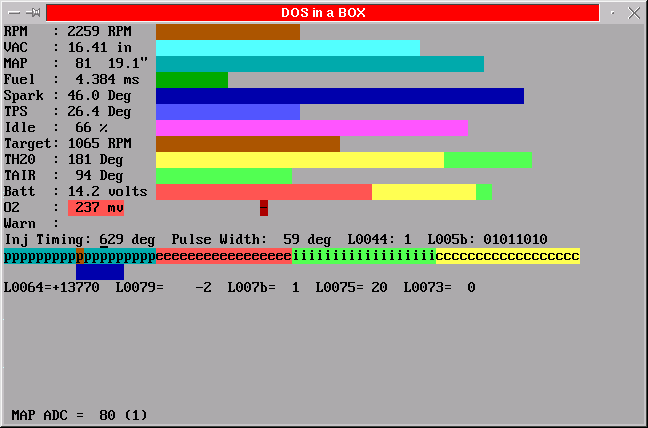
| emux.com | This one is a big one (not in size). This is a special case simulator that emulates all the sensor inputs and timing signals from a running Chevy 350 motor with a Pro-Flo EFI installed. It also emulates the key 68HC11 control registers, interrupts, ADCs, and whatever else was needed to get the ECU code to actually run on a PC and think it is in car. As you can imagine this was not a trivial task, especially to make it run fast enough to be somewhat real time. On a fast PC it will actually emulate faster than the 68HC11 is running in the ECU. This code is not really stable because it is always being modified for different experiments (it is stable in the fact that it doesn't crash or does anything bad, but I keep playing with it). The code here is fully functional and will run. It is based on the above debugger and has the same basic user interface when it is in the command mode. There are a few extra commands though when it is running the code. These commands allow you to change the inputs (sensor, rpm, etc.) that is being fed into the ECU code. Kind of neat to see it running. Very helpful when changing stuff to assure that you haven't broken anything. Also in graphically seeing the relationships between various inputs and the effects on the engines operation. There is a short Readme and also a screen capture of it running. To fully understand all the ram locations displayed you will have to get into the actual code. (Hint: The only file this code will load is one named 'efi.s19' located in the same directory as 'emux'. Here is the S19 file for the Edelbrock pn: 3516 code set: ecu_8000.s19 . Just remember to rename it to 'efi.s19') | ||||||||||||||||
| ser3.com | This little program is what you need if you have a laptop (at least a 486) and want to interface to the ECU in you car. You will have to build a special serial interface cable but it is not difficult. I built mine inside of the DB-9 hood. You can check out my schematic. For some strange reason the serial signals are double inverted between the ECU and the controller. This cable will change the polarity so you can plug it into your laptop. This program has the same (or at least very similar) display as the above simulator. Running this program makes it so much easier to see what the ECU is doing than looking through the small windows the supplied controller gives you. You can see all operating parameters at the same time in more or less real time (the serial interface is running at 9600 baud). You can also change all the fuel/spark maps and all of the other parameters that you could from controller. This is also the program that I use to log operational performance data. This particular version is capable of logging data but it is in a somewhat esoteric binary format that will need decoding and explaining elsewhere. | ||||||||||||||||
| S19 Format | Here is a page I found explaining the Motorola 'S' format. | ||||||||||||||||
| Opcodes | A cheat sheet for the 68HC11 opcodes. | ||||||||||||||||
| Registers | A cheat sheet showing all of the 68HC11 registers and Control Bit assignments. |