This one I am still looking
at. I have always noticed that the RPM reported by the control module
seems to jump around quite a bit. Other owners of this system that
I have talked to have expressed the same concerns. Wasn't sure if
it was real noise or just the normal jitters of a digital display.
On most of the data logging runs I only sampled the RPM at 10 second intervals,
but even at that low sample rate it looked like the timing periods was
moving more than expected or explained. Remember that RPM is just
the derivative of the timing period. I then ran a couple of runs
collecting nothing but MAP ADC and the timing period (L0040 - the predicted
next timing period) on the first and nothing but the timing period (L003e
- current timing period processed) on the other. The fastest that
you can get data out at 9600 baud using the standard request/send/verify
format from the ECU is a little over 52 responses per second. Still
way under sampled but a little better. What was interesting looking
at this data was its magnitude and also it clearly had some associated
period. This is more than just random noise. There were places
that reported an RPM change of close to 200 RPM pp, maybe 10 times within
a second ! Well I guarantee that cruising steadily down the freeway
with a manual transmission I would notice the motor changing 200 RPM !
Because the data is so under sampled you can't determine the actual period
but it is obvious that there is one. What all this means is that
as the timing period changes between each cylinder firing the calculated
fuel pulse width is going to be modulated also. Probably not huge
problem because the fuel burn will tend to get averaged out. Of more
concern is what all this jitter was doing to the spark. With this
magnitude of timing period change you can have 4 to 6 degrees of spark
scatter. To prove if what I was getting out of the ECU was real or
not I ran another experiment. I took two inductive timing lights
and put each one on a cylinder 180 distributor degrees apart (like 1 and
6, or 4 and 7, etc.). I tied them together and forced both triggers
on. If there was no timing difference between cylinders I should
not see the timing marks move. If the scatter was real the marks
should move relative to each other. Well you can guess what I found.
The two marks changed relative position to each other about 3 or 4 degrees.
They walked around a little at different RPMs also. To prove that
both the timing lights were firing at the same time accurately I would
put both pickups on the same secondary lead. Solid as a rock with
no relative jitter no matter at what RPM. Trying different pairs
I would see slight differences in the amount of jitter. There is
no way of even knowing that the worse case is even 180 degrees apart.
It may be worse between other cylinders. There was no easy way to
delay one of the timing lights far enough to try other combinations.
At this point in time it looks very real. Where it is actually coming
from is hard to say. The distributor bushing were replaced when I
setup the EFI. I pulled the cap off and I can hardly detect any slop
in the bearing at all. Is it in the cam gears ? I hope not.
The gear drive should be more stable than a chain. Is it errors in
the manufacturing of the shutter wheel ? Maybe. More likely
in the relationship between the shutter paddle and the hall effect sensor.
If each paddle does not track exactly in the same path as all of the others
then the ignition trigger point could change as each paddle crossed the
permanent magnet at a different distance. Could be a combination
of all these things. If it is a tracking issue it would take some
precision forming to make each paddle track absolutely perfectly.
At this point what I am going to do is loose the
whole ignition trigger setup in the distributor and install a crank trigger.
You can't get more accurate than a crank trigger in determining where the
piston is. I haven't done this yet. It will be a winter project.
Looking at different manufactures I see that Crane Cams has a kit that
uses a hall effect trigger as the sensor. This is advertised as accurate
between 0 and 12000 RPM. Static timing adjustment with this unit
is appealing. Also the hall effect trigger output will be easy to
interface into the existing hardware. I'll make another shutter wheel
with just one shutter paddle on it for the distributor. It will be
used for nothing more than signaling when the number one firing event occurs.
This is needed to determine the injector phasing. Another issue is
the relationship of the rotor to the cap. When I had the cap off
recently I could see tracks melted into the cap because the rotor is not
phase correctly to the cap. Maybe this is associated with the other
errors in the distributor modifications and installation. Hopefully
I can now optimize the relationship between rotor and cap rather than taking
whatever I get when the hall effect sensor triggers.
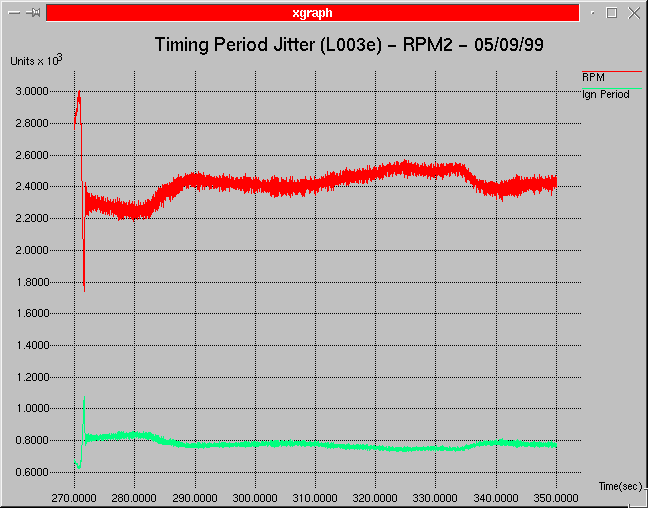
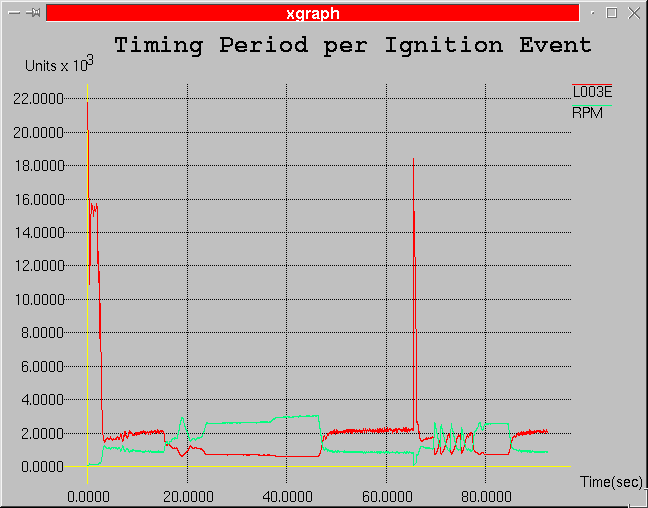
This plot is a segment from the second run where I collected the current timing period from L003e. The L003e stash is the value of the timing period that has just occurred. This segment was cruising down the freeway. You can clearly see how noisy the data is. The below graphs expand on this one.
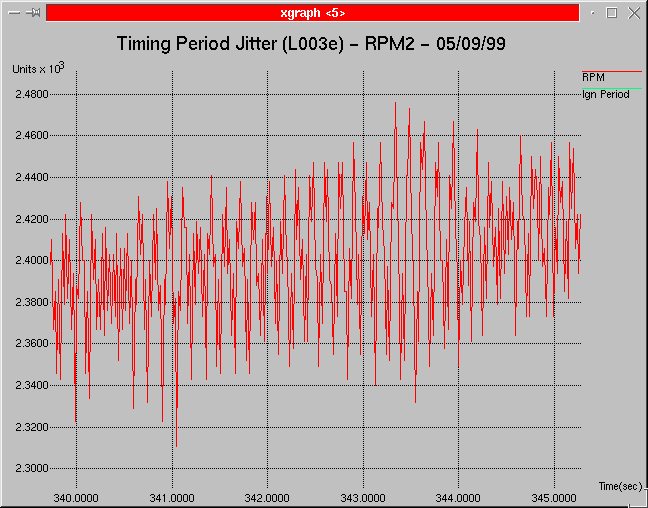
This plot is a 5 second period cruising around 2400 RPM. You can easily see the periodic nature of the data. This is more than random jitter. Because it is so under sampled it is not possible to determine the exact frequency. Being the data is aliased its magnitude is probably under stated also. No way is the motor changing this kind of RPM at these speeds.

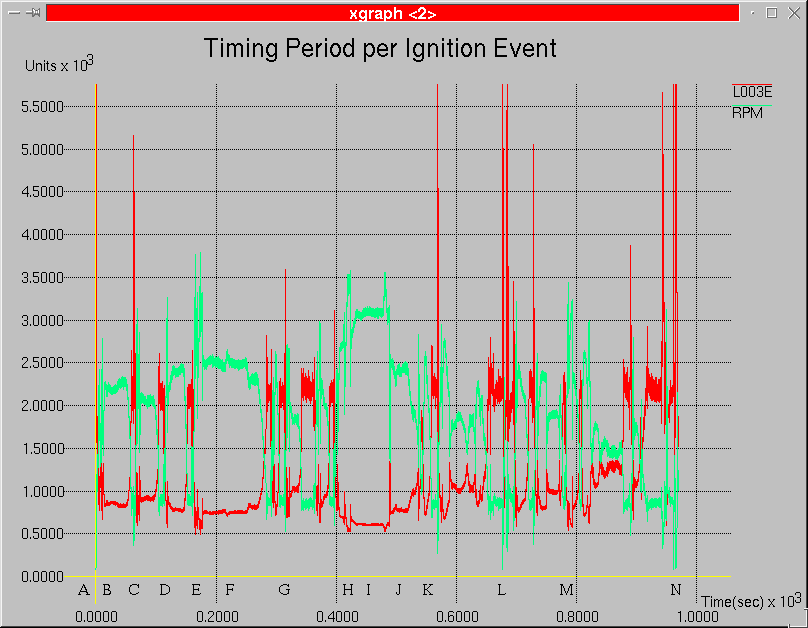
This timing period plot is during the same time period
as the above RPM plot. The 'Y' units is the timer value (L003e) in
8 us units. So if we pick a big peak-to-peak delta of 47 counts this
would translate into 376 us of jitter. So at 2400 RPM we are turning
40 revolutions a second, which is 14,400 degrees a second.
376 us of time jitter works out to about 5.4 degrees of spark scatter.
Not good for a performance oriented hobby.... This will have to be
fixed.
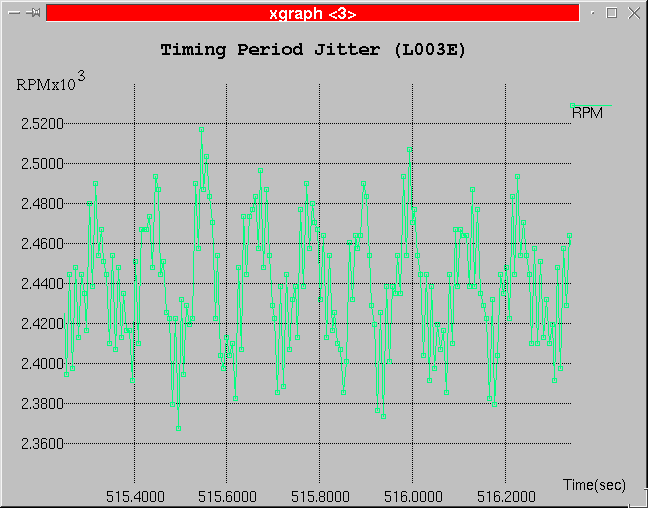
 |
Xgraph
Xgraph - markers |
Legend:
| A | - Initial start. |
| B | - Data start school Stop sign. |
| C | - Shopping center signal. |
| D | - Stop sign at vets. |
| E | - Onto freeway. |
| F | - 65 MPH 5th gear. |
| G | - Off freeway. Through several signals to get back on south bound. |
| H | - Off freeway. Through several signals to get back on south bound. |
| I | - 65 MPH 4th gear. |
| J | - 65 MPH 5th gear. |
| K | - Off the freeway to gas station. |
| L | - Restart at gas station |
| M | - Back home. |
| N | - Couple hot re-starts |
Below is a couple of expanded plots. There is no way that the motor could possibly accelerate as fast as the timing numbers suggest. Can't really determine a period here even though the noise has some rhythm to it. Well when I get the crank trigger installed we shall see......

| Xgraph
Xgraph - markers |
 |
| Look how much smoother the RPM and timing period data is ! | 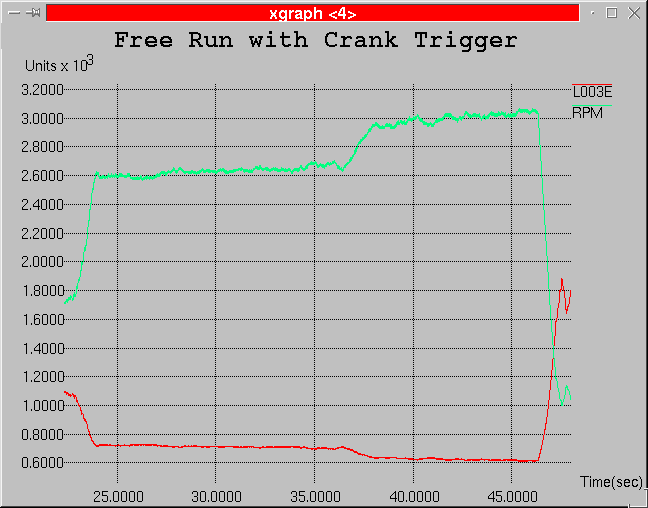 |
| 5 to 10 RPM worth of jitter only ! | 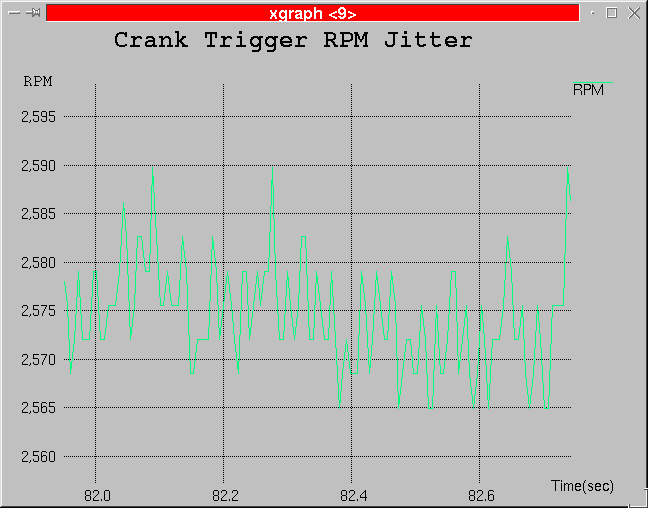 |
| Look at the units, one count per ! | 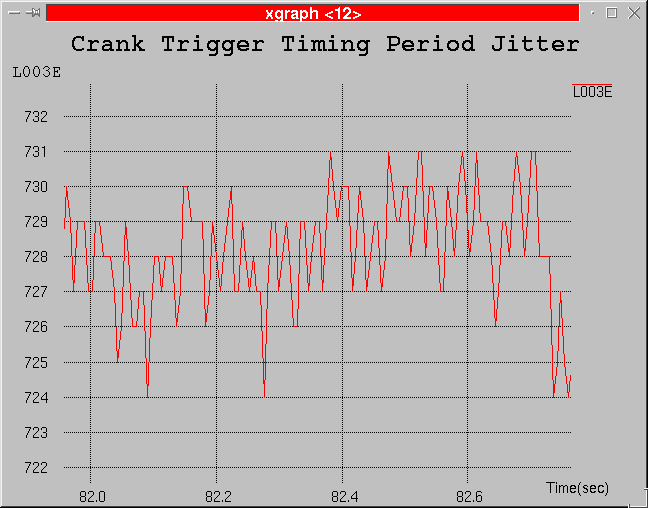 |
The below link will take you to some wave forms taken in the car to verify performance. One of them you can clearly see the jitter and noise between then distributor pickup and the crank trigger's edges. Also some observations on the original Edelbrock shutter wheel and Rotor-to-Cap relationships.